🧶 Beautiful ✨ Detailed 💝 Adorable

Emotional Support Pickle Amigurumi Pattern

Emotional Support Pickle Amigurumi Pattern
4.2★ Rating
2-3 Hours Time Needed
1.1K Made This
✂️

Beginner Friendly Level

Perfect for those just starting their sewing journey, with clear instructions and simple techniques

⏱️

Bite-Sized Project

Complete in under 2 hours—quick, fun, and perfect for a little creative escape.

🧸

Cute Companion

An adorable friend to cherish, handcrafted with love to bring comfort and joy for years to come.

About This Emotional Support Pickle Amigurumi Pattern

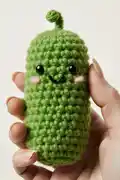
This Emotional Support Pickle pattern is designed to bring smiles and comfort to anyone who needs a little pick-me-up! The pattern features simple amigurumi techniques that are perfect for beginners, including working in the round with a magic ring, basic increases and decreases, and creating a cute stem detail. The finished pickle measures approximately 12cm in height with a 5cm diameter, making it the perfect pocket-sized companion to carry around or display on a desk for instant mood-boosting.

Emotional Support Pickle Amigurumi Pattern crochet pattern - detailed view of completed project

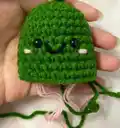
What makes this pattern extra special is the attention to adorable details like the embroidered smile, pink cheeks, and expressive safety eyes that give your pickle loads of personality. Plus, it comes with printable signs and cards to make it an official emotional support friend!

Why You'll Love This Emotional Support Pickle Amigurumi Pattern

I absolutely love this pattern because it combines humor with heartfelt comfort in the most unexpected way! There's something so delightfully absurd yet genuinely comforting about having your own little pickle friend. I love how quick and satisfying this project is to complete—you can whip one up in just a couple of hours and instantly have a gift that will make someone laugh and feel loved. The simple construction means even if you're new to amigurumi, you'll feel confident and successful. Plus, those little crocheted hands and the printable emotional support certificate? Pure genius! It's the perfect blend of quirky creativity and genuine thoughtfulness.

Emotional Support Pickle Amigurumi Pattern step 1 - construction progress Emotional Support Pickle Amigurumi Pattern step 2 - assembly progress Emotional Support Pickle Amigurumi Pattern step 3 - details and accessories Emotional Support Pickle Amigurumi Pattern step 4 - final assembly and finishing

Switch Things Up

I absolutely love experimenting with this pattern because it's so versatile! One of my favorite variations is creating a whole pickle family by using different yarn weights—try bulky yarn with a 5mm hook for a chubby papa pickle, or thread weight with a 1.5mm hook for tiny baby pickles that fit on a keychain. You can also play with colors beyond traditional green. I've made purple pickles, rainbow pickles, and even pastel pink pickles that look absolutely adorable!

For the facial expressions, I sometimes skip the embroidered smile and create different emotions—sleepy eyes with curved lines, surprised expressions with oval eyes, or even grumpy pickles with downturned mouths. You can add texture by working in the back loops only for certain rounds to create ridges that mimic real pickle bumps. I've also experimented with adding accessories like tiny crocheted hats, scarves, or bowties for special occasions.

The printable sign is another area where creativity shines! Instead of the standard emotional support text, I've customized signs with messages like "Pickle Rick," "You're kind of a big dill," or personalized names. You could even make themed pickles for holidays—add a Santa hat for Christmas, bunny ears for Easter, or a witch hat for Halloween. The possibilities are truly endless with this little pickle friend!

Common Mistakes & How to Fix Them

✗ Not using a stitch marker can cause you to lose track of rounds and create an uneven pickle shape with misaligned features ✗ Pulling the magic ring too tight before completing the stem can cause the stem to curl incorrectly or detach from the body ✗ Stuffing too firmly can distort the pickle shape and make it difficult to close the final rounds neatly and invisibly ✗ Forgetting to place eyes before completing round 11 makes it nearly impossible to insert safety eyes through tightly crocheted later rounds ✗ Making slip stitches too loose creates visible and unsightly seams that ruin the smooth amigurumi appearance of your pickle

Emotional Support Pickle Amigurumi Pattern

Create your very own adorable Emotional Support Pickle with this delightful crochet amigurumi pattern! This charming little companion stands at 12cm tall and features expressive safety eyes, a sweet embroidered smile, and rosy cheeks that will bring joy to anyone who needs a comforting friend. Perfect for gifting or keeping as your personal pickle pal, this pattern includes detailed instructions for creating the pickle body, stem, tiny hands, and even a printable emotional support sign and card. Whether you're looking to spread smiles or craft a unique gift, this quirky pickle is sure to become a treasured companion that brings comfort and laughter wherever it goes.

Beginner Friendly 2-3 Hours

Materials Needed for Emotional Support Pickle Amigurumi Pattern

— Main Fabric

  • 01
    5 Ply Cotton Yarn in Green color
  • 02
    Small amount of black yarn (2 ply) for mouth embroidery
  • 03
    Small amount of pink yarn for cheek embroidery

— Tools Required

  • 01
    3.5mm crochet hook
  • 02
    6mm diameter safety eyes
  • 03
    Yarn needle
  • 04
    Stitch marker
  • 05
    Scissors
  • 06
    Stuffing (polyester fiberfill)
  • 07
    Hot melt glue
  • 08
    Printer for sign and card

Progress Tracker

0% Complete

— Stem and Body :

Info :

Start with a magic circle, then ch7 in MR

Info :

Grab the top loop of the 2nd chain to make a sc, continue making 5sc total (don't press the stem, let it curl naturally)

Info :

Make a sl st in MR and pull the two strings on the hook tight so the sl st will be smaller

Info :

Ch1 as turning chain (the sl st and turning ch do not count as stitches)

Round 1 :

MR of 6sc [6]

Round 2 :

6 inc [12]

Round 3 :

(sc, inc) * 6 [18]

Round 4 :

(sc, inc, sc) * 6 [24]

Round 5-11 :

24sc [24]

Info :

Place eyes between R8-R9 with 3 holes between them, then sew mouth and cheeks

Round 12-21 :

24sc [24]

Info :

Begin stuffing the pickle

Round 22 :

(sc, dec, sc) * 6 [18]

Round 23 :

(sc, dec) * 6 [12]

Round 24 :

3 dec [9]

Info :

Make a sl st, stuff a little more, leave about 15cm and cut yarn. Pass the needle through the front loops of all 9 stitches and pull tight to close the hole, then weave in the tail end

— Hands (Make 2) :

Instructions :

Ch8, go into the 3rd stitch from the hook and do 6dc, ch1, leave long tail and cut yarn. Sew them on the body

— Face Details :

Eyes :

Place 6mm safety eyes between R8-R9 with 3 holes between them

Mouth :

Use 2 ply black yarn to embroider a smile. Needle out from the first hole between eyes, needle in from the 3rd hole between eyes, needle out from the middle hole of 1 row below, needle under the black yarn, pull the yarn down to a V shape, needle in from the same middle hole. Tie double knots inside

Cheeks :

Use pink yarn to sew cheeks on both sides of the face

— Finishing :

Info :

Print sign on card and glue it on the body. Print the sign file on 5x7 card and cut each sign

Assembly Instructions

  • After completing the body and stem, ensure the stem curls naturally without pressing or flattening it during construction.
  • Insert and secure 6mm safety eyes between rounds 8-9, making sure there are exactly 3 holes between them for proper spacing.
  • Embroider the mouth using 2 ply black yarn following the V-shape technique, starting between the eyes and creating the smile one row below.
  • Sew pink cheeks on both sides of the face using pink yarn for a rosy, cheerful appearance.
  • Attach the two crocheted hands to the sides of the pickle body at an appropriate height using the long tails left from construction.
  • Print the emotional support sign and card on 5x7 card stock, cut them out, and glue the sign to the front of the pickle body.
  • Weave in all remaining yarn ends securely on the inside of the pickle to maintain a clean, professional finish.

Important Notes

  • 💡Use a stitch marker at the beginning or end of each round to keep track of your position and maintain even shaping
  • 💡When making the stem, do not press or flatten it—allow it to curl naturally for the authentic pickle look
  • 💡The slip stitch and turning chain at the stem connection do not count as stitches in your stitch count
  • 💡Make sure to pull the slip stitch tight when connecting the stem to the body to minimize visible seams
  • 💡Place safety eyes before stuffing and closing rounds 12-21, as it becomes difficult to insert them later
  • 💡Use invisible decrease technique to maintain smooth, professional-looking decreases without gaps
  • 💡Stuff firmly but not too tightly to maintain the pickle shape and allow for proper closing of the final rounds

This adorable Emotional Support Pickle pattern was designed to spread joy and comfort in the most delightfully quirky way possible! Combining simple amigurumi techniques with personality-packed details like embroidered smiles and printable emotional support certificates, this little green friend is ready to brighten anyone's day. Whether you're making it for yourself or gifting it to someone who needs a smile, this pickle proves that comfort can come in the most unexpected and hilarious packages. So grab your green yarn and let's crochet some emotional support magic! 🥒💚✨

You ask,

we answer.

FAQs

Can I use a different yarn weight or hook size for this pattern?

Yes! You can use different yarn weights and corresponding hook sizes, but keep in mind that your finished pickle will be larger or smaller than the stated 12cm height. The pattern works best with a tight gauge to prevent stuffing from showing through, so always use a hook size smaller than recommended on your yarn label.

What if I don't have safety eyes? Can I embroider them instead?

Absolutely! You can embroider eyes using black yarn instead of using safety eyes. This actually makes the pickle safer for young children and babies. Simply stitch two circles or ovals between rounds 8-9 with the same 3-hole spacing for a sweet, handmade look.

How do I prevent the stem from looking too stiff or falling off?

The key is to not pull the magic ring too tight before completing all the stem chains and single crochets. Let the stem curl naturally and don't press it flat. When you make the slip stitch to connect it to the body, pull those two strings tight as instructed to create a secure, nearly invisible connection.

Do I really need to print the emotional support sign, or can I skip it?

The sign is optional but highly recommended because it adds so much personality and humor to the finished pickle! If you don't have a printer, you could hand-write a little sign on cardstock or simply give your pickle as-is. The pickle itself is still absolutely adorable without the sign.

How much yarn will I need for one pickle?

You'll need approximately 20-30 grams of green 5-ply cotton yarn for the body and stem, plus small amounts of black and pink yarn for the facial features. One standard 50g ball of green yarn will easily make 2-3 pickles with yarn left over.