🧢 Beautiful ✨ Detailed πŸ’ Adorable

Crochet Caddy Organizer Pattern

Crochet Caddy Organizer Pattern
4.0β˜… Rating
12-15 Hours Time Needed
1.9K Made This
βœ‚οΈ

Advanced Level

Designed for experienced knitters, these patterns involve intricate designs and complex techniques to challenge and inspire.

⏱️

Slow & Steady

A 10-12 hour projectβ€”great for savoring the process over several sessions.

🏑

Cozy Accent

A warm touch for your space that transforms ordinary corners into inviting nooks filled with handmade charm.

About This Crochet Caddy Organizer Pattern

This Crochet Caddy pattern is a comprehensive organizational solution designed specifically for crochet enthusiasts. The pattern combines multiple techniques including working with T-shirt yarn for the sturdy basket base, twisted single crochet for the outer tidy section, and intricate colorwork for the decorative elements. You'll create a functional basket with wooden ring handles, multiple pockets for storing hooks of various sizes, a unique hat-shaped pin cushion, and a beautiful starburst granny square pocket for small notions.

Crochet Caddy Organizer Pattern crochet pattern - detailed view of completed project

The pattern includes detailed instructions for gauge checking, invisible joins, and proper assembly techniques. With its combination of durability and decorative appeal, this caddy will become an essential part of your crafting routine.

Why You'll Love This Crochet Caddy Organizer Pattern

I absolutely love this pattern because it combines practical storage with beautiful design elements! The twisted single crochet technique creates a lovely textured fabric that's both sturdy and attractive. I'm particularly fond of the hat-shaped pin cushion – it's such a whimsical touch that adds personality to the organizer. The multiple pockets are perfectly sized for different hook sizes, and the scissor flap is genius for keeping sharp tools secure. What really makes this pattern special is how it uses up yarn stash beautifully – the T-shirt yarn for structure and smaller acrylic yarn for decorative details. It's incredibly satisfying to create something so functional and pretty at the same time!

Crochet Caddy Organizer Pattern step 1 - construction progress Crochet Caddy Organizer Pattern step 2 - assembly progress Crochet Caddy Organizer Pattern step 3 - details and accessories Crochet Caddy Organizer Pattern step 4 - final assembly and finishing

Switch Things Up

I love experimenting with this pattern to make it uniquely mine! For the basket base, I've tried using different T-shirt yarn colors or even creating an ombre effect by gradually changing shades as I work up the sides. The starburst pocket is perfect for playing with color combinations – I sometimes match it to my craft room dΓ©cor or create seasonal versions.

You can easily modify the number of pockets based on your hook collection size. If you have mostly larger hooks, make the pockets wider by adding more stitches. For a more feminine look, I sometimes add small crocheted flowers or appliquΓ©s to the outer section.

The hat pin cushion can be replaced with a simple round cushion if you prefer a more streamlined aesthetic, or you could create multiple small cushions in different colors. I've also experimented with adding small loops along the top edge for hanging scissors or adding a fabric lining to the pockets for extra durability. The wooden rings can be wrapped with coordinating yarn before attaching for added detail!

Common Mistakes & How to Fix Them

βœ— Not maintaining consistent tension when working with T-shirt yarn can result in uneven basket sides that don't stand properly βœ— Forgetting to mark the first stitch in continuous rounds leads to confusion and misaligned increases throughout the basket base βœ— Skipping gauge checking for the outer tidy section results in a piece that doesn't fit properly around the basket βœ— Working twisted single crochet incorrectly by not placing hook over the working yarn creates regular single crochet instead of the textured stitch βœ— Not pinning the outer section before final assembly can cause uneven attachment and puckering around the basket edges

Crochet Caddy Organizer Pattern

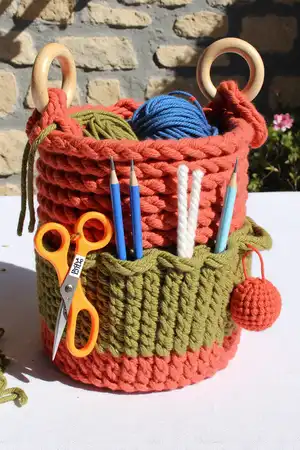
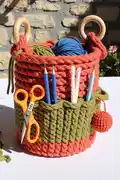
Transform your crafting space with this versatile Crochet Caddy! This practical organizer features a sturdy T-shirt yarn basket base with multiple hook pockets, a charming hat-shaped pin cushion, and a decorative starburst pocket. The outer tidy section wraps around the basket, creating dedicated storage for hooks, scissors, and small notions. Perfect for keeping all your crochet essentials neatly organized and within reach, this caddy combines functionality with handmade charm. Whether you're a busy crocheter juggling multiple projects or just love organized crafting, this pattern will help you create the ultimate crochet companion.

Advanced 12-15 Hours

Materials Needed for Crochet Caddy Organizer Pattern

β€” Main Fabric

  • 01
    600g of T-shirt yarn for basket base
  • 02
    100g (230m) of 100% acrylic 3 ply yarn in main color for outer tidy section
  • 03
    Oddments of 100% acrylic yarn in various colors for hat pin cushion and starburst pocket

β€” Tools Required

  • 01
    9mm crochet hook
  • 02
    7mm crochet hook
  • 03
    3.5mm crochet hook
  • 04
    2.5mm crochet hook
  • 05
    Yarn needle
  • 06
    Scissors
  • 07
    Pins
  • 08
    Stitch markers or bobby pins
  • 09
    Small amount of fiber fill for pin cushion
  • 10
    2 x 2.5 inch MacramΓ© wooden rings for handles (optional)

Progress Tracker

0% Complete

β€” BASE OF BASKET:

Foundation:

With a 9mm hook and T-shirt yarn Ch5, sl st into first chain to make ring

Info:

Work in continuous rounds, always place a marker on your first stitch

Round 1:

Work into ring 1 sc x 8 (8)

Round 2:

*sc-inc* x 8 (16)

Round 3:

*1sc, sc-inc* x 8 (24)

Round 4:

*1sc x 2, sc-inc* x 8 (32)

Round 5:

*1sc x 3, sc-inc* x 8 (40)

Round 6:

*1sc x 4, sc-inc* x 8 (48)

Round 7:

*1sc x 5, sc-inc* x 8 (56)

Info:

Base should measure 8 inches in diameter. Cut yarn and finish with invisible join

β€” SIDES:

Info:

With 7mm hook, make slip knot and re-join yarn to any FL of last round

Round 1:

Work in FL only, 1 TSC x 55 (56)

Round 2:

1 TSC x 56

Info:

Repeat Round 2 until sides measure 7 inches from base

Next Round:

1 TSC x 4, Ch 4, Sk 2, 1TSC x 4, Ch4, Sk2, 1TSC x 4, Ch4, Sk2, 1TSC x 38

Final Round:

1 TSC x 4, 1SC x 6 over Ch4 CH-SP, SK 1, 1 TSC x 3, 1SC x 6 over Ch4 stitches CH-SP, SK 1, 1TSC x 3, 1SC x 6 over Ch4 CH-SP, 1 TSC x 8, attach ring over next two stitches, 1 TSC x 26, attach wooden ring over next two stitches, 1TSC. Cut yarn and invisible join

β€” HAT SHAPED PIN CUSHION:

Foundation:

Using oddments of acrylic yarn and 2.5mm hook make MR, 1sc x 6 into ring. Close ring

Round 1:

*sc-inc* x 6 (12)

Round 2:

*1sc, sc-inc* x 6 (18)

Round 3:

*1sc x 2, sc-inc* x 6 (24)

Round 4:

*1sc x 3, sc-inc* x 6 (30)

Round 5:

*1sc x 4, sc-inc* x 6 (36)

Round 6:

*1sc x 5, sc-inc* x 6 (42)

Rounds 7-8:

1sc x 42 (42)

Info:

Cut yarn and finish with invisible join. With different color, make slip knot and re-join yarn anywhere in FL only

Round 9:

In FL of each stitch 1sc x 42 (42)

Rounds 10-11:

1sc x 42 (42)

Round 12:

*1 hdc, 1dc, 1tr, 1dc, 1hdc, 1sc* to end, sl st into first stitch and cut yarn

Round 13:

With different color, re-join yarn anywhere of last round. (Ch2, 1sc), Ch2, *(1sc, Ch2)* in each stitch to last stitch 1sc, Ch2, sl st into first stitch. Cut yarn and fasten off
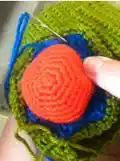
β€” POCKET FRONT STARBURST SQUARE:

Round 1:

With oddments and 2.5mm hook, MR, ch3 (counts as 1 dc), 15 dc into ring. Sl st to top of ch3 to close round. Close ring and cut yarn

Round 2:

Change color. Re-join yarn in top of any dc stitch and make 16 puff stitches. Join round with sl st into first ch stitch

Info:

Puff stitch: Draw up loop as high as ch3, yo, insert hook into same stitch, pull up loop (3 loops), yo, insert same stitch, pull up loop (5 loops), yo, insert same stitch, pull up loop (7 loops), yo, pull through all 7 loops, ch1

Round 3:

Change color. Make slip knot and re-join yarn in any Ch 1 space and make 16 Double crochet cluster stitches. Sl st into top of first cluster stitch to close round

Round 4:

(Ch4, 1 tr x 2, ch3, 1 tr x 3) first corner. In next ch1 space (1 dc x 3), in next ch1 space (1 x 3 hdc), in next ch1 space (1 x 3 dc), in next space second corner (1 x 3tr, ch3, 1 x 3tr). Repeat pattern two more times, then repeat dc, hdc, dc pattern once. Sl st to top of ch3 to join round

β€” OUTER TIDY SECTION:

Foundation Row:

With 3.5mm hook and main color acrylic yarn Ch26. Skip first chain and 1 TSC x 25

Rows 1-3:

1 TSC x 25, Ch1 turn (25)

Row 4:

1 TSC x 5, BL only 1TSC x 20, pivot work and work back up FL only 1 TSC x 20. Ch1, turn (45)

Row 5:

1 TSC x 20, across bottom and up 1 TSC x 25. Ch1, turn (45)

Row 6:

1 TSC x 25, across bottom and up 1 TSC x 20 (45)

Row 7:

1 TSC x 20, across bottom and up 1 TSC x 25 (45)

Row 8:

1 TSC x 25, across bottom and up 1 TSC x 20 (45)

Row 9:

1 TSC x 20, across bottom and up 1 TSC x 25 (45)

Row 10:

1 TSC x 5, PM on 5th stitch, 1 TSC x 20, across bottom and up 1 TSC x 20. Ch1, turn

Row 11:

Join front of pocket to back by crocheting 1 TSC x 20 through both layers of pocket. Ch1, turn (25)

Rows 12-14:

1 TSC x 25, Ch1, turn (25)

Info:

Rows 4-14 form the pattern for crochet hook pockets. Repeat rows 4-14 three more times so you have 4 pockets ending with Row 14

Rows 15-36:

1 TSC x 25 (25)

Info:

Attach pin cushion using yarn needle and back stitch around inner rim. Leave gap to stuff with fiber fill before finishing

Info:

Continue with crochet hook pockets and repeat rows 4-14 two more times

Rows 37-38:

1 TSC x 25

Row 39:

1 TSC x 5, in FL only, 1 TSC x 5, Ch1, turn. *1 TSC x 5, Ch1 turn* x 7 more rows on these 5 stitches. Cut yarn

Row 40:

With right side facing, make slip knot and re-join yarn to 11th stitch of Row 39 and work 1 TSC to end. Ch1, turn

Row 41:

1 TSC x 25, working into BL of Row 18 ch1, turn (25)

Rows 42-45:

1 TSC x 25 (25)

Row 46:

1 TSC x 5, join flap to main piece, 1 TSC x 5 through both flap and main piece, 1 TSC x 15 to end (25)

Rows 47-49:

1 TSC x 25 (25)

Info:

Repeat rows 4-14 two more times

Info:

Continue to work 1 TSC x 25, Ch1 turn until work reaches around basket and meets beginning. Pin around basket to check for snug fit before finishing

Assembly Instructions

  • Pin the starburst pocket front to the last section of the outer piece and backstitch around three edges, leaving the top edge open to form a functional pocket
  • With wrong sides facing, whipstitch the ends of the outer tidy section together through back loops only to form a complete circle
  • Slip the circular outer piece over your basket and pin in place, measuring from the top of the basket to ensure it sits evenly all around
  • Backstitch along the top edge of the outer section to attach it to the basket, then weave ends to the inside of the basket
  • Backstitch along the bottom edge of the outer section in the same manner, securing the entire piece to the basket and weaving in all remaining ends

Important Notes

  • πŸ’‘Keep tension loose when working with T-shirt yarn to prevent hand fatigue and ensure proper stitch definition throughout the basket
  • πŸ’‘Always use stitch markers for the first stitch in continuous rounds to avoid losing your place and creating misshapen circles
  • πŸ’‘Check gauge carefully before starting the outer tidy section as incorrect gauge will result in a piece that doesn't fit the basket properly
  • πŸ’‘Pin all components in place before final sewing to ensure proper positioning and avoid having to remove and reattach pieces
  • πŸ’‘When attaching the wooden rings, ensure your working yarn stays at the front and passes through the ring for secure attachment
  • πŸ’‘Stuff the hat pin cushion firmly but not overly tight to maintain its shape while keeping pins secure
  • πŸ’‘The twisted single crochet technique requires placing your hook over the working yarn instead of yarn over for proper texture

This comprehensive Crochet Caddy pattern brings organization and beauty to your crafting space! Designed for experienced crocheters who love combining practicality with decorative details, this pattern teaches multiple techniques from T-shirt yarn basket construction to delicate colorwork. The result is a stunning organizational system that keeps all your hooks, scissors, and notions beautifully arranged. With its sturdy construction and charming details like the whimsical hat pin cushion, this caddy will become your favorite crafting companion. 🧢 Happy organizing and creating! 🧡✨

You ask,

we answer.

FAQs

Can I use a different weight of T-shirt yarn for the basket?

Yes, but you'll need to adjust your hook size accordingly and check that your finished base measures approximately 8 inches in diameter. Thicker yarn will create a larger basket, while thinner yarn will create a smaller one.

What is twisted single crochet and why is it used in this pattern?

Twisted single crochet is created by placing your hook over the working yarn instead of doing a traditional yarn over. This creates a denser, more textured fabric that's ideal for the outer organizer section as it provides structure and durability.

Can I make this caddy without the wooden ring handles?

Absolutely! The wooden rings are optional. You can either skip them entirely or create crocheted handles using the T-shirt yarn if you prefer a fully crocheted look.

How do I adjust the number of pockets for my needs?

The pattern creates 6 hook pockets total, but you can add more by repeating rows 4-14 additional times, or create fewer pockets by reducing the number of repetitions. Just ensure your outer section still fits around the basket circumference.

What if my outer tidy section doesn't fit around my basket?

This usually indicates a gauge issue. Check your twisted single crochet gauge against the pattern specifications. You may need to continue working additional rows until the piece fits snugly, or start over with a different hook size to match gauge.