🧢 Beautiful ✨ Detailed πŸ’ Adorable

No-Sew Llama, Owl & Horse Amigurumi Pattern

No-Sew Llama, Owl & Horse Amigurumi Pattern
4.0β˜… Rating
4-5 Hours Time Needed
1.7K Made This
βœ‚οΈ

Intermediate Level

Ideal for those with basic knitting experience, featuring slightly more advanced stitches and techniques to expand your skills.

⏱️

Weekend Treat

Takes 5-7 hours, making it an enjoyable project to finish over a couple of days.

🐰

Whimsical Buddy

Playful characters full of personality, designed to spark imagination and become cherished playtime favorites.

About This No-Sew Llama, Owl & Horse Amigurumi Pattern

This innovative no-sew pattern collection brings three beloved animals to life using a clever construction technique that eliminates assembly time. Each amigurumi is crocheted from one section directly into another, creating seamless transitions between body parts. The llama features a vibrant striped saddle, the owl showcases beautiful embroidered belly details, and the horse boasts a luxurious flowing mane that adds realistic texture and movement to your finished piece.

No-Sew Llama, Owl & Horse Amigurumi Pattern crochet pattern - detailed view of completed project

Working with super bulky yarn and a smaller hook creates wonderfully dense fabric that holds stuffing perfectly while giving each character a huggable, squishy texture. The patterns include special techniques like bobble stitches for dimensional details and front-loop-only crocheting for textural interest.

Why You'll Love This No-Sew Llama, Owl & Horse Amigurumi Pattern

I absolutely love this pattern collection because it revolutionizes the amigurumi-making process by eliminating the most tedious partβ€”sewing pieces together! The no-sew technique means you can finish each adorable character in a fraction of the time while still achieving professional-looking results. I'm particularly fond of how each animal has its own personality through clever color changes and embroidered details. The llama's colorful saddle stripes bring such joy, the owl's embroidered belly adds whimsy, and the horse's cascading mane creates beautiful movement. These patterns taught me that efficient construction doesn't mean sacrificing charm, and the satisfaction of completing a project without threading a single sewing needle is truly unmatched.

No-Sew Llama, Owl & Horse Amigurumi Pattern step 1 - construction progress No-Sew Llama, Owl & Horse Amigurumi Pattern step 2 - assembly progress No-Sew Llama, Owl & Horse Amigurumi Pattern step 3 - details and accessories No-Sew Llama, Owl & Horse Amigurumi Pattern step 4 - final assembly and finishing

Switch Things Up

I love experimenting with color combinations to give each animal its own unique personality and style! For the llama, instead of the traditional blue, purple, and orange saddle stripes, try using rainbow colors or even metallic yarn for a festival-ready look that really makes your llama stand out. The owl offers wonderful opportunities for creativityβ€”swap the brown body for grey or cream tones and use bright colored yarn for a fantasy owl effect that children absolutely adore.

When it comes to the horse, I've found that changing the mane color completely transforms the character. Try silver or golden yarn for the mane to create a magical unicorn vibe, or use multiple shades of brown blended together for ultra-realistic texture. You could even add small beads to the mane for extra sparkle and movement. I also recommend playing with the belly colors on the owlβ€”instead of brown embroidery, use contrasting bright colors or even add small French knots for a dotted pattern effect.

For all three patterns, consider the eyes carefully since they truly bring personality to life. While the pattern calls for standard black safety eyes, colored eyes in blue, green, or amber create entirely different expressions and moods. I've even used sparkly safety eyes for a whimsical touch that makes these amigurumi perfect for gift-giving. Don't be afraid to add your personal touches like tiny bows, scarves, or even crocheted accessories to make each creation uniquely yours!

Common Mistakes & How to Fix Them

βœ— Forgetting to stuff the body sections before closing them completely, which makes it nearly impossible to stuff properly later without undoing stitches βœ— Not maintaining consistent tension when switching between yarn colors, causing visible gaps or puckering where color changes occur throughout the pattern βœ— Skipping the chain at the beginning of rows when instructed, which throws off stitch counts and creates uneven shaping in your amigurumi βœ— Pulling too tightly on bobble stitches, which flattens them and eliminates the dimensional texture they're meant to create in the design βœ— Misreading front-loop-only and back-loop-only instructions, resulting in incorrect texture placement and making certain sections look inconsistent or misshapen

No-Sew Llama, Owl & Horse Amigurumi Pattern

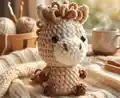
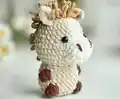
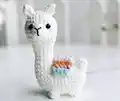
Create three adorable no-sew amigurumi friends with this comprehensive pattern bundle! This unique collection features a charming llama with a colorful saddle, a sweet owl with embroidered details, and a majestic horse with a flowing mane. Each pattern uses the innovative no-sew technique where you crochet from one body part directly into another, eliminating tedious assembly work. Perfect for crafters who want finished projects faster without sacrificing cuteness and charm in their handmade creations.

Intermediate 4-5 Hours

Materials Needed for No-Sew Llama, Owl & Horse Amigurumi Pattern

β€” Main Fabric

  • 01
    Super Bulky yarn (Category 6) in white, blue, purple, and orange colors for the Llama
  • 02
    Super Bulky yarn (Category 6) in brown, white, yellow, and skin color for the Owl
  • 03
    Super Bulky yarn (Category 6) in brown, light brown, beige, and white colors for the Horse

β€” Tools Required

  • 01
    3.5mm (E) crochet hook
  • 02
    Stitch markers
  • 03
    Sewing needle (for embroidery)
  • 04
    Scissors
  • 05
    Plastic safety eyes 8mm (for Llama and Owl)
  • 06
    Plastic safety eyes 10mm (for Horse)
  • 07
    Hot glue gun
  • 08
    Fiberfill stuffing

Progress Tracker

0% Complete

β€” LLAMA PATTERN:

β€” Head to Body (No Sew):

Row 1:

6 SC in an MR (6)

Row 2:

6 INC (12)

Row 3:

(SC, INC) 6 times (18)

Row 4:

(2 SC, INC) 6 times (24)

Row 5-8:

24 SC (24)

Row 9:

(SC, DEC) 8 times (16)

Row 10:

(6 SC, DEC) 2 times (14)

Info:

Stuffing

Row 11-14:

14 SC (14)

Row 15:

5 SC, (SC, INC) 2 times, 5 SC (16)

Row 16:

Make 8 CH, crochet with the second chain from the hook: INC, 6 SC (of the chains), 16 SC (of the body), 6 SC, (SC, BO in one st) (of the chains) (32)

Row 17:

2 INC, 28 SC, INC, INC into the stitch's BO (36)

Row 18-21:

36 SC (36)

Row 22:

SC, DEC, 9 SC, (SC, DEC) 3 times, 9 SC, (SC, DEC) 2 times (30)

Row 23:

DEC, SC, BO, 6 SC, BO, SC, 4 DEC, BO, 6 SC, BO, DEC (24)

Info:

Stuffing

Row 24:

12 DEC (12)

Row 25:

6 DEC (6)

Info:

Cut the yarn

β€” Nose:

Row 1:

Crochet 10 Slst from rows 5-7 in a circular shape

Row 2:

Crochet 10 single crochets (SC) into the 10 slip stitches of row 1

Row 3:

5 DEC

Info:

Stuffing, cut the yarn, embroider the mouth, attach the eyes, and embroider the pink cheeks

β€” Ears:

Info:

Pick up the yarn from row 2: 2 CH, DC-picot, 2 CH, Slst in one stitch

β€” Llama Saddle:

Info:

Change colors sequentially in the following order: blue, purple, orange, until you complete row 10

Row 1:

5 Ch, turn: 4 SC, turn (4)

Row 2-10:

Ch, 4 SC, turn (4)

Info:

Cut the yarn, secure the saddle on the back with adhesive glue

β€” OWL PATTERN:

β€” Body to Head (No Sew):

Row 1:

6 SC in an MR (6)

Row 2:

6 INC (12)

Row 3:

(SC, INC) 6 times (18)

Row 4:

(2 SC, INC) 6 times (24)

Row 5:

(3 SC, INC) 6 times (30)

Row 6-9:

30 SC (30)

Row 10:

(SC, DEC) 10 times (20)

Row 11:

2 SC, DEC, attach the wings to the body by crocheting them together, 2 SC, DEC, 2 SC, 2 DEC, attach the wings to the body by crocheting them together: 2 SC, 2 SC, DEC (15)

Row 12:

FLO, 15 DEC (30)

Row 13:

(4 SC, INC) 6 times (36)

Row 14-19:

36 SC (36)

Row 20:

(2 SC, DEC) 9 times (27)

Info:

Stuffing

Row 21:

(SC, DEC) 9 times (18)

Row 22:

9 DEC (9)

Row 23:

4 DEC, SC (5)

Info:

Weave in the yarn end and cut

β€” Wings (Make 2):

Row 1:

Make 7 CH, start in the second stitch from the hook: 2 SC, HDC, DC, HDC, 4 SC in one stitch, HDC, DC, HDC, 2 SC

β€” Eyes (Make 2):

Row 1:

6 SC in an MR (6)

Row 2:

6 INC (12)

Row 3:

(SC, INC) 6 times (18)

Info:

Cut the yarn

β€” Nose:

Row 1:

6 SC in an MR (6)

Info:

Cut the yarn, secure the eyes and nose on the head using adhesive glue, attach plastic eyes

β€” Ears (Make 2):

Info:

Pick up the yarn from rows 19-21: 3 Slst

Row 1:

Ch, FLO 3 SC, BLO: 3 SC (Crochet into both sides of the nose with slip stitches) (6)

Row 2:

3 DEC (3)

Info:

Cut the yarn, use brown yarn to embroider the belly, use yellow yarn to embroider the feet

β€” HORSE PATTERN:

β€” Body to Head (No Sew):

Row 1:

6 SC in an MR (6)

Row 2:

6 INC (12)

Row 3:

(SC, INC) 6 times (18)

Row 4:

(2 SC, INC) 6 times (24)

Row 5:

8 SC, BO, 6 SC, BO, 8 SC (24)

Info:

When the text is BROWN color, switch to brown yarn color

Row 6-7:

24 SC (24)

Row 8:

6 SC, BO, 10 SC, BO, 6 SC (24)

Row 9:

24 SC (24)

Row 10:

(SC, DEC) 8 times (16)

Row 11:

FLO, (SC, INC) 8 times (24)

Row 12:

(SC, INC) 12 times (36)

Row 13-15:

36 SC (36)

Row 16:

(2 SC, DEC) 4 times, 2 SC, DEC, (2 SC, DEC) 4 times (27)

Info:

When the text is bold and underlined, switch to WHITE yarn

Row 17-19:

12 SC, 3 SC, 12 SC (27)

Info:

Stuffing

Row 20:

(SC, DEC) 4 times, SC, DEC, (SC, DEC) 4 times (18)

Row 21:

(SC, DEC) 6 times (12)

Row 22:

6 DEC (6)

Info:

Weave in the yarn end and cut

β€” Ears (Make 2):

Info:

Make 5 chains start with the second chain from the hook: 3 SC, 3 SC in the last stitch, 2 SC, INC. Attach the ear point straight from the arm going up with 2 SLST at R20-21

β€” Nose:

Row 1:

Make 6 chains, crochet into the second chain from the hook, and work on both sides of the loop: INC, 3 SC, 4 SC in the last stitch, 3 SC, INC (14)

Row 2:

SC, INC, 3 SC, (SC, INC) 2 times, 3 SC, SC, INC (18)

Row 3:

18 SC (18)

Info:

Connect the nose to the head at R13-16 with 18 SLST, cut the yarn

β€” Mane Horse:

Info:

Pick up the yarn from R21-R22: Make 1 Chain, SLST in the next stitch, and repeat 18 times. Continue crocheting the mane in a straight down line from R22-11: SLST in the next row, and repeat to the end. Repeat from R11 to R22. Cut the yarn. Make two lines to create nose holes with brown yarn. Attach the eyes to the head at R16-17, 6st apart

Assembly Instructions

  • For the Llama: Embroider the mouth details on the nose using brown yarn, then add pink cheeks with embroidery for a cheerful expression
  • For the Llama: Attach the completed nose piece to the face using hot glue, ensuring it's centered and secure before adding safety eyes
  • For the Llama: Position and glue the colorful striped saddle onto the back of the llama's body for decorative detail
  • For the Owl: Create wing pieces separately, then attach them during Row 11 by crocheting them directly into the body as instructed
  • For the Owl: Secure crocheted eyes and nose to the head using hot glue, then add plastic safety eyes to the white crocheted eye pieces
  • For the Owl: Embroider belly details with brown yarn and add yellow embroidered feet for finishing touches
  • For the Horse: Attach the completed nose piece to the muzzle area at rows 13-16 using slip stitches to create seamless integration

Important Notes

  • πŸ’‘The no-sew technique requires careful attention to instructions about when to attach pieces during construction rather than after completion
  • πŸ’‘Use consistent tension throughout to ensure the super bulky yarn creates even, dense fabric that holds stuffing securely
  • πŸ’‘Hot glue gun is essential for attaching certain decorative elements like the saddle, eyes, and nose piecesβ€”have it ready and warmed up
  • πŸ’‘Pay special attention to color change instructions, particularly for the horse pattern where bold/underlined text indicates yarn color switches
  • πŸ’‘Stuff pieces firmly as you work since you won't have easy access to add more stuffing after closing with the no-sew method
  • πŸ’‘When working with bobble stitches, make sure they pop out prominently to create the intended dimensional texture effects
  • πŸ’‘Mark your rows carefully with stitch markers to avoid losing count, especially during the longer sections with repeated row instructions

This innovative no-sew pattern bundle revolutionizes amigurumi crafting by eliminating the tedious assembly process while delivering three absolutely adorable animal friends. Each pattern features clear row-by-row instructions that guide you through creating seamlessly connected pieces, resulting in professional-looking projects with minimal finishing work. The combination of super bulky yarn with detailed stitch techniques creates wonderfully huggable textures that bring personality to every llama, owl, and horse you create. Whether you're making gifts or building your own collection, these patterns offer the perfect balance of creative satisfaction and efficient construction. πŸ¦™πŸ¦‰πŸ΄ Happy crocheting! 🧢✨

You ask,

we answer.

FAQs

What does 'no-sew' mean in this pattern?

The no-sew technique means you crochet pieces directly onto each other as you work, eliminating the need to sew separate body parts together at the end. For example, the wings on the owl are attached by crocheting them into the body during Row 11, creating seamless construction.

Can I use regular worsted weight yarn instead of super bulky?

While you can substitute yarns, using worsted weight will create much smaller animals and require a corresponding hook size change. The super bulky yarn paired with a 3.5mm hook creates the intended dense fabric and size, so changing yarn weight will significantly alter the final results.

How do I know when to switch yarn colors for the horse pattern?

The pattern provides clear visual cues: when text appears in BROWN color, switch to brown yarn; when text is bold and underlined, switch to WHITE yarn. Always read ahead one row to prepare your color changes and ensure smooth transitions.

What's the purpose of using FLO and BLO stitches in these patterns?

Front Loop Only (FLO) and Back Loop Only (BLO) create textural ridges and dimensional effects. In the owl pattern, Row 12's FLO creates a distinct line where the body transitions to the head, adding visual interest and helping define different body sections.

Can I make these patterns without a hot glue gun?

While hot glue is recommended for secure attachment of eyes, nose, and decorative elements like the llama's saddle, you can substitute fabric glue or carefully hand-sew these pieces. Just ensure whatever method you choose creates secure attachments that won't come loose with handling.