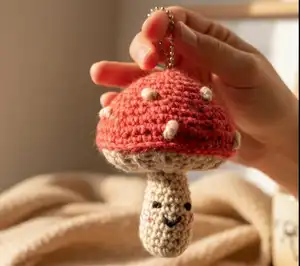
Transform your backpack into a magical forest escape with this adorable mushroom charm! This delightful amigurumi project stands at 4 inches tall and features an enchanting design with a colorful cap, charming gills, and the sweetest little face. Perfect for kids heading back to school or anyone who loves woodland-inspired accessories, this tiny treasure uses worsted weight yarn scraps you probably already have at home. Attach it to backpacks, tote bags, or purse straps using the included ball chain for instant whimsy wherever you go!
Progress Tracker
0% Complete
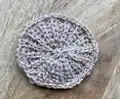
— Support Circle :
Round 1 :
With CC, make an adjustable loop, 6 SC into loop, pull on beginning yarn tail to close loop (6 sts)
Round 2 :
2 SC into each st around (12 sts)
Round 3 :
[SC into the next st, 2 SC into next st] 6 times (18 sts)
Round 4 :
[2 SC into the next st, SC into each of the next 2 sts] 6 times (24 sts)
Info :
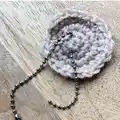
Fasten off leaving long yarn tail. Check gauge. Insert one end of the ball chain down through the top surface of the support circle, and then up through the Support circle so that it comes out through the top surface of the circle about 1/2 inch away from where it went down. Fasten ends of ball chain together.
— Stem :
Round 1 :
With CC, make an adjustable loop, 6 SC into loop, pull on beginning yarn tail to close loop (6 sts)
Round 2 :
2 SC into each st around (12 sts)
Round 3 :
[SC into each of the next 3 sts, 2 SC into next st] 3 times (15 sts)
Round 4-8 :
SC into each st around
Round 9-11 :
SC around making one inv dec per round. Place each decrease in a different place during each round so that a decrease is not worked into another decrease (12 sts after working Rnd 11). Stuff stem firmly with fiberfill.
Round 12 :
Working into the back loop only on this round, SC2tog 6 times (6 sts)
Info :
Fasten off with a sl st. Using a yarn needle, weave yarn tail through each of the remaining 6 sts and pull tight to close hole. Do not weave in end, instead, use ending yarn tail for sewing later.
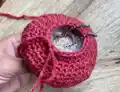
— Gills :
Row 1 :
With CC, ch 6. Beginning with 2nd Ch from hook YOslst in each of next 5 chs (5 sts)
Rows 2-30 :
Ch 1 turn, YOslst blo in each st
Info :
Do not fasten off. Rotate work 90-degrees to work along the side edge of previous rows. You will be working only into the raised ridges that occur every other row in the YOslst blo stitch pattern. SC2tog across edge 7 times, SC into the last raised ridge. Fasten off leaving long yarn tail for sewing (8 sts). Weave yarn tail through each of the SC stitches made along edge and pull tight to form a circle. Continue using yarn tail to whip stitch short edges of fabric together to create circle. Weave in ends.
— CC Edging :
Info :
With a new piece of CC, pull up a loop anywhere around outer edge of Gills circle. Ch 1 to anchor yarn, SC twice between ridges, and SC once in each ridge for a total of 45 SC around, sl st to fasten off (45 sts)
— Cap of Mushroom :
Round 1 :
Pull up loop of MC in any st from CC edging rnd. Sl st in each st around. Do not join but continue working in continuous rnds.
Round 2 :
Working into the SC sts from the CC edging round (not working into the previous Rnd of sl sts), [SC in each of next 14 sts, 2 SC in next st] 3 times (48 sts)
Round 3 :
[SC in each of next 3 sts, 2 SC in next st, SC in each of next 4 sts] 6 times (54 sts)
Round 4 :
[SC in each of next 7 sts, inv dec] 6 times (48 sts)
Round 5 :
[SC in each of next 3 sts, inv dec, SC in each of the next 3 sts] 6 times (42 sts)
Round 6 :
[SC in each of next st, inv dec, SC in each of the next 4 sts] 6 times (36 sts)
Round 7 :
[SC in each of next 3 sts, inv dec, SC in the next st] 6 times (30 sts)
Round 9 :
[Inv dec, SC in each of the next 3 sts] 6 times (24 sts)
Info :
Place stitch marker in working loop so that it will not ravel while you are working on the next step. Stuff cap with fiberfill. Place Support circle (with ball chain attached) on the inside of the cap on top of the fiberfill. This should fit just inside of the opening at the top of the cap. Using the ending yarn tail at the top of the stem and a yarn needle, stitch the top of the stem to the underside of the gills (stitching through the fiberfill and through the top surface of the Support circle). The unused loops around the top edge of the stem will give you a distinct edge to stitch to the gills.
— Continuing with the Cap :
Info :
Remove stitch marker and place hook back in working loop. Continue to add fiberfill as needed.
Round 12 :
[SC in the next st, inv dec, SC in the next st] 6 times (18 sts)
Round 13 :
[Inv dec, SC in the next st] 6 times (12 sts)
Round 15 :
When you work this round you will need to trap each strand of the ball chain in place with your stitches. Un-hook the ball chain so there are two separate ends. Place one strand of the ball chain just to the left of the working loop. Let the chain hang to the outside of your work. Inv dec in next st, trapping the ball chain in place, inv dec twice more, repeat trapping the other end of the ball chain, and working 3 more decreases (6 sts)
Info :
Fasten off. Using yarn needle, weave yarn tail through the front loop of each of the remaining 6 sts and pull tight to close top of Cap. Weave in ends. Use a double strand of CC to make French knots on mushroom cap as desired.
— Finishing :
Info :
Weave in ends. Use black embroidery floss and embroidery needle to embroider a small v shape for a mouth, and two large French knots for eyes onto the stem using photos for reference. Use light pink embroidery floss to embroider small circular shapes below each eye using small chain stitches.
This charming Mushroom Backpack Charm pattern by Brenda K. B. Anderson brings a touch of forest magic to everyday accessories! With clever construction techniques including a hidden support circle and textured gills, this little mushroom friend is as fun to make as it is to display. The customizable face and colorful cap spots let you create a unique character every time. Perfect for using up yarn scraps and creating handmade gifts that kids and adults alike will treasure! 🍄✨