🧶 Beautiful ✨ Detailed 💝 Adorable

Cute Ghost Plushie Amigurumi Pattern

Cute Ghost Plushie Amigurumi Pattern
4.7★ Rating
3-4 Hours Time Needed
2.6K Made This
✂️

Beginner Friendly Level

Perfect for those just starting their sewing journey, with clear instructions and simple techniques

⏱️

Bite-Sized Project

Complete in under 2 hours—quick, fun, and perfect for a little creative escape.

🧸

Cute Companion

An adorable friend to cherish, handcrafted with love to bring comfort and joy for years to come.

About This Cute Ghost Plushie Amigurumi Pattern

Cute Ghost Plushie Amigurumi Pattern crochet pattern - detailed view of completed project

The finished ghost stands about 25cm tall and features adorable details like blushed cheeks and expressive eyebrows. The striped purple and orange hat adds a pop of color and whimsical charm that makes this plushie extra special.

Why You'll Love This Cute Ghost Plushie Amigurumi Pattern

I absolutely love this pattern because it's such a quick and satisfying make that produces the cutest results! The plush yarn works up fast, so you can see your ghost come to life in just a few hours. I especially adore how the embroidered facial features give each ghost its own unique personality—you can make them happy, surprised, or playfully shy. The tilted hat adds such a fun, quirky touch that makes me smile every time. Plus, it's versatile enough to customize with different color combinations, so you can create a whole family of friendly ghosts. This pattern has become one of my go-to gifts because everyone loves receiving these adorable handmade companions!

Cute Ghost Plushie Amigurumi Pattern step 1 - construction progress Cute Ghost Plushie Amigurumi Pattern step 2 - assembly progress Cute Ghost Plushie Amigurumi Pattern step 3 - details and accessories Cute Ghost Plushie Amigurumi Pattern step 4 - final assembly and finishing

Switch Things Up

I love experimenting with different color combinations for this adorable ghost pattern! Instead of the classic white body, I've tried making ghosts in soft pastels like baby pink, mint green, or lavender for a dreamy aesthetic. The hat offers endless possibilities too—you could do rainbow stripes, ombre effects, or even add tiny crocheted flowers or stars for embellishment.

For a more personalized touch, I sometimes embroider names or initials on the body, making them perfect personalized gifts. I've also experimented with different facial expressions—closed happy eyes instead of safety eyes, or even adding little fangs for a playful vampire ghost crossover!

Another fun variation I enjoy is making mini versions using sport weight yarn and a smaller hook for keychain-sized ghosts. They work up in under an hour and make fantastic stocking stuffers or bag charms. You could even create a whole family of ghosts in graduating sizes!

Common Mistakes & How to Fix Them

✗ Overstuffing the arms can make them too stiff—remember to only stuff the lower half lightly for better draping and natural movement ✗ Missing the marker placement in the back of the head can throw off eye positioning—always keep track of where your round begins ✗ Pulling the yarn too tight when embroidering facial features can distort the head shape—use gentle tension for best results ✗ Forgetting to attach the hat in back loops only will make it difficult to sew on—carefully work into the specified loops for a clean finish

Cute Ghost Plushie Amigurumi Pattern

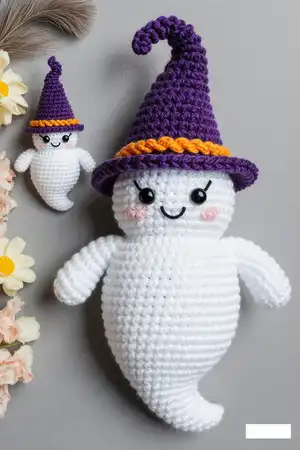
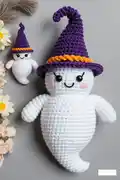
Create an adorable ghostly companion with this charming amigurumi pattern! Perfect for Halloween or year-round cuddles, this cute ghost features a sweet embroidered face, rosy cheeks, and a colorful striped hat that adds extra personality. Standing approximately 25cm tall, this plushie works up quickly using soft plush yarn and simple crochet techniques. Whether you're crafting for yourself or creating handmade gifts, this friendly ghost will bring smiles and cozy vibes to any space. The pattern includes detailed instructions for the body, arms, head, and festive hat, making it an enjoyable project from start to finish.

Beginner Friendly 3-4 Hours

Materials Needed for Cute Ghost Plushie Amigurumi Pattern

— Main Fabric

  • 01
    Plush yarn Himalaya Dolphin Baby 100g/120m in White (80301)
  • 02
    Plush yarn Himalaya Dolphin Baby 100g/120m in Purple (80340)
  • 03
    Plush yarn Himalaya Dolphin Baby 100g/120m in Orange (80316)
  • 04
    Black thread for embroidering eyebrows and mouth (YarnArt Jeans 53 or similar)

— Tools Required

  • 01
    Crochet hook 4.00 mm
  • 02
    Safety eyes 14 mm
  • 03
    Stuffing (Polyester fiber fill)
  • 04
    Yarn needle for sewing
  • 05
    Scissors
  • 06
    Stitch markers
  • 07
    Pink blush for coloring cheeks

Progress Tracker

0% Complete

— ARMS :

Info :

Crochet with the white yarn. Stuff only lower half of the arm. Make 2 pieces.

Round 1 :

6 sc into a magic ring (6)

Round 2 :

6 inc (12)

Round 3-4 :

12 sc (2 rounds)

Round 5 :

(4 sc, dec)*2 (10)

Round 6 :

10 sc

Round 7 :

(3 sc, dec)*2 (8)

Round 8 :

8 sc

Round 9 :

Flatten the arm and crochet 4 sc through both sides. Fasten off and cut the yarn.

— BODY :

Info :

Crochet with the white yarn. Stuff as you go.

Round 1 :

6 sc into a magic ring (6)

Round 2 :

6 sc (6)

Round 3 :

(sc, inc)*3 (9)

Round 4 :

(2 sc, inc)*3 (12)

Round 5 :

4 inc, 4 dec (12)

Round 6 :

(sc, inc)*6 (18)

Round 7 :

3 sc, 4 inc, 3 sc, 4 dec (18)

Round 8 :

(2 sc, inc)*6 (24)

Round 9 :

6 sc, 4 inc, 6 sc, 4 dec (24)

Round 10 :

(3 sc, inc)*6 (30)

Round 11 :

9 sc, 4 inc, 9 sc, 4 dec (30)

Round 12 :

(4 sc, inc)*6 (36)

Round 13 :

12 sc, 4 inc, 12 sc, 4 dec (36)

Round 14 :

(11 sc, inc)*3 (39)

Round 15-18 :

39 sc (4 rounds)

Round 19 :

(11 sc, dec)*3 (36)

Round 20 :

36 sc

Round 21 :

(4 sc, dec)*6 (30)

Info :

Now we will join the arms

Round 22 :

7 sc, 4 sc through the first arm and the body, 10 sc, 4 sc through the second arm and the body, 5 sc (30)

Round 23 :

(3 sc, dec)*6 (24)

Round 24 :

24 sc

Info :

Don't cut the white yarn, we will continue with the head.

— HEAD :

Info :

Continue crocheting with the white yarn. Stuff as you go.

Round 1 :

(sc, inc)*12 (36)

Round 2 :

(2 sc, inc)*12 (48)

Round 3 :

(7 sc, inc)*6 (54)

Round 4 :

4 sc, inc, (8 sc, inc)*5, 4 sc (60)

Round 5-7 :

60 sc (3 rounds)

Round 8 :

4 sc, dec, (8 sc, dec)*5, 4 sc (54)

Round 9-11 :

54 sc (3 rounds)

Info :

Insert the safety eyes between rounds 6 and 7 with 8 stitches between them (6 stitches visible). The marker is in the back of the head.

Round 12 :

(7 sc, dec)*6 (48)

Round 13 :

3 sc, dec, (6 sc, dec)*5, 3 sc (42)

Round 14 :

(5 sc, dec)*6 (36)

Round 15 :

2 sc, dec, (4 sc, dec)*5, 2 sc (30)

Round 16 :

(3 sc, dec)*6 (24)

Round 17 :

sc, dec, (2 sc, dec)*5, sc (18)

Round 18 :

(sc, dec)*6 (12)

Round 19 :

6 dec (6)

Info :

Make sure that the head is stuffed firmly. Close the opening and hide the yarn inside.
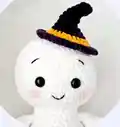
— EMBROIDERING :

Eyebrows :

With a black thread embroider the eyebrows in round 10. They are 2 st wide and with 8 st between them.

Mouth :

Embroider the mouth in round 4. It's 3 st wide.

Cheeks :

Color the cheeks with pink blush.
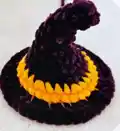
— HAT :

Info :

Start crocheting with the purple yarn. Stuff lightly.

Round 1 :

6 sc into a magic ring (6)

Round 2-3 :

6 sc (2 rounds)

Round 4 :

(sc, inc)*3 (9)

Round 5-6 :

9 sc (2 rounds)

Round 7 :

6 sc, 3 inc (12)

Round 8 :

6 sc, (sc, inc)*3 (15)

Round 9 :

9 sc, (sc, inc)*3 (18)

Round 10 :

(2 sc, inc)*6 (24)

Info :

Change the yarn to orange color.

Round 11 :

(3 sc, inc)*6 (30)

Round 12 :

30 sc

Info :

Change the yarn to purple color.

Round 13 :

Front loops only: (sc, inc)*15 (45)

Round 14 :

45 sc

Info :

Make a sl st, fasten off and cut the yarn, leaving a tail for sewing. Sew the hat to the top of the head in the back loops of round 13. I sew it tilted to one side.

Assembly Instructions

  • Arms are attached during body construction at round 22 by crocheting through both the arm and body simultaneously
  • Embroider eyebrows in round 10 of the head, making them 2 stitches wide with 8 stitches between them
  • Embroider the mouth in round 4 of the head, making it 3 stitches wide for a sweet expression
  • Apply pink blush to the cheeks using makeup or chalk pastels for that adorable rosy glow
  • Sew the completed hat to the top of the head using the back loops of round 13 on the hat
  • Position the hat tilted to one side for extra personality and charm

Important Notes

  • 💡Use a stitch marker to keep track of where each round begins, especially important with plush yarn
  • 💡Stuff the body and head firmly but not overly tight to maintain the soft, huggable quality
  • 💡Only stuff the lower half of the arms to allow them to drape naturally at the sides
  • 💡Insert safety eyes between rounds 6 and 7 with 8 stitches between them before closing the head
  • 💡Work in continuous rounds without joining unless specifically instructed to slip stitch
  • 💡Change yarn colors at the specified rounds for the hat to create the striped pattern effect

This adorable ghost pattern is perfect for creating a friendly companion that's anything but spooky! The combination of soft plush yarn and sweet embroidered details results in a cuddly plushie that everyone will love. Whether you're making it for Halloween decor, a child's toy, or a unique handmade gift, this little ghost is sure to bring smiles wherever it goes. The tilted striped hat adds just the right touch of whimsy and personality. 🧶 Happy crocheting and enjoy creating your new ghostly friend! 👻✨

You ask,

we answer.

FAQs

Can I use regular yarn instead of plush yarn for this pattern?

Yes, you can substitute regular worsted weight yarn, but the finished ghost will be smaller and have a different texture. Adjust your hook size accordingly and expect the final size to be around 15-18cm instead of 25cm.

How do I prevent the plush yarn from being difficult to see stitches?

Use a stitch marker at the beginning of each round and count your stitches carefully. Good lighting helps tremendously, and you can gently spread the yarn fibers to see where to insert your hook.

Can I make the hat in different colors?

Absolutely! The hat is completely customizable with any color combination you like. Try seasonal colors like red and green for Christmas or pastel shades for a softer look.

Is this pattern safe for young children?

If making for children under 3 years old, consider embroidering the eyes instead of using safety eyes, and ensure all parts are securely attached to prevent any choking hazards.

How do I achieve the tilted hat look?

When sewing the hat to the head, position it slightly off-center and angled to one side. Pin it in place first to find the angle you like best before permanently sewing it down.