🧢 Beautiful ✨ Detailed πŸ’ Adorable

Balloon Dog Amigurumi Pattern

Balloon Dog Amigurumi Pattern
4.0β˜… Rating
5-7 Hours Time Needed
1.4K Made This
βœ‚οΈ

Intermediate Level

Ideal for those with basic knitting experience, featuring slightly more advanced stitches and techniques to expand your skills.

⏱️

Weekend Treat

Takes 5-7 hours, making it an enjoyable project to finish over a couple of days.

🐾

Pocket Pal

A mini friend to carry anywhere, providing comfort and companionship in a perfectly portable size.

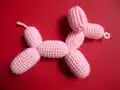
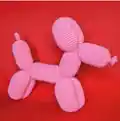
About This Balloon Dog Amigurumi Pattern

Balloon Dog Amigurumi Pattern crochet pattern - detailed view of completed project

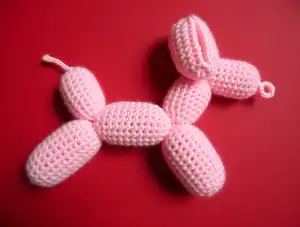
The finished balloon dog stands proudly at 20 cm tall and measures 23 cm from its perky tail to its sweet nose, making it a perfect display piece or gift for anyone who loves playful, creative designs.

Why You'll Love This Balloon Dog Amigurumi Pattern

I absolutely love how this pattern transforms a simple continuous spiral into something so recognizably fun and nostalgic. The genius of crocheting it like an actual balloon dog means you get to experience that satisfying moment of shaping at the end, watching your long crocheted tube transform into a recognizable pup. I find the repetitive rounds meditative yet engaging, and the final assembly feels like solving a delightful puzzle. Plus, you can make it in any color you love, creating your own collection of whimsical balloon pups that never deflate.

Balloon Dog Amigurumi Pattern step 1 - construction progress Balloon Dog Amigurumi Pattern step 2 - assembly progress Balloon Dog Amigurumi Pattern step 3 - details and accessories Balloon Dog Amigurumi Pattern step 4 - final assembly and finishing

Switch Things Up

I love experimenting with this balloon dog pattern because it's so versatile once you understand the basic construction. Try making a whole pack of mini balloon dogs in rainbow colors for a party decoration display that never deflates. You could work the pattern in metallic yarn for a glamorous twist that catches the light beautifully.

For a more advanced challenge, I sometimes add surface crochet details to mimic the shine lines on real balloons, or embroider a simple face on the nose section for extra personality. You can also play with proportions by adjusting the round counts in different sections to create a more elongated dachshund-style dog or a chunkier bulldog version.

I've found that using variegated yarn creates a fun carnival effect, while working in classic red or blue gives that authentic balloon animal nostalgia. For gift-giving, I attach a small ribbon or bow around the neck area to make it extra special. The possibilities are endless once you master the basic shaping technique.

Common Mistakes & How to Fix Them

βœ— Losing count during the long rounds of repeated single crochets can throw off proportions, so use stitch markers at the beginning of each round to stay on track
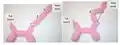
 βœ— Stuffing too firmly in the narrow sections like the tail tip or legs will make shaping difficult, so keep stuffing light and even throughout the entire piece βœ— Not following the exact round counts for each body section will result in misaligned joints when assembling, so double-check your round numbers before moving to the next segment βœ— Pulling too tight when sewing joints together can create puckering or distort the balloon shape, so use gentle tension and hide stitches inside the bumps for a clean finish

Balloon Dog Amigurumi Pattern

Create your own whimsical balloon dog with this unique crochet pattern that mimics the iconic twisted balloon animal design. This charming project is worked in continuous spirals from tail to nose, forming adorable bumps that capture the playful spirit of a classic party balloon sculpture. Perfect for adding a pop of color and fun to any space, this pattern transforms simple stitches into a delightful decorative piece that stands about 20 cm tall and stretches 23 cm from tail to nose.

Intermediate 5-7 Hours

Materials Needed for Balloon Dog Amigurumi Pattern

β€” Main Fabric

  • 01
    Cotton 8/4 yarn in your choice of color (approximately 60g needed)
  • 02
    Standard cotton yarn with approximately 170m per 50g ball

β€” Tools Required

  • 01
    Crochet hook 2.0-2.5mm (US size B-1)
  • 02
    Yarn needle for weaving ends and sewing joints
  • 03
    Scissors
  • 04
    Stuffing (polyester fiberfill)
  • 05
    Stitch markers (optional but recommended)

Progress Tracker

0% Complete

β€” The Balloon :

Info :

Work in continuous spirals from tail to nose, starting with a magic loop

Round 1 :

6 sc in ml (6)

Round 2-6 :

sc all the way around (6) - 5 rounds (tip of the tail)

Round 7 :

*sc inc* x6 (12)

Round 8 :

*1 sc, sc inc* x6 (18)

Round 9 :

*2 sc, sc inc* x6 (24)

Round 10 :

*3 sc, sc inc* x6 (30)

Round 11-25 :

sc all the way around (30) - 15 rounds (tail)

Round 26 :

*3 sc, sc dec* x6 (24)

Round 27 :

*2 sc, sc dec* x6 (18)

Info :

Put some stuffing in tail section

Round 28 :

*1 sc, sc dec* x6 (12)

Round 29 :

*sc dec* x6 (6)

Round 30 :

sc all the way around (6)

Round 31 :

*sc inc* x6 (12)

Round 32 :

*1 sc, sc inc* x6 (18)

Round 33 :

*2 sc, sc inc* x6 (24)

Round 34 :

*3 sc, sc inc* x6 (30)

Round 35-51 :

sc all the way around (30) - 17 rounds (leg 1)

Round 52-60 :

repeat round 26-34 (30)

Round 61-77 :

sc all the way around (30) - 17 rounds (leg 2)

Round 78-86 :

repeat round 26-34 (30)

Round 87-106 :

sc all the way around (30) - 20 rounds (body)

Round 107-115 :

repeat round 26-34 (30)

Round 116-132 :

sc all the way around (30) - 17 rounds (leg 3)

Round 133-141 :

repeat round 26-34 (30)

Round 142-158 :

sc all the way around (30) - 17 rounds (leg 4)

Round 159-167 :

repeat round 26-34 (30)

Round 168-179 :

sc all the way around (30) - 12 rounds (neck)

Round 180-188 :

repeat round 26-34 (30)

Round 189-203 :

sc all the way around (30) - 15 rounds (ear 1)

Round 204-212 :

repeat round 26-34 (30)

Round 213-227 :

sc all the way around (30) - 15 rounds (ear 2)

Round 228-236 :

repeat round 26-34 (30)

Round 237-249 :

sc all the way around (30) - 13 rounds (nose)

Round 250 :

*3 sc, sc dec* x6 (24)

Round 251 :

*2 sc, sc dec* x6 (18)

Info :

Put some stuffing in nose section

Round 252 :

*1 sc, sc dec* x6 (12)

Round 253 :

*sc dec* x6 (6)

Round 254 :

sc all the way around (6)

Round 255 :

*sc inc* x6 (12)

Round 256 :

*1 sc, sc inc* x6 (18)

Info :

Slip st in the next stitch, cut the yarn, pull it through and weave in the ends

Assembly Instructions

  • Identify and number all nine joints created by the decrease/increase sequences throughout the balloon piece
  • For the first pair of legs, sew joint 1 and joint 3 together to form the back legs positioning
  • For the second pair of legs, sew joint 4 and joint 6 together to create the front legs positioning
  • For the ears, sew joint 7 and joint 9 together to shape the ear structure on the head
  • Close the hole at the tip of the nose by either sewing it shut or tying a tight knot around the outside
  • Ensure all joints are securely sewn with hidden stitches to maintain the smooth balloon appearance
  • Adjust stuffing as needed during assembly to maintain even balloon bump shapes throughout

Important Notes

  • πŸ’‘This pattern is worked in continuous spirals without joining, so use a stitch marker to track the beginning of each round
  • πŸ’‘Keep stuffing light and even throughout to allow proper shaping during assembly
  • πŸ’‘The pattern creates natural bumps through the decrease and increase sequences that form the joints
  • πŸ’‘Follow the exact round counts for each section as they determine where joints will align during assembly
  • πŸ’‘Use cotton yarn for best results as it holds the balloon shape structure well
  • πŸ’‘The crochet gauge is important for achieving the correct finished size of 20cm tall by 23cm long

This adorable Balloon Dog pattern brings the whimsy of party balloon animals into a permanent crochet form that will never deflate. The clever construction method of working one long continuous piece and then shaping it through strategic joint sewing makes this project both fun and rewarding. Whether displayed on a shelf or given as a cheerful gift, this playful pup captures pure joy in every stitch. πŸŽˆπŸ• Happy crocheting! 🧢✨

You ask,

we answer.

FAQs

Can I use a different yarn weight for this pattern?

Yes, you can use different yarn weights, but you'll need to adjust your hook size accordingly and keep in mind that it will change the finished size of your balloon dog. Make sure to check your gauge to maintain the proper stitch density for stuffing.

How do I keep track of which section I'm working on during the long repetitive rounds?

Write down each section as you complete it and use multiple stitch markers to mark important joints. You can also take photos as you progress to help identify where each body part begins and ends.

What's the best way to stuff the narrow sections without distorting them?

Use small amounts of stuffing at a time, pushing it gently into place with the back of your crochet hook or a chopstick. Keep the stuffing lighter in narrow areas and only stuff firmly enough to maintain shape without stretching the stitches.

Can I make the balloon dog in multiple colors?

Absolutely! You can change colors at any joint section to create a multicolored balloon dog effect. Just remember to weave in all ends securely inside the bumps where they won't be visible.

How do I identify which joints to sew together?

The pattern creates nine natural joints where you work the decrease and increase rounds. Count them from the tail end and number them 1-9, then follow the assembly guide to sew the correct pairs together as shown in the picture guide.