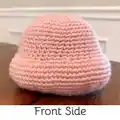
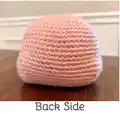
Create the most adorable little pig friend with this comprehensive amigurumi pattern! This charming project features a chubby piggy with a distinctive snout, floppy ears with that perfect earlobe detail, and a curly tail that captures the essence of everyone's favorite farm animal. Perfect for intermediate crocheters ready to expand their skills, this pattern uses lightweight cotton yarn to create a beautifully detailed pig with dimensional features. The clever construction includes special techniques like working in front loops only to create the snout's shape and combining two-toned ears for realistic depth. With detailed instructions for every part—from the expressive head with safety eyes to the cute hooved feet in contrasting pink—you'll craft a pig that's bursting with personality. Whether you're making a gift for a farm animal lover, adding to a nursery collection, or building your own amigurumi menagerie, this little pig will bring smiles and joy wherever it goes!
Progress Tracker
0% Complete
— HEAD :
Info :
Work with light pink yarn
Row 3 :
[ 1 sc, inc ] x 6 (18)
Row 4 :
[ 2 sc, inc ] x 6 (24)
Row 5 :
[ 3 sc, inc ] x 6 (30)
Row 6 :
[ 4 sc, inc ] x 6 (36)
Row 7 :
[ 5 sc, inc ] x 6 (42)
Row 8 :
[ 6 sc, inc ] x 6 (48)
Row 9 :
[ 7 sc, inc ] x 6 (54)
Row 18 :
14 inc in front loop, 4 sc, 14 inc in front loop, 22 sc (82)
Row 21 :
60 sc, dec, 18 sc, dec (80)
Row 22 :
60 sc, dec, 16 sc, dec (78)
Row 23 :
60 sc, dec, 14 sc, dec (76)
Row 24 :
60 sc, dec, 12 sc, dec (74)
Row 25 :
60 sc, dec, 10 sc, dec (72)
Row 26 :
[ 10 sc, dec ] x 6 (66)
Row 27 :
[ 2 sc, dec ] x 5, sc 12, [ dec, 2 sc ] x 8, dec (52)
Row 28 :
[ sc, dec ] x 6, sc 6, [ dec, sc ] x 8, dec x 2 (36)
Row 29 :
[ 4 sc, dec ] x 6 (30)
Row 30 :
[ 3 sc, dec ] x 6 (24)
Info :
Fasten the thread. Leave a long tail for sewing. Stuff the head tightly. Do not sew the head to the body until the eyes have been fastened on securely
Info :
Place the black safety eyes between rows 14 and 15. The eyes should be about 7 stitches apart. Fasten the back of the safety eyes through the head securely
— NOSE :
Info :
Work with dark pink yarn
Row 1 :
Starting in the second chain from hook, sc 12 all around the foundation chain (6 sc on one side, then continue to other side and sc 6 more). There will be two stitches in each chain when finished
Row 3 :
24 sc in back loop only
Row 4 :
dec, 2 sc, dec, 3 sc, dec, 2 sc, dec, 3 sc, dec, 4 sc (19)
Info :
Fasten the thread. Leave a long tail for sewing. Place a small amount of stuffing in the inside of the nose. Sew between and just under the eyes on rows 18-22 of the head
— EARS PART 1 (x2) :
Info :
Work with dark pink yarn. Make 2 pieces
Row 2 :
[4 sc in the next stitch] x 3 times (12)
Row 3 :
2 sc, [4 sc in next stitch, 3 sc] x 2, 4 sc in next stitch, sc (21)
Row 4 :
4 sc, [4 sc in next stitch, 6 sc] x 2, 4 sc in next stitch, 2 sc (30)
— EARS PART 2 (x2) :
Info :
Work with light pink yarn. Make 2 pieces
Row 2 :
[4 sc in next stitch] x 3 times (12)
Row 3 :
2 sc, [4 sc in next stitch, 3 sc] x 2, 4 sc in next stitch, sc (21)
Row 4 :
4 sc, [4 sc in next stitch, 6 sc] x 2, 4 sc in next stitch, 2 sc (30)
Row 5 :
6 sc, [4 sc in next stitch, 9 sc] x 2, 4 sc in next stitch, 3 sc (39)
Info :
After you make one light pink ear, leave the thread uncut and continue to crochet the light pink and a dark pink ear together. Take the dark pink triangle and place it over the light pink triangle. Sc through both triangles all the way around. Because the light pink has more stitches (39) than the dark pink (30) you will need to skip three stitches on each side of the light pink triangle. Spread the skips out evenly
Info :
Sew the ears on the head between rows 7 and 13. Let there be about 12 stitches between the ears on row 7. Leave about 4 stitches of the bottom of the ear unattached to give it an earlobe look. Bend the top of the ear to give it a folded look
— BODY :
Info :
Work with light pink yarn
Row 3 :
[ 1 sc, inc ] x 6 (18)
Row 4 :
[ 2 sc, inc ] x 6 (24)
Row 5 :
[ 3 sc, inc ] x 6 (30)
Row 6 :
[ 4 sc, inc ] x 6 (36)
Row 7 :
[ 5 sc, inc ] x 6 (42)
Row 8 :
[ 6 sc, inc ] x 6 (48)
Row 9 :
[ 7 sc, inc ] x 6 (54)
Row 10 :
[ 8 sc, inc ] x 6 (60)
Row 11 :
[ 9 sc, inc ] x 6 (66)
Row 12 :
[ 10 sc, inc ] x 6 (72)
Row 15 :
6 sc, inc, [ 11 sc, inc ] x 5, 5 sc (78)
Row 22 :
[ 11 sc, dec ] x 6 (72)
Row 23 :
[ 10 sc, dec ] x 6 (66)
Row 25 :
5 sc, dec, [ 9 sc, dec ] x 5, 4 sc (60)
Row 26 :
[ 8 sc, dec ] x 6 (54)
Row 27 :
4 sc, dec, [ 7 sc, dec ] x 5, 3 sc (48)
Row 29 :
[ 6 sc, dec ] x 6 (42)
Row 33 :
[ 5 sc, dec ] x 6 (36)
Row 34 :
[ 4 sc, dec ] x 6 (30)
Row 35 :
[ 3 sc, dec ] x 6 (24)
Info :
Fasten the thread securely and hide the tail in the body. Stuff the body tightly. Sew the head onto the body
— ARMS (x2) :
Info :
Start with dark pink yarn. Make 2 pieces
Row 4 :
24 sc in back loop only
Row 5 :
[ 4 sc, dec ] x 4 (20)
Info :
Switch to light pink yarn. For a seamless transition, put the hook into the next loop. Wrap the light pink thread around the hook and pull through. Wrap the light pink thread around the hook again and pull through the light pink and dark pink loops to finish the first stitch. Continue in light pink
Row 6 :
[ 3 sc, dec ] x 4 (16)
Row 12 :
[ 6 sc, dec ] x 2 (14)
Row 18 :
[ 5 sc, dec ] x 2 (12)
Info :
Fasten the thread. Leave a long tail for sewing. Stuff lightly and do not stuff all the way. Leave the top 4 rows of the arm empty of stuffing. Sew where the head and body of the pig meet at a 45 degree angle. Leave about 10 stitches in between the arms at the top, front side of the pig
— LEGS (x2) :
Info :
Start with dark pink yarn. Make 2 pieces
Row 4 :
[ sc, inc ] x 12 (36)
Row 5 :
36 sc back loop only
Row 6 :
[ 4 sc, dec ] x 6 (30)
Row 7 :
[ 3 sc, dec ] x 6 (24)
Info :
Switch to light pink yarn. For a seamless transition, put the hook into the next loop. Wrap the light pink thread around the hook and pull through. Wrap the light pink thread around the hook again and pull through the light pink and dark pink loops to finish the first stitch. Continue in light pink
Row 8 :
[ 10 sc, dec ] x 2 (22)
Row 11 :
[ 9 sc, dec ] x 2 (20)
Row 14 :
[ 8 sc, dec ] x 2 (18)
Info :
Leave a long tail for sewing. Stuff lightly and do not stuff all the way. Leave the top 4 rows of the leg empty of stuffing. Sew on the bottom of the pig
— TAIL :
Info :
Start with dark pink yarn
Instructions :
Chain 16. Starting in the second chain from hook, 4 sc in each chain for the next 13 chains. Then make 2 sc in the second to last chain, and then sl st in the last chain and tie off
Info :
You can leave a long tail to sew it onto the pig. Sew on rows 11-13 on the back of the pig
This charming Little Pig amigurumi pattern was designed by Inspire Amigurumi to bring farmyard cuteness into your home with incredible detail and personality! The clever construction techniques—from the dimensional snout to the two-toned layered ears and curly tail—create a pig that's brimming with character and charm. With clear instructions for every special technique and plenty of helpful tips along the way, you'll create an adorable piggy friend that's perfect for gifting or keeping all to yourself. This pattern teaches valuable skills like seamless color changes and dimensional shaping that you'll use in countless future projects. 🐷🧶 Happy crocheting and enjoy your new little oinker! 💕✨