About This Ice Cream Turtle Amigurumi Pattern
This Ice Cream Turtle pattern brings together the sweetness of ice cream and the cuteness of a turtle in one delightful amigurumi project. The pattern features a unique shell design with ruffled edges that mimic ice cream scoops, creating a whimsical and eye-catching texture. Using soft chenille yarn in coordinating colors, you'll create either a classic Neapolitan look or a dreamy Cotton Candy version. The construction method is straightforward, with legs and tail cleverly crocheted directly into the body for seamless assembly.
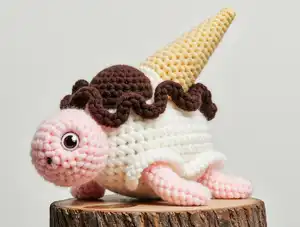
The finished turtle stands at about 7 inches tall with its adorable cone hat slightly tilted to the side, giving it extra personality. The use of bulky chenille yarn makes this project work up quickly while creating a plush, huggable texture that's perfect for gift-giving or adding to your own collection of handmade friends.
Why You'll Love This Ice Cream Turtle Amigurumi Pattern
I absolutely love this pattern because it combines two of my favorite things—adorable animals and sweet treats! The chenille yarn gives the turtle such a soft, cuddly texture that makes it irresistible to squeeze. I especially enjoy how the ruffled ice cream scoops add dimension and visual interest to what could have been a simple shell. The pattern is incredibly forgiving for beginners thanks to the fluffy yarn that hides minor stitch imperfections, yet it's engaging enough to keep experienced crocheters entertained. Plus, having two color scheme options means you can make multiple turtles without them looking identical, and the waffle cone hat is just the perfect finishing touch that makes everyone smile!
Switch Things Up
I love experimenting with color combinations for this adorable turtle! While the pattern suggests Neapolitan and Cotton Candy schemes, I've created versions using mint chocolate chip colors (green, white, and brown) and even a rainbow sherbet version with multiple pastel colors in the shell layers.
For a more realistic turtle, I've tried using natural earth tones—sage green for the body parts with tan and brown for the shell scoops. You could even skip the ice cream theme entirely and create a floral turtle by using flower-colored yarns and omitting the cone.
I've also experimented with different textures by mixing chenille with standard velvet yarn or even adding a sparkly yarn strand held together with the main color for a magical effect. The ruffled edges look stunning when made with variegated yarn that slowly transitions through colors.
If you want to make a larger version, try using super bulky Bernat Blanket yarn with a 6mm hook—your turtle will be nearly twice the size! Conversely, using sport weight yarn and a 2.5mm hook creates an adorable miniature version perfect for keychains.
I've personalized turtles by embroidering names or initials on the bottom of the shell before attaching the cone. Adding a small bow between the head and shell or creating tiny accessories like sunglasses from craft wire and felt gives each turtle unique personality. The possibilities are truly endless with this versatile pattern!
Common Mistakes & How to Fix Them
✗ Losing your place in fluffy yarn: Use stitch markers liberally, as chenille yarn makes it difficult to see individual stitches clearly
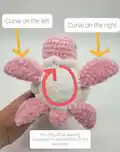
✗ Not stuffing the scoops before closing: Add stuffing to each ice cream layer before moving to the next section to maintain proper shape
✗ Misplacing legs and tail: Follow the stitch count carefully in Round 22 to ensure even spacing and proper leg orientation for stability
✗ Attaching the cone too tightly: Sew the cone loosely enough to maintain its shape and create that charming tilted look mentioned in the pattern