About This Bowling Llama Amigurumi Pattern
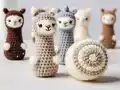
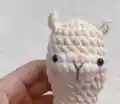
This Bowling Llama pattern is a no-sew wonder that integrates all parts directly into the body and head as you crochet. The ears emerge in round 2, the snout develops in rounds 6-8, and the legs appear in rounds 12 and 23, creating a seamless construction process. The accompanying bowling ball adds a playful sports theme, complete with color-change details that make it look authentic and fun.

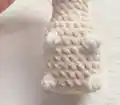
With bobble stitches creating texture and dimension, this pattern teaches valuable techniques while producing an adorable result. The finished llama can even stand upright on its own with an optional base insert.
Why You'll Love This Bowling Llama Amigurumi Pattern
I absolutely love this pattern because it eliminates the tedious sewing process that usually comes with amigurumi! The no-sew construction means you can watch your llama come to life seamlessly without worrying about attaching separate limbs. The integrated bowling ball companion adds such a unique, playful twist that makes this more than just another animal amigurumi. I also appreciate how the pattern teaches advanced techniques like bobble stitches and color changes while still being approachable for intermediate crocheters. The fact that it can stand on its own makes it perfect for display, and at just 15cm tall, it's the ideal desk buddy or gift for sports lovers and llama enthusiasts alike.
Switch Things Up
I love experimenting with this pattern by changing up the color schemes to create different llama personalities! Instead of the traditional cream and white, try using pastel pink and lavender for a magical unicorn-llama hybrid, or go bold with bright rainbow colors for each section of the body.
You could also modify the bowling ball companion into different sports equipment - imagine a tiny soccer ball, basketball, or even a miniature disco ball for a party llama! Simply adjust the color placement in the bowling ball pattern rounds to create the look you want.
For a seasonal twist, I've made winter holiday versions using red and green yarn with a tiny santa hat added on top, or autumn versions in orange and brown tones. The bobble stitches can be emphasized with contrasting colors to make them pop even more dramatically.
If you're making this for a child, consider using safety embroidery for the nose instead of separate thread, and double-check that your stitches are extra tight to prevent any stuffing accidents. You could even add a small bell inside the bowling ball to make it a rattle toy!
Advanced crocheters might enjoy adding tiny accessories like a crocheted scarf, a miniature bowling pin friend, or even a trophy. The possibilities for customization are endless, and each variation brings its own charm to this already adorable design!
Common Mistakes & How to Fix Them
✗ Forgetting to add toy stuffing at the specified points can make it difficult to stuff properly later and cause uneven shapes
✗ Not making stitches close enough together allows fiberfill to peek through gaps, ruining the finished appearance of your llama
✗ Skipping the invisible decrease technique results in visible bumps and an unprofessional finish on your amigurumi project
✗ Missing the integrated parts like ears and legs in rounds 2, 12, and 23 disrupts the no-sew construction design
✗ Not mastering color change and bobble stitch techniques before starting leads to frustration and inconsistent results throughout the pattern