🧶 Beautiful ✨ Detailed 💝 Adorable

Moose Slippers Crochet Pattern

Moose Slippers Crochet Pattern
4.1★ Rating
4-5 Hours Time Needed
3.1K Made This
✂️

Beginner Friendly Level

Perfect for those just starting their sewing journey, with clear instructions and simple techniques

⏱️

Weekend Treat

Takes 5-7 hours, making it an enjoyable project to finish over a couple of days.

🏡

Cozy Accent

A warm touch for your space that transforms ordinary corners into inviting nooks filled with handmade charm.

About This Moose Slippers Crochet Pattern

Moose Slippers Crochet Pattern crochet pattern - detailed view of completed project

Available in four adult sizes ranging from women's 5/6 to 11/12, these slippers are customizable to fit perfectly. The pattern includes helpful tutorial photos and clear stitch guides to ensure your success.

Why You'll Love This Moose Slippers Crochet Pattern

I absolutely love this pattern because it transforms simple crochet techniques into something truly special and functional! The double strand method creates slippers that are both warm and durable, perfect for everyday wear. I'm obsessed with how the plaid sock detail adds such a cozy, cabin-inspired vibe, and the moose features are impossibly cute without being too complicated. What really makes me excited is how quickly these work up – you can make a pair in just one weekend! The fact that they come in multiple sizes means I can create matching pairs for friends and family. Plus, there's something so satisfying about wearing handmade slippers that you created yourself, and these are sturdy enough to actually use daily rather than just for show.

Moose Slippers Crochet Pattern step 1 - construction progress Moose Slippers Crochet Pattern step 2 - assembly progress Moose Slippers Crochet Pattern step 3 - details and accessories Moose Slippers Crochet Pattern step 4 - final assembly and finishing

Switch Things Up

I absolutely love how versatile this moose slipper pattern is! While the classic brown moose with plaid trim is adorable, I've had so much fun experimenting with different color combinations to create unique variations. Try making them in grey for a more modern look, or go wild with bright colors for kids – imagine hot pink moose slippers with rainbow plaid!

I've also played around with the plaid pattern itself. Instead of the traditional red and black buffalo plaid, I've created versions with blue and white for a winter wonderland vibe, or green and cream for a more subtle, earthy feel. You could even skip the color work entirely and do stripes or a solid color sock if plaid isn't your thing.

For the antlers, I sometimes use a slightly darker beige or even light brown to create more contrast against the body color. I've also experimented with adding small jingle bells to the antler tips for holiday versions – they make a sweet jingling sound when you walk!

Another fun variation I love is changing up the embellishments. Instead of gem buttons, I've used safety eyes for a more amigurumi look, or embroidered the features entirely for a softer, more traditional appearance. You could add a little red pom-pom for a Rudolph-inspired nose during the holidays!

I've even made larger versions as boot cuffs by working additional rounds and skipping the foot portion entirely. They look adorable peeking out of boots! The possibilities are truly endless, and each variation brings its own charm to this already delightful pattern.

Common Mistakes & How to Fix Them

✗ Not using double strand for the foot base which results in thin, flimsy slippers that won't hold their shape or provide adequate warmth ✗ Skipping the heel seam step or sewing it incorrectly, causing the slipper to not fit properly and creating uncomfortable gaps around the foot ✗ Placing the ears and antlers unevenly or at wrong positions, making the moose face look asymmetrical and unprofessional on the finished slipper ✗ Working the optional plaid sock pattern too tightly which causes the cuff to not fit over the foot properly when putting on slippers ✗ Not counting stitches carefully when attaching yarn for the cuff, resulting in uneven rows and a lopsided appearance around the ankle opening

Moose Slippers Crochet Pattern

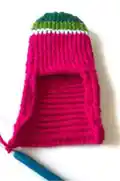
Create adorable moose slippers that will keep your toes cozy all winter long! This delightful pattern features charming moose details including antlers, ears, and cute gem button eyes. The slippers are worked using a double strand method for durability and warmth, with an optional plaid sock trim that adds extra style. Perfect for gifting or treating yourself to handmade comfort, these quick and easy slippers come in multiple adult sizes from small to extra-large. The pattern includes detailed instructions for the foot, cuff, optional plaid sock, ears, and antlers, making it a fun project that combines functionality with whimsical charm.

Beginner Friendly 4-5 Hours

Materials Needed for Moose Slippers Crochet Pattern

— Main Fabric

  • 01
    Worsted Weight Yarn (#4) in Brown - 7-10 ozs depending on size
  • 02
    Worsted Weight Yarn (#4) in Red (Color A) - 1 oz
  • 03
    Worsted Weight Yarn (#4) in Dark Red (Color B) - 1 oz
  • 04
    Worsted Weight Yarn (#4) in Black (Color C) - 1 oz
  • 05
    Worsted Weight Yarn (#4) in Beige - 1/2 oz

— Tools Required

  • 01
    Crochet hook H/8/5.00mm
  • 02
    Yarn needle
  • 03
    Assorted sew-on gem buttons for eyes and nose details
  • 04
    Stitch markers (recommended)
  • 05
    Scissors

Progress Tracker

0% Complete

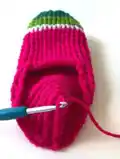
— FOOT – Double Strand :

Info :

With Brown color, holding two strands together

R1 :

Make a magic ring, ch 1, 6 sc in ring, sl st to join in 1st sc, turn (6)

R2 :

Ch 1, 2 sc in each st arnd, sl st to join in 1st sc, turn (12)

R3 :

Ch 1, *2 sc, sc* arnd, sl st to join in 1st sc, turn (18)

R4 :

Ch 1, *2 sc, sc x 2* arnd, sl st to join in 1st sc, turn (24)

R5 :

Ch 1, *2 sc, sc x 3* arnd, sl st to join in 1st sc, turn (30)

R6 :

Ch 1, sc in each st arnd, sl st to join in 1st sc, turn (30)

R7-21(23,25,27) :

Repeat R6. Fasten off.

Info :

Count 10 sts to the left, attach yarn, turn

R22(24,26,28) :

Ch 1, sc in same space as join and in next 19 sts, turn (20)

R23(25,27,29) :

Ch 1, sc across, turn (20)

R24(26,28,30)-34(36,38,40) :

Repeat R23(25,27,29)

R35(37,39,41) :

At the end of round 34(36,38,40): Ch 1, turn, hold the two heel ends together with the RS touching & sl st in each st down (working through both layers) to join; Fasten off.

— CUFF – Double Strand :

Info :

With Brown, attach yarn to seam

R1 :

Ch 1, sc in end of each row and in each st arnd, sl st to join, turn (36)

R2 :

Ch 1, sc in each st arnd, sl st to join, turn (36)

R3-5 :

Repeat R2

R6 (WITHOUT SOCK) :

Ch 1, hdc in each st arnd, sl st to join; Fasten off. (36)

R6 (WITH SOCK) :

Ch 1, *2 hdc, hdc x 4* arnd, sl st to join; Fasten off. (42)

— SOCK – Single Strand (Optional) :

Info :

Attach yarn to TLO left of seam, Starting Plaid pattern

R1 :

(RS) With Color A: Ch 1, sc x 3, With Color B: sc x 3, * With Color A: sc x 3, With Color B: sc x 3* arnd, sl st to join in 1st sc, turn (42)

R2 :

With Color B: Ch 1, sc x 3, With Color A: sc x 3, * With Color B: sc x 3, With Color A: sc x 3* arnd, sl st to join in 1st sc, turn (42)

R3 :

Repeat round 1

R4 :

With Color C: Ch 1, sc x 3, With Color B: sc x 3, * With Color C: sc x 3, With Color B: sc x 3* arnd, sl st to join in 1st sc, turn (42)

R5 :

With Color B: Ch 1, sc x 3, With Color C: sc x 3, * With Color B: sc x 3, With Color C: sc x 3* arnd, sl st to join in 1st sc, turn (42)

R6 :

Repeat round 4

R7-9 :

Repeat rounds 1-3; Fasten off.

Info :

Optional: Continue repeating rounds 1-6 to desired length and roll cuff down

— EARS – Single Strand :

Info :

Make 4 pieces with Brown

R1 :

Magic ring, ch 1, 4 sc in ring (4)

R2 :

sc arnd (4)

R3 :

2 sc in each st arnd (8)

R4-5 :

sc arnd (8)

R6 :

*2 sc, sc* arnd (12)

R7-8 :

sc arnd (12)

R9 :

*dec, sc* arnd; Fasten off (8)

— ANTLERS – Single Strand :

Info :

Make 4 pieces with Beige

R1 :

Magic ring, ch 1, 5 sc in ring (5)

R2 :

sc arnd (5)

R3 :

2 sc in each st arnd (10)

R4 :

sc arnd (10)

R5 :

2 sc x 2, sc x 2, dec x 2, sc x 2 (10)

R6 :

sc, bobble, sc x 8 (10)

R7-8 :

sc arnd (10)

R9 :

sc x 2, bobble, sc x 7 (10)

R10-11 :

sc arnd (10)

R12 :

sc x 3, bobble, sc x 6 (10)

R13-14 :

sc arnd (10)

R15 :

sc x 2, dec x 2, sl st x 2 (leave last two sts unworked); Fasten off. (8)

Assembly Instructions

  • Count 10 stitches to the left of the seam and attach ear to 10th stitch over rows 2 & 3. Count 10 stitches to the right of the seam and attach ear to 10th stitch over rows 2 & 3.
  • Count 12 stitches to the left of the seam and attach antler to 12th stitch over rows 4-6. Count 12 stitches to the right of the seam and attach antler to 12th stitch over rows 4-6.
  • Count 16 stitches to the left of the seam and attach large gem for an eye to 16th-17th stitches over rows 2 & 3. Count 16 stitches to the right of the seam and attach large gem for an eye to 16th-17th stitches over rows 2 & 3. Leave 2-3 stitches between eyes.
  • Attach smallest gems to front of slipper, between rows 5 & 6, so they are lined up with the eyes. Leave approximately 3 stitches between them for the nose details.
  • If making the optional plaid sock, ensure all color changes are neat and weave in ends securely on the inside of the slipper.
  • Pin all pieces in place before sewing to ensure symmetrical placement of moose features on both slippers.
  • Hide all yarn strings by weaving them through the interior stitches and trim excess carefully.

Important Notes

  • 💡The base and cuff are worked using the double strand method (holding two strands together) for durability and warmth
  • 💡The sock, ears, and antlers are worked with single strand only, so don't use double strand for these pieces
  • 💡Use stitch markers to keep track of your starting point, especially when working in continuous rounds
  • 💡The plaid sock trim is completely optional – follow the specific R6 instructions based on whether you want to add it
  • 💡Sizes are adjustable by working more or fewer rounds in R7-21 for the foot length
  • 💡Make sure to work the heel seam with right sides touching so the seam ends up on the inside of the slipper
  • 💡Pin ears and antlers before sewing to ensure they are symmetrically placed on both slippers

These charming Moose Slippers bring woodland whimsy right to your feet! The pattern cleverly combines sturdy double strand construction with adorable single strand details to create slippers that are both functional and impossibly cute. With optional plaid trim reminiscent of cozy cabin vibes and sweet moose features including bobbled antlers and gem button eyes, these slippers make perfect gifts or a treat for yourself. Available in four adult sizes, they're quick to make and will keep you warm all winter long. 🦌 Happy crocheting! 🧶✨

You ask,

we answer.

FAQs

What does 'double strand' mean and why is it important?

Double strand means holding two strands of yarn together and working with them as one. This technique is crucial for the foot and cuff sections because it creates a thicker, more durable fabric that will hold up to walking and provide better warmth and cushioning for your feet.

Can I skip the plaid sock trim?

Yes! The plaid sock is completely optional. The pattern includes two different instructions for R6 of the cuff – one version without the sock that fastens off after the hdc round, and one version with the sock that increases stitches to accommodate the plaid pattern. Choose whichever you prefer!

How do I adjust the size if my foot is between sizes?

You can easily adjust the length by working more or fewer rounds in R7-21 of the foot section. Try the slipper on as you go to check the fit. For width adjustments, consider using a slightly larger or smaller hook, or adjust your tension to make the fabric looser or tighter.

What type of gem buttons should I use for the eyes and nose?

Use larger sew-on gem buttons (approximately 8-10mm) for the eyes and smaller gems (approximately 4-5mm) for the nose details. Make sure they're securely sewn on, especially if the slippers will be worn by children. You can also use felt circles or embroidered details as an alternative.

Why won't my ears stand up properly?

Ears are meant to be sewn flat against the slipper rather than standing upright like some amigurumi projects. Make sure you're sewing two ear pieces together (making them double-layered) before attaching them to the slipper over rows 2 & 3. This creates a more realistic moose ear that lays naturally.

How do I work into the Third Loop Only (TLO)?

The third loop is the horizontal loop that appears on the back of a half double crochet stitch, running parallel to the front and back loops. When attaching yarn for the sock, look for this loop on the backside of your R6 stitches and insert your hook through it. The pattern includes tutorial photos to help identify this loop.