๐Ÿงถ Beautiful โœจ Detailed ๐Ÿ’ Adorable

Moonlit Bralette Crochet Pattern

Moonlit Bralette Crochet Pattern
4.7โ˜… Rating
4-5 Hours Time Needed
3.7K Made This
โœ‚๏ธ

Intermediate Level

Ideal for those with basic knitting experience, featuring slightly more advanced stitches and techniques to expand your skills.

โฑ๏ธ

Weekend Treat

Takes 5-7 hours, making it an enjoyable project to finish over a couple of days.

โœจ

Stylish Touch

An elegant detail to elevate any look, combining traditional techniques with contemporary design sensibilities.

About This Moonlit Bralette Crochet Pattern

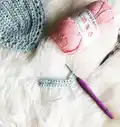
The Moonlit Bralette is an exclusive design that combines functionality with delicate beauty. This pattern uses a double-strand technique with Paintbox Cotton DK yarn to create structured, supportive cups with charming decorative borders. The design features adjustable shoulder straps and a customizable bottom strap that can be tied in front or back, allowing you to personalize the fit and style to your preference.

Moonlit Bralette Crochet Pattern crochet pattern - detailed view of completed project

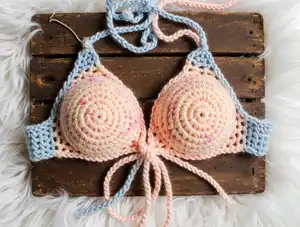
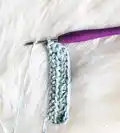
Working with half-double crochet stitches as the foundation, this pattern creates beautiful cup shaping through strategic increases at the top edge. The finishing touches include elegant borders and woven strap details that add both visual interest and structural support.

Why You'll Love This Moonlit Bralette Crochet Pattern

I absolutely love this pattern because it transforms simple crochet techniques into something truly special and wearable! The double-strand method creates a fabric that's both sturdy and soft, giving you confidence in the finished piece. I find the cup construction fascinating - watching the shape develop with each row is so satisfying. Plus, the customizable strap system means you can adjust everything to fit perfectly, which is rare in handmade lingerie patterns. It's empowering to create your own intimate apparel that's uniquely yours!

Moonlit Bralette Crochet Pattern step 1 - construction progress Moonlit Bralette Crochet Pattern step 2 - assembly progress Moonlit Bralette Crochet Pattern step 3 - details and accessories Moonlit Bralette Crochet Pattern step 4 - final assembly and finishing

Switch Things Up

I love customizing this bralette pattern to create different looks! You can easily transform this design by experimenting with yarn colors - try soft pastels for a romantic vibe, bold jewel tones for something striking, or classic neutrals for everyday wear. I've also played with adding beads or small charms along the border for extra sparkle at festivals or beach days.

For a more modest version, I sometimes create a longer body by continuing the cup pattern downward, essentially turning it into a cropped tank top. You could also adjust the coverage by starting with more chains for fuller cups. The strap placement is another fun element to customize - try positioning the shoulder straps wider apart for a different neckline, or create a racerback style by joining them at the center back.

If you want more support, consider adding elastic thread worked into some of the rows, or create a wider bottom band with additional rows before adding the tie. I've even experimented with creating matching bottoms using the same border technique, making a complete crochet swimwear set! The possibilities are endless once you understand the basic construction.

Common Mistakes & How to Fix Them

โœ— Forgetting to work in the very last chain of previous rows at the bottom edge, causing cups to curve incorrectly โœ— Not maintaining consistent tension when holding two strands together, resulting in uneven cup shape and structure โœ— Skipping the CH1 space at the top middle stitch during border rounds, which disrupts the cup's curved edge โœ— Making shoulder straps too short by not trying on during construction, leading to poor fit and uncomfortable wear โœ— Weaving bottom strap inconsistently through the base loops, creating uneven gathering and an unprofessional appearance

Moonlit Bralette Crochet Pattern

Create your own stunning moonlit bralette with this exclusive crochet pattern! This delicate and feminine design features beautiful cup construction with decorative borders and adjustable straps for the perfect fit. Whether you're crafting intimate apparel for yourself or creating a unique handmade gift, this pattern guides you through every stitch with clear instructions. The double-strand technique creates a luxurious, supportive fabric that's both comfortable and stylish, perfect for layering or wearing as a statement piece.

Intermediate 4-5 Hours

Materials Needed for Moonlit Bralette Crochet Pattern

โ€” Main Fabric

  • 01
    2 balls of Paintbox Cotton DK yarn in your choice of color
  • 02
    Two strands held together throughout the project

โ€” Tools Required

  • 01
    4mm crochet hook
  • 02
    Scissors
  • 03
    Tapestry needle for weaving in ends

Progress Tracker

0% Complete

โ€” Cups (Make 2) :

To begin :

CH 14(16,18) for sizes S, M, L

R1 :

HDC in 3rd CH from hook and in every CH after

R2 :

CH2, turn. In same CH work HDC and in each CH until you get to the CH3 space at the top of this row. In this CH3 space, work 3 HDC. Continue HDC in every stitch after. Be sure to place a HDC in the very very last CH of the previous row to keep your cup straight at the bottom

R3 :

CH2, turn. HDC in every stitch until you get to the top where we previously placed 3 HDC. Work HDC, HDC, CH1, HDC in middle stitch of the three, HDC in the next CH. HDC as usual down the row to the bottom

Info :

Repeat Row 3 for 3(5,7) more times depending on size. DO NOT CUT YARN

โ€” Border :

Border Round 1 :

CH4, turn. Skip one CH, work HDC. CH1, skip 1, HDC in next CH until you reach the top where we turn. In the top middle CH, work HDC, CH2, HDC in same stitch. CH1, continue border as usual to very bottom

Border Round 2 :

CH2, turn. Work HDC in each CH1 space and at the top of each HDC. So one HDC in every CH1 space and every HDC. Until you get to the top where the cup turns. In top CH space, work 2 HDC, CH1, 2 HDC. Continue the border like normal down the other side (Each CH1 space and each HDC)

Bottom Border :

CH2, immediately work HDC in the side of the very last HDC of previous border row. Along the bottom, as consistently as you can, work HDC, CH1, skip a space, HDC. Ending with a HDC in side of previous row's first HDC. Cut and tie off

Info :

Make one more cup following the same instructions

โ€” Straps :

Shoulder Straps :

Attach yarn at top of each cup. CH 80

Bottom Strap :

CH 150-200. Weave the strap in and out of your bottom loops. You can choose to have the bow tie in the front or in the back

Assembly Instructions

  • Create both cups following the pattern instructions completely before beginning assembly work
  • Attach shoulder straps by securing yarn at the top center point of each cup and chaining 80 stitches
  • Try on the bralette with shoulder straps attached to determine ideal bottom strap length before crocheting
  • Chain between 150-200 stitches for the bottom strap depending on your measurements and desired tie length
  • Weave the bottom strap through the CH1 spaces along the bottom border of both cups consistently
  • Adjust strap positioning so cups are evenly spaced and symmetrical before securing all ends
  • Weave in all yarn ends securely using tapestry needle, ensuring they won't unravel with wear

Important Notes

  • ๐Ÿ’กAlways hold two strands of yarn together throughout the entire project for proper structure and support
  • ๐Ÿ’กMaintain consistent tension when working with double strands to ensure even cup shaping
  • ๐Ÿ’กDon't forget to work into the very last chain of each row at the bottom edge to keep cups straight
  • ๐Ÿ’กTry on the piece during construction to check fit before completing all straps
  • ๐Ÿ’กThe pattern works for three sizes by adjusting the starting chain: 14 for Small, 16 for Medium, 18 for Large
  • ๐Ÿ’กBottom strap length is adjustable between 150-200 chains depending on body measurements and bow preference

This exclusive Moonlit Bralette pattern brings handmade elegance to your wardrobe with beautiful construction and customizable fit! The double-strand technique creates a supportive, structured fabric while the decorative borders add a delicate feminine touch. Perfect for crafters ready to explore wearable crochet projects, this pattern combines practical construction with stylish design elements. Create something truly special that's uniquely yours! ๐ŸŒ™โœจ

You ask,

we answer.

FAQs

Can I use different yarn weights for this pattern?

While the pattern specifically calls for DK weight yarn held double, you could experiment with other weights. However, you'll need to adjust your hook size and starting chains accordingly. The double-strand technique is important for structure and support, so if using heavier yarn, you might work with a single strand instead.

How do I know which size to make?

The pattern offers three sizes: Small (14 chains), Medium (16 chains), and Large (18 chains). It's best to measure a well-fitting bralette you already own and create a gauge swatch to determine which starting chain count will give you the right cup width.

Can I make the straps longer or shorter?

Absolutely! The shoulder strap measurement of 80 chains is a guideline. Try on your piece during construction and adjust the chain length to fit your body. The bottom strap is also adjustable between 150-200 chains depending on your size and how long you want the ties.

What if my cups aren't symmetrical?

Asymmetry often comes from inconsistent tension or missing the last stitch at the bottom edge. Use stitch markers to track your starting and ending points, and count your stitches each row. If one cup is larger, you may have accidentally added increases.

How should I care for my finished bralette?

Hand wash your cotton bralette in cool water with gentle detergent and lay flat to dry. Avoid wringing or twisting the fabric. Because it's made with natural fiber, it may stretch slightly with wear but should maintain its shape with proper care.