🧢 Beautiful ✨ Detailed πŸ’ Adorable

Miniature Pippi Doll Amigurumi Pattern

Miniature Pippi Doll Amigurumi Pattern
4.9β˜… Rating
4-5 Hours Time Needed
1.9K Made This
βœ‚οΈ

Intermediate Level

Ideal for those with basic knitting experience, featuring slightly more advanced stitches and techniques to expand your skills.

⏱️

Weekend Treat

Takes 5-7 hours, making it an enjoyable project to finish over a couple of days.

🧸

Tiny Treasure

Small, sweet, and gift-worthy creations that fit perfectly in the palm of your hand with detailed charm.

About This Miniature Pippi Doll Amigurumi Pattern

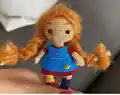
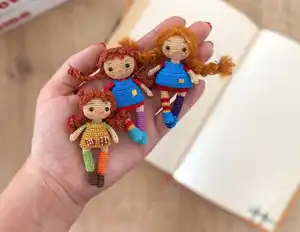
This miniature Pippi doll pattern brings the beloved character to life in an incredibly petite 7 cm size. The pattern guides you through creating a fully articulated doll with separate arms and legs, a charming dress with a decorative apron, tiny shoes, and elaborate hair that can be styled in classic braids. Every detail has been carefully designed to capture the playful spirit of Pippi in miniature form.

Miniature Pippi Doll Amigurumi Pattern crochet pattern - detailed view of completed project

Working with lace yarn and a tiny hook creates a beautifully detailed finish that makes this miniature doll truly special. The pattern includes options for different outfit colors and two hair styling techniques to personalize your creation.

Why You'll Love This Miniature Pippi Doll Amigurumi Pattern

I absolutely love this pattern because it combines the challenge of miniature work with the reward of creating something incredibly precious. The tiny size makes it perfect for gift-giving, ornament-making, or starting a collection of mini characters. I find the detailed construction satisfying, and there's something magical about seeing such a recognizable character come to life at such a small scale. The hair options give creative freedom, and the dress with apron adds that extra touch of charm that makes each doll unique.

Miniature Pippi Doll Amigurumi Pattern step 1 - construction progress Miniature Pippi Doll Amigurumi Pattern step 2 - assembly progress Miniature Pippi Doll Amigurumi Pattern step 3 - details and accessories Miniature Pippi Doll Amigurumi Pattern step 4 - final assembly and finishing

Switch Things Up

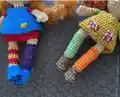
When I work on miniature patterns like this, I love experimenting with different color combinations for the outfit. Instead of the traditional red and green suggested, I've tried pastel versions in soft pink and lavender which create an absolutely dreamy vintage doll aesthetic. You could also go bold with bright turquoise and yellow for a more modern, playful look.

For the hair, I find that using mohair gives the most authentic texture, but I've also experimented with embroidery floss separated into individual strands for ultra-fine detail. If you want really wild hair, try using fuzzy novelty yarn in fun colors like purple or rainbow variegated.

The apron offers wonderful personalization opportunities - I sometimes add tiny cross-stitch designs or use contrasting thread to create decorative edging. You could even crochet a miniature pocket and attach a tiny button for extra charm.

Consider making multiple dolls in different outfit colors to create a collection, or adapt the pattern by changing the dress to pants for a different character interpretation. The beauty of working at this scale is that you can complete several variations quickly and create unique gifts for everyone on your list!

Common Mistakes & How to Fix Them

βœ— Not maintaining consistent tension with lace yarn can result in uneven stitches that are highly visible at miniature scale βœ— Overstuffing the tiny body parts can distort the shape and make the 7 cm doll appear bulky instead of delicate βœ— Forgetting to center the legs properly when joining to body creates an unbalanced doll that won't stand correctly βœ— Placing safety eyes without proper spacing or at wrong rounds makes the facial expression look disproportionate on small head βœ— Not securing mohair hair pieces with glue before braiding causes them to come loose and unravel over time

Miniature Pippi Doll Amigurumi Pattern

Create an adorable miniature Pippi doll standing just 7 cm tall with this detailed amigurumi pattern! This charming project features a complete doll with movable arms and legs, a sweet dress with apron, shoes, and beautiful braided hair. Perfect for creating tiny treasures that capture the whimsical spirit of childhood adventure. The pattern includes step-by-step instructions for every component, from the delicate facial features to the intricate hair styling options, making it a delightful project for crocheters who love miniature work.

Intermediate 4-5 Hours

Materials Needed for Miniature Pippi Doll Amigurumi Pattern

β€” Main Fabric

  • 01
    Lace yarn no. 50 / 20 gr in different colors (skin tone, red, green, orange, dark purple, yellow)
  • 02
    Brands recommended: Altınbaşak, Leylak or similar lace weight yarns
  • 03
    Fiberfill stuffing for filling
  • 04
    Hair yarn or mohair rope for hair styling

β€” Tools Required

  • 01
    Crochet hook 0.55mm / size 22
  • 02
    Crochet hook 3mm (for dress section)
  • 03
    Safety eyes 3mm
  • 04
    Liquid glue
  • 05
    Yarn needle for sewing
  • 06
    Scissors
  • 07
    Stitch markers

Progress Tracker

0% Complete

β€” Arms (Make 2) :

Round 1 :

Skin colour: magic ring 5sc (5)

Round 2 :

5sc inc (10)

Round 3 :

10sc

Round 4 :

sc, sc in 3dc bobble, 8sc

Round 5 :

2sc dec, 6sc (8)

Round 6-8 :

8sc (3 rounds)

Round 9-12 :

Red/green colour: 8sc (7 rounds) and finished. Closed 4 sc

β€” Legs (Make 2) :

Round 1 :

Green+orange/dark purple+yellow/red: magic ring 5sc (5)

Round 2 :

5sc inc (10sc)

Round 3-12 :

10sc (10 rounds)

Round 13-15 :

Skin colours: 10 sc (3 rounds) - filling fiber

β€” Body :

Info :

Make 6 ch and join to the other leg. Let the loops be opposite each other. Let the legs be even. If you want it to be more introverted, combine accordingly. After joining, crochet 10 sc and set starting point. 10+6+10+6 in total (32sc)

Round 1-7 :

Change colour to red/green: 32sc (6 rounds)

Info :

Round 4 BLO - If you're going to do the red suit, that's BLO, the body's going to die, plus four rows of HDC crocheted

Round 8 :

14 sc, dec, 14 sc, dec (30sc)

Round 9 :

3sc dec x 6 (24 sc) - start filling fiber

Round 10-11 :

24 sc (2 rounds)

Round 12 :

2sc dec (18)

Round 13-14 :

18sc (2 rounds)

Round 15 :

Skin colours: Sc dec (12)

Round 16 :

12 sc (1 round)

Info :

Take the beginning of the loop back and center it

β€” Dress :

Info :

Attach the string to the BLO row on the body section. Make 2 ch and make 32 HDC. Complete the round and combine with cc. Repeat 4 times and finish

β€” Head :

Round 31 :

Skin colours: Sc inc x 6 (18)

Round 32 :

2sc inc x 6 (24)

Round 33 :

Sc inc x 12 (36)

Round 34 :

5sc inc x 6 (42)

Round 35 :

6sc inc x 6 (48)

Round 36-43 :

48 sc (8 rounds)

Info :

The 38th and 39th rounds are fitted with a locked eye. Keep a distance of 6sc

Round 44 :

6sc dec

Round 45 :

5sc dec

Round 46 :

4sc dec - start filling fiber

Round 47 :

3Sc dec

Round 48 :

2sc dec

Round 49 :

sc dec

Round 50 :

closed

β€” Shoes :

Round 1 :

magic ring 8sc (8)

Round 2 :

8sc inc (16sc)

Round 3 :

blo: 16sc

Round 4 :

16 sc

Round 5 :

5sc, 3sc dec, 5sc (13)

Round 6 :

5sc, sc dec, 5sc (12)

Round 7 :

FLO: 12sc, cc

Info :

Sew the shoes to the legs

β€” Hair :

Round 1 :

magic ring 6sc (6)

Round 2 :

6sc inc x 6 (12)

Round 3 :

1sc inc x 6 (18)

Round 4 :

2sc inc x 6 (24)

Info :

After that, we will work on RS 24th

Hair Strand 1 :

Make 15 chains, scroll with 14 HDC or cc's

Hair Strand 2 :

10 ch, 9 HDC

Hair Strand 3-5 :

7 ch, 6 HDC (3 times) - Make 6 hairs in the same loop twice

Hair Strand 6 :

5 ch, 4 HDC (1 times)

Hair Strand 7-9 :

7 ch, 6 HDC (2 times) - Make four hairs in the same loop twice

Hair Strand 10 :

10 ch, 9 HDC

Hair Strand 11 :

15 ch, 14 HDC

Hair Strand 12-15 :

35 ch, 34 HDC (4 times)

Hair Strand 16-21 :

25 ch, 24 HDC (6 times)

Hair Strand 22-25 :

35 ch, 34 HDC (4 times)

Info :

Turn the hair over and stick it on the head. Let the bangs come forward. Glue the remaining pieces of hair. Braid long hair

β€” Hair with Mohair Rope (Alternative) :

Info :

Cut the hair rope with the density you want. Usually cutting 12 of them, 10 or 12 centimeters long, triple them into the head and then light glue to secure them. Then braid your hair. Glue the hair to the head as in the photo. Or perpendicular to the hair. Cut it in half and knit

β€” Apron :

Row 1 :

19 Chains make and turn 18 sc make

Row 2 :

2sc inc x 6 (24sc) turn and 1 ch

Row 3 :

4sc, 5 ch and make sc in rs4, 10 sc, 5 ch and make sc in rs4, 4 sc

Row 4 :

1 round 26 sc

Row 5 :

4 sc, 2inc, 14sc, 2inc, 4sc (30 sc)

Row 6 :

4sc inc x 6 (36)

Row 7-12 :

6 rounds 36 sc and finished

Info :

Make SC 1 round around Apron. Patch over the apron with needle and thread. It should be like a pocket. Make it square

Assembly Instructions

  • Sew the completed shoes to the bottom of each leg piece before attaching legs to body
  • Join the two legs to the body by creating a 6 chain bridge between them, ensuring legs are positioned opposite and even
  • Attach the dress to the BLO row on the body section as indicated in the pattern instructions
  • Sew or attach the apron over the dress front, creating a pocket-like appearance with square shaping
  • Insert the safety eyes between rounds 38-39 of the head with 6sc spacing between them before closing
  • Attach the completed hair cap to the head, positioning bangs forward and braiding long strands as desired
  • Sew arms to the sides of the body at shoulder level, ensuring they are symmetrical and positioned evenly

Important Notes

  • πŸ’‘Working with lace yarn and tiny hooks requires excellent lighting and patience for best results
  • πŸ’‘Maintain consistent tension throughout as any irregularities will be highly visible at miniature scale
  • πŸ’‘Use stitch markers to track your rounds, especially when working the head and body sections
  • πŸ’‘Stuff body parts gradually and lightly to maintain the delicate 7cm proportions without distortion
  • πŸ’‘When attaching hair, use liquid glue sparingly to avoid stiffening the yarn or creating visible marks
  • πŸ’‘The pattern offers color variation options for the outfit - choose your combination before starting
  • πŸ’‘Pin all pieces in place before final sewing to ensure proper positioning and balance for standing

This enchanting Miniature Pippi doll pattern captures childhood magic in a perfectly petite 7cm size! The detailed instructions guide you through creating a fully articulated character complete with colorful outfit, tiny shoes, and signature braided hair. Working with lace yarn creates beautifully refined details that make this miniature truly special. Whether you're creating a gift, adding to a collection, or making decorative ornaments, this pattern delivers a charming result. 🧢 Happy crocheting! 🧡✨

You ask,

we answer.

FAQs

What makes this pattern suitable for intermediate level crocheters?

This pattern requires working with very fine lace yarn (no. 50) and a tiny 0.55mm hook, which demands good tension control and experience with miniature work. The construction involves joining multiple small pieces, creating a dress with BLO techniques, and detailed hair assembly that benefits from prior crochet experience.

Can I use regular yarn instead of lace yarn for this pattern?

While you can use regular yarn with an appropriately sized hook, the finished doll will be much larger than the intended 7cm size. The charm of this pattern lies in its miniature proportions, which are achieved specifically with lace weight yarn and tiny hooks.

How do I attach the legs to create an even, balanced body?

Create a 6 chain bridge between the two completed legs, ensuring the loops are opposite each other and legs are positioned evenly. Start crocheting 10 sc on one leg, then work across the chain, continue on the second leg, and back across the chain for a total of 32 sc that forms the base of the body.

What's the difference between the two hair methods provided?

The first method involves crocheting a hair cap with various length chain strands that can be braided, giving a more structured look. The mohair rope alternative involves cutting 10-12cm pieces and attaching them directly to the head with glue before braiding, creating a softer, more natural hair texture.

How should I position the safety eyes on such a tiny head?

Place the 3mm safety eyes between rounds 38 and 39 of the head, keeping exactly 6 single crochets spacing between them. It's crucial to position them correctly before closing the head, as the small scale makes adjustments difficult once secured.

Can I make this doll larger by using thicker yarn?

Yes, you can scale up the pattern by using DK or worsted weight yarn with a 3-4mm hook. However, you'll need to adjust the safety eye size proportionally and recalculate stuffing amounts. The finished size will be approximately 15-20cm depending on your yarn choice.