🧶 Beautiful ✨ Detailed 💝 Adorable

Highline Wristlet Keychain Crochet Pattern

Highline Wristlet Keychain Crochet Pattern
4.5★ Rating
15-30 Minutes Time Needed
1.1K Made This
✂️

Beginner Friendly Level

Perfect for those just starting their sewing journey, with clear instructions and simple techniques

⏱️

Bite-Sized Project

Complete in under 2 hours—quick, fun, and perfect for a little creative escape.

🧣

Snug Essential

Everyday comfort with practical charm, designed for both functionality and style through changing seasons.

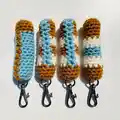
About This Highline Wristlet Keychain Crochet Pattern

Highline Wristlet Keychain Crochet Pattern crochet pattern - detailed view of completed project

At only 10 yards per keychain, this pattern is perfect for using up yarn scraps and experimenting with different cotton yarn brands. The fast completion time makes it ideal for crafters who need quick projects for gifts or market sales.

Why You'll Love This Highline Wristlet Keychain Crochet Pattern

I absolutely love this pattern because it's one of those rare projects that combines speed, practicality, and style all in one! The fact that I can whip up a beautiful wristlet in just 15 minutes means I always have handmade gifts ready when I need them. I'm obsessed with how the cone stitch creates that gorgeous textured look reminiscent of old train tracks—it's such a unique detail that people always comment on. The versatility is incredible too; I've made these in team colors for sports fans, holiday themes for seasonal gifts, and elegant neutrals for everyday use. Plus, using up yarn scraps while creating something truly useful feels amazing. Whether I'm making them for craft fairs or as quick thank-you gifts, these wristlets never fail to impress, and the option to add a leather wrap takes them from cute to absolutely stunning!

Highline Wristlet Keychain Crochet Pattern step 1 - construction progress Highline Wristlet Keychain Crochet Pattern step 2 - assembly progress Highline Wristlet Keychain Crochet Pattern step 3 - details and accessories Highline Wristlet Keychain Crochet Pattern step 4 - final assembly and finishing

Switch Things Up

I love experimenting with different variations of the Highline Wristlet to keep things fresh and exciting! One of my favorite tweaks is playing with bold color blocking—instead of subtle color changes, I go for high-contrast combinations like black and neon pink, or navy and gold, which really make that train track texture pop. I've also tried using velvet yarn for a luxuriously soft and squishy version that feels amazing to wear, though it does snag more easily than cotton.

For a more bohemian vibe, I sometimes add small metal charms or beads to the swivel hook before attaching it, giving each wristlet a personalized touch. I've even experimented with making longer versions by adding 10-15 extra foundation chains, which creates more of a bracelet-style wristlet that wraps around twice—perfect for smaller wrists or for people who prefer extra security.

Another fun modification I enjoy is creating themed sets for specific occasions. For weddings, I make them in the bride's colors and attach custom leather tags with the couple's initials and wedding date stamped on them. For sports teams, I match the exact team colors and sometimes add tiny team logo charms. During the holidays, I create festive combinations like red and white for Christmas, orange and black for Halloween, or pastels for Easter, making them perfect seasonal gifts or market items that sell incredibly fast!

Common Mistakes & How to Fix Them

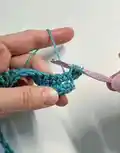
✗ Making the foundation chain too tight, which makes it difficult to work into and reduces the stretchiness of the finished wristlet 
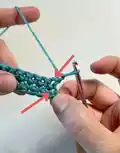
✗ Not maintaining consistent tension during the cone stitch rows, resulting in an uneven textured appearance across the pattern ✗ Forgetting to work on the right side for both rows 3 and 4, which disrupts the visual symmetry of the design ✗ Pulling too loosely when seaming the ends together and attaching the swivel hook, causing a sloppy connection that weakens over time 
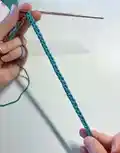
✗ Skipping the step to flip the long tail foundation chain over before working Row 1, leading to confusion and incorrect stitch placement

Highline Wristlet Keychain Crochet Pattern

Create your own trendy wristlet keychain with this fast and easy crochet pattern! Perfect for beginners and experienced crocheters alike, this versatile accessory takes only 15 minutes to make and uses just 10 yards of worsted cotton yarn. The Highline Wristlet features a unique cone stitch texture that creates a beautiful train track design, and you can customize it with 1, 2, or 3 color combinations. Choose between a standard version with a swivel hook or an elevated leather-wrapped version for a more polished look. These practical keychains make excellent last-minute gifts, market inventory items, or personal accessories that are both functional and fashionable.

Beginner Friendly 15-30 Minutes

Materials Needed for Highline Wristlet Keychain Crochet Pattern

— Main Fabric

  • 01
    Worsted weight (4) 100% cotton yarn - approximately 10-11 yards per keychain
  • 02
    Lion Brand 24/7 Cotton in colors: Amber, Ecru, Bay Leaf, or Jade (186 yards/3.5 oz per skein)
  • 03
    WeCrochet Dishie cotton yarn as an alternative option
  • 04
    For multi-colored versions: 5 yards of each color for 2-color designs or 3-4 yards each for 3-color designs

— Tools Required

  • 01
    Crochet hook G6 - 4.00 mm
  • 02
    Yarn needles for weaving in ends
  • 03
    Tape measure
  • 04
    Scissors
  • 05
    Swivel hook with 1/2-inch ring (for standard version)
  • 06
    Swivel hook with 1-inch ring (for leather-wrapped version)
  • 07
    Leather tag 2.5 x 1 inch, approximately 2mm thickness (for leather-wrapped version)
  • 08
    Leather hole punch tool or awl (for leather-wrapped version)

Progress Tracker

0% Complete

— Foundation Chain:

Long Tail Foundation:

Measure out 27 inches from yarn end (24 inches + 3 inches tail). Make slip knot at 27-inch mark and place on hook. Wrap long tail over hook from front to back, YO with working yarn and pull through 2 loops for first ch. Repeat for total of 32 foundation chs.

Alternative Foundation:

Place slip knot on hook leaving 3-4 inch tail, ch 32.

— Row 1 (RS):

Setup:

Ch 1. Flip long tail foundation ch over to work into backside under 2 loops of each foundation st. (If using regular ch, work into back bump of each ch starting with 2nd ch from hook).

Stitching:

Work 1 Sc into each st across row. Ch 1 and turn work. (32)

— Row 2 (WS):

Stitching:

Sc in each st across row. Ch 1 and turn work. (32)

— Row 3 (RS):

Cone Stitch Row:

Work a Cone st into each st across row. Ch 1 and fasten off. Do not turn work. (32)

Info:

Cone st: YO and insert hook under both loops of indicated st, YO and pull up loop. YO and insert hook in same st but 2 rows below, YO and pull up loop. Pull to adjust 5 loops on hook to same height, YO and pull through all 5 loops on hook.

— Row 4 (RS):

Final Row:

Place slip knot on hook and join to first st with standing Sc (counts as st). Work Sc into each remaining st in row. Do not fasten off. (32)

— Standard Version Seaming (with 1/2-inch swivel hook):

Preparation:

Turn work so RS of end of Row 4 faces you. Fold wristlet under in half so WSs are together and ends are aligned at top. Work with tighter tension than normal for secure connection.

First Seam St:

Work first half of Sc2tog by inserting hook into side of final st at end of Row 4 and side of first st of Row 4 on other end, YO and pull up loop through both layers (2 loops on hook). Insert hook again into both layers in space between first insertion point and center point of wristlet ends, place swivel hook ring on hook with clasp hanging down, YO and pull up loop catching ring, YO and pull through all 3 loops on hook.

Second Seam St:

Working into side of Cone sts at ends of Row 3, work 1 Sc through both layers and also through ring of swivel hook.

Third Seam St:

Work first half of Sc2tog by inserting hook into both layers in space between Second Seam St and end sts from Row 1 and also through swivel hook ring, YO and pull up loop (2 loops on hook). Insert hook into end sts of Row 1 on both layers (do not insert through swivel hook ring), YO and pull through all 3 loops on hook. Ch 1 and fasten off. Weave in all tails.

— Leather Wrapped Version Seaming (with 1-inch swivel hook):

Preparation:

Complete Rows 1-4 as instructed. Turn work so RS of end of Row 4 faces you. Fold wristlet under in half so WSs face each other and ends are together at top.

First Seam St:

Work Sc2tog by inserting hook into side of final st at end of Row 4 and side of first st of Row 4 on other end, YO and pull up loop through both layers (2 loops on hook). Insert hook through both layers in space between first insertion point and center point of wristlet ends, YO and pull up loop, YO and pull through all 3 loops on hook.

Second Seam St:

Working into side of Cone sts at ends of Row 3, work 1 Sc through both layers.

Third Seam St:

Work Sc2tog by inserting hook into both layers in space between Second Seam St and end sts from Row 1, YO and pull up loop (2 loops on hook). Insert hook into end sts of Row 1 for both layers, YO and pull through all 3 loops on hook. Ch 1 and fasten off. Weave in all tails.

Leather Attachment:

Use leather tag 2.5 inches long by 1 inch wide. Using leather hole punch or awl, make four holes across 1-inch ends of strip. Attach 10-inch length of yarn to WS of wristlet near seamed edges, 1/4 inch from seam.

Final Assembly:

Thread leather strip through 1-inch ring of swivel hook and wrap ends of leather around seamed ends of wristlet. Sew through holes of both layers working back and forth through all holes to attach. Knot off on WS of work and weave in tail to finish.

— Multi-Color Options:

Color Changes:

For multi-colored versions, fasten off and weave ends before each color change. Always weave tail into matching color for clean appearance.

Row 2 or 4 Color Change:

Join new color with standing Sc in first st of row (counts as st).

Row 3 Color Change:

Join yarn to first st with slip st (does not count as st) and begin making Cone sts starting in first st where you joined.

Assembly Instructions

  • For standard version: fold the completed wristlet in half with wrong sides facing each other and ends aligned at the top
  • Work three seaming stitches through both layers while simultaneously attaching the swivel hook ring to create a secure connection
  • Ensure the swivel hook clasp hangs downward during attachment so it opens properly when in use
  • For leather-wrapped version: complete the three-stitch seam first without the swivel hook to join the wristlet ends together
  • Punch four evenly spaced holes along each 1-inch end of the leather strip using a leather hole punch or awl
  • Thread the leather strip through the 1-inch swivel hook ring, then wrap both ends around the seamed portion of the wristlet
  • Using a 10-inch length of matching yarn, sew back and forth through the punched holes and both layers of the wristlet to secure the leather wrap in place

Important Notes

  • 💡The long tail foundation chain creates a stretchier edge than regular chains, which is essential for comfortable wrist wear
  • 💡Gauge is not critical for this project, but foundation chain should measure approximately 8 inches before working Row 1
  • 💡Both Row 3 and Row 4 are worked on the right side of the work to create matching visual appearance on the outer edges
  • 💡Keep seaming stitches tighter than normal tension to ensure the connection to the swivel hook remains secure with use
  • 💡For the leather-wrapped version, choose leather that is thick enough to be sturdy but flexible enough to bend around the wristlet
  • 💡This pattern works beautifully with yarn scraps and is perfect for customizing with team colors, holiday themes, or wedding palettes
  • 💡Each wristlet uses only 10-11 yards of yarn, making it an economical project that's ideal for market inventory or gift-giving

The Highline Wristlet Keychain pattern brings together simplicity and style in one fast, satisfying project! Inspired by the historic Durango & Silverton railroad route through Colorado's stunning canyon landscapes, this design captures the essence of vintage train tracks with its unique cone stitch texture. Whether you're creating solid-color classics or vibrant multi-colored combinations, each wristlet takes shape in just 15 minutes and uses minimal yarn. The optional leather-wrapped version elevates this practical accessory into a premium handmade piece perfect for gifts or personal use. With endless color possibilities and two finishing options, you'll find yourself making these trendy keychains on repeat! 🧶✨

You ask,

we answer.

FAQs

Can I use a different weight of yarn for this pattern?

While the pattern is designed for worsted weight (4) cotton yarn, you could experiment with other weights by adjusting your hook size accordingly. Keep in mind that using a different weight will change the finished size of the wristlet, and you may need to add or subtract foundation chains to achieve a comfortable fit around your wrist.

What if I don't know how to do the long tail foundation chain?

No problem! The pattern includes detailed written instructions and a photo tutorial for the long tail foundation chain. Alternatively, you can use a regular chain foundation—just note that it may be slightly less stretchy than the long tail version. Make sure to keep your chains loose for easier working.

How do I make the cone stitch if I've never done it before?

The cone stitch is thoroughly explained in the Special Stitches section with step-by-step written instructions and helpful photos. It's essentially a combination of a regular stitch and a spike stitch worked into the same location but two rows below. The photos show exactly where to insert your hook and how the finished stitch should look.

Can I make these wristlets without the swivel hook hardware?

While the pattern is specifically designed to attach to swivel hooks for keychain functionality, you could modify the seaming instructions to simply join the ends together without hardware. However, the swivel hook is what makes these practical as wristlet keychains, and they're inexpensive and widely available at craft stores.

How much yarn do I need if I want to make multiple wristlets?

Each single-color wristlet requires only 10-11 yards of worsted weight cotton yarn. For multi-colored versions, you'll need approximately 5 yards of each color for a 2-color design, or 3-4 yards of each color for a 3-color combination. This makes the pattern perfect for using up yarn scraps!

Where can I find the leather supplies for the wrapped version?

Leather strips, hole punches, and swivel hooks with 1-inch rings can be found at most craft stores in the leatherworking section. You can also find these supplies online. The pattern recommends leather that's approximately 2mm thick—sturdy enough to hold its shape but flexible enough to bend around the wristlet comfortably.