🧢 Beautiful ✨ Detailed πŸ’ Adorable

Crochet Corset Belt Pattern

Crochet Corset Belt Pattern
4.0β˜… Rating
8-12 Hours Time Needed
3.5K Made This
βœ‚οΈ

Intermediate Level

Ideal for those with basic knitting experience, featuring slightly more advanced stitches and techniques to expand your skills.

⏱️

All-Day Adventure

Requires 8-10 hours, ideal for a full day of immersive knitting.

✨

Stylish Touch

An elegant detail to elevate any look, combining traditional techniques with contemporary design sensibilities.

About This Crochet Corset Belt Pattern

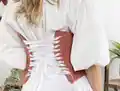
This corset belt pattern brings Victorian elegance into modern fashion with authentic construction techniques. Featuring a professional steel busk closure, optional spiral steel boning for structure, and adjustable ribbon lacing, this piece is as functional as it is beautiful. The pattern includes six size options and uses specialized stitches like linked double crochet and half double crochet back bar to create a sturdy yet flexible fabric that molds beautifully to your waist.

Crochet Corset Belt Pattern crochet pattern - detailed view of completed project

Why You'll Love This Crochet Corset Belt Pattern

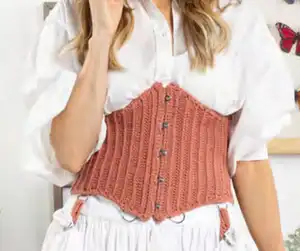
I absolutely love this pattern because it combines practical fashion with authentic historical construction techniques! The linked double crochet creates such a beautiful, professional finish that looks store-bought. What excites me most is how customizable it is - you can make it as simple or elaborate as you want with the optional boning and D-rings. The way the corset actually functions with real hardware makes you feel like you're creating something truly special, not just another crochet project. Plus, the satisfaction of lacing it up and seeing how perfectly it fits is incredibly rewarding!

Crochet Corset Belt Pattern step 1 - construction progress Crochet Corset Belt Pattern step 2 - assembly progress Crochet Corset Belt Pattern step 3 - details and accessories Crochet Corset Belt Pattern step 4 - final assembly and finishing

Switch Things Up

I love experimenting with different color combinations for this corset belt! While the pattern uses a beautiful neutral Fawn shade, imagine how stunning it would look in deep burgundy, forest green, or even a bold jewel tone like sapphire blue. You could also create a two-tone effect by using one color for the front shaping sections and another for the back.

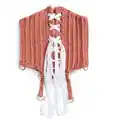
For a truly unique piece, I sometimes add decorative elements during the finishing stage. Small crocheted flowers, metallic thread woven through the eyelets, or even tiny beads sewn along the edges can elevate the design. If you're making this for a Renaissance faire or steampunk event, consider using leather cord instead of satin ribbon for the lacing - it completely changes the aesthetic!

Another fun modification I enjoy is adjusting the width. While the pattern creates a classic corset belt width, you could easily add more foundation chains and additional rows to create a longer underbust corset. Just remember to purchase additional boning and a longer busk to accommodate the extra length. The versatility of this pattern means you can truly make it your own! ✨

Common Mistakes & How to Fix Them

βœ— Skipping the gauge swatch can result in an ill-fitting corset that's either too tight or too loose for your waist measurement βœ— Not maintaining consistent tension with linked double crochet stitches creates an uneven fabric texture that looks unprofessional and affects the fit βœ— Forgetting to work in front loops only during specified rows will change the texture and prevent proper shaping of the corset βœ— Placing the steel busk incorrectly or too close to the edge causes the fabric to pucker and prevents smooth closure βœ— Rushing through the eyelet rows without checking spacing results in uneven lacing holes that make the back lacing look crooked

Crochet Corset Belt Pattern

Create your own stunning corset belt with this detailed crochet pattern! This fashionable accessory features authentic corset construction with a steel busk closure, optional boning for structure, and adjustable lacing at the back. Perfect for adding a vintage-inspired touch to any outfit, this belt can be customized to fit waist sizes from 23 to 50 inches. The pattern uses linked double crochet and half double crochet back bar techniques to create a beautiful textured fabric that's both flexible and supportive.

Intermediate 8-12 Hours

Materials Needed for Crochet Corset Belt Pattern

β€” Main Fabric

  • 01
    Bernat Maker bulky weight yarn in Fawn (06013) color
  • 02
    245-568 yards depending on size (XS/S through 4/5XL)

β€” Tools Required

  • 01
    Size U.S. G/6 (4mm) crochet hook
  • 02
    Yarn needle
  • 03
    Locking stitch marker
  • 04
    10 inch (25.5 cm) steel corset busk
  • 05
    Approximately 10 yards (9.1 m) of 1/2 inch (1.5 cm) wide satin ribbon for lacing
  • 06
    Optional: Eight 1 inch (2.5 cm) D-rings for skirt hikes
  • 07
    Optional: Two pieces of 1/4 inch spiral steel boning 5 inches (12.5 cm) long
  • 08
    Optional: Four pieces of 1/4 inch spiral steel boning 7 inches (18 cm) long

Progress Tracker

0% Complete

β€” LEFT HALF (Busk Pin Side) :

Foundation Chain :

Ch 46

β€” Front Shaping :

1st row (RS) :

1 dc in 3rd ch from hook. 1 lnkdc in each ch to end of chain. Turn. (44 dc)

2nd row (WS) :

Ch 1. Working in front loops only, 1 sc in each dc to end of row. Turn. PM at end of row.

3rd row :

Ch 1. 1 sc in each sc to end of row. Turn.

4th row (WS) :

Ch 1. Working in front loops only, 1 hdc in each sc to end of row. Turn.

5th row :

Ch 1. 1 hdchb in each hdc to end of row. Turn.

6th row :

Ch 1. 1 hdchb in first hdchb. Hdchb2tog. 1 hdchb in each hdchb to last 3 hdchb. Hdchb2tog. 1 hdchb in last hdchb. Turn. (42 hdchb)

7th to 14th rows :

Rep 5th and 6th rows 4 times more. (34 hdchb)

15th row :

Ch 1. 1 hdchb in each hdc to end of row. Turn.

Info :

Rep last row until work from marked row measures approx 5Β½ (7Β½-9Β½-11Β½-14Β½-16Β½)" [14 (19-24-29-37-42) cm], ending on a WS row.

β€” Back Shaping :

1st row (RS) :

Ch 1. 1 hdchb in first st. 2 hdchb in next st. 1 hdchb in each st to last 2 hdchb. 2 hdchb in next hdchb. 1 hdchb in last hdchb. Turn. (36 hdchb)

2nd row :

Ch 1. 1 hdchb in each hdchb to end of row. Turn.

3rd to 10th rows :

Rep 1st and 2nd rows 4 times more. (44 hdchb)

β€” Eyelets :

1st row (RS) :

Ch 1. 1 sc in each of first 3 hdchb. *Ch 2. Skip next 2 hdchb. 1 sc in each of next 2 hdchb. Rep from * to last hdchb. 1 sc in last hdchb. Turn.

2nd row :

Ch 1. 1 sc in each of first 3 sc. *2 sc in next ch-2 sp. 1 sc in each of next 2 sc. Rep from * to last sc. 1 sc in last sc. Turn.

3rd row :

Ch 2. Working in front loops only, 1 dc in first st. 1 lnkdc in each st to end of row. Turn.

4th row :

As 3rd row. Fasten off.

Info :

Sew final row to unworked loops of 2nd row to form back facing.

β€” RIGHT HALF (Busk Hook Side) :

Foundation Chain :

Ch 45

β€” Front Shaping :

1st row (RS) :

1 sc in 2nd ch from hook. 1 sc in each ch to end of chain. Turn. (44 sc)

2nd row :

Ch 1. 1 sc in each of first 5 sc. (Ch 2. Skip next 2 sc. 1 sc in each of next 6 sc) 4 times. Ch 2. Skip next 2 sc. 1 sc in each of last 5 sc. Turn.

3rd row :

Ch 2. 1 dc in first sc. 1 lnkdc in each of next 4 sc. (2 lnkdc in next ch-2 sp. 1 lnkdc in each of next 6 sc) 4 times. 2 lnkdc in next ch-2 sp. 1 lnkdc in each of last 5 sts. Turn.

Info :

Work from 4th row to end as given for Left Half.

Assembly Instructions

  • For Right Front Busk: Stretching edge slightly, insert loops of corset busk through ch-2 spaces worked in 2nd row, then sew foundation chain to unworked back loops of 3rd row.
  • For Left Front Busk: With WS facing up and stretching edge slightly, insert pins of corset busk up between sc worked in 2nd row as shown in diagram.
  • Sew unworked loops of foundation chain to unworked back loops of 3rd row on left side.
  • With RS facing, join yarn with sl st to far right edge of work and work 1 row of sc evenly to opposite edge. Fasten off. Repeat for remaining edges on both pieces.
  • For optional boning: Create boning casings by placing sl st on hook with working yarn behind boning, then yoh and draw through loop repeatedly until length is covered.
  • Following placement diagram, whipstitch boning casing to hdchb ridge on WS of work, ensuring boning is at least 1/2 inch from edge.
  • For optional D-rings and skirt hikes: Ch 22, work 1 dc in 3rd ch from hook and 1 lnkdc in each ch to end. Fold each edge around D-ring and whipstitch in place.

Important Notes

  • πŸ’‘The corset is designed to fit with no ease - fit is adjustable based on gap allowed at center back lacing
  • πŸ’‘Gauge is critical: 20 hdchb and 13 rows should equal 4 inches (10 cm) for proper fit
  • πŸ’‘Ch 2 at beginning of row does not count as a stitch throughout the pattern
  • πŸ’‘Numbers for each size are color-coded throughout the pattern - when only one number appears in black, it applies to all sizes
  • πŸ’‘Place stitch marker at end of 2nd row and measure from this marked row for accurate length
  • πŸ’‘Work optional D-rings into lower edge with 3 sc around flat edge of each ring during edging
  • πŸ’‘Ensure steel boning is positioned at least 1/2 inch from edge of work to prevent damage to fabric

This sophisticated Crochet Corset Belt pattern brings authentic Victorian styling to your modern wardrobe! With professional construction techniques including a steel busk closure, optional boning, and adjustable lacing, you'll create a truly functional and beautiful accessory. The pattern's detailed instructions guide you through specialized stitches to achieve a store-quality finish that you'll be proud to wear or gift. Available in six sizes to fit waists from 23 to 50 inches, this versatile piece works perfectly for costumes, festivals, or adding dramatic flair to everyday outfits. 🧢✨

You ask,

we answer.

FAQs

What is the difference between the Left Half and Right Half of the corset?

The Left Half features the pin side of the busk closure and starts with linked double crochet, while the Right Half has the hook side with chain-2 spaces worked into the second row to accommodate the busk loops. They're constructed slightly differently to accommodate the specific hardware on each side.

Is the steel boning required or can I skip it?

The steel boning is optional but highly recommended for structure and support. Without it, the corset will still be wearable but won't have the same shaping ability or support. If you plan to wear it as a functional garment rather than just decorative, the boning makes a significant difference.

How do I know which size to make?

The corset is designed to fit with no ease, meaning it should match your actual waist measurement when laced closed. Choose the size based on your desired finished waist measurement, keeping in mind you can adjust the fit by leaving a larger or smaller gap at the back lacing.

What does 'hdchb' mean and how do I work this stitch?

Hdchb stands for half double crochet back bar. You work one hdc into the horizontal bar below the space normally worked, which is created by the previous hdc row at the front of the work. The pattern includes a diagram showing exactly where to insert your hook.

Can I use a different yarn weight for this pattern?

It's not recommended to substitute yarn weight as this will significantly change the gauge and sizing. The pattern is specifically designed for bulky weight yarn to create the proper structure and support. If you use different yarn, you'll need to recalculate all measurements and possibly adjust the busk size.

Where can I purchase the corset busk and other hardware?

Corset busks, spiral steel boning, and D-rings can be purchased from corset-making supply stores online, fabric stores with notions sections, or craft stores that carry costume-making supplies. Make sure to get the exact sizes specified in the pattern for proper fit.