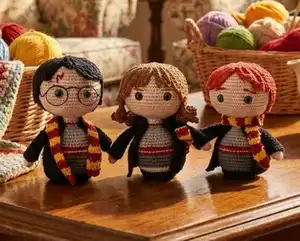
Bring the magic of Hogwarts to life with this enchanting Harry Potter trio amigurumi pattern! Create Harry, Ron, and Hermione as adorable 12cm dolls, each with their signature features - Harry's lightning scar and iconic glasses, Ron's ginger hair, and Hermione's beautiful brown locks. Complete with Gryffindor robes, house scarves, and tiny details that capture each character's personality, this pattern is perfect for any Potterhead who loves to crochet. These pocket-sized wizards make wonderful gifts or collectibles for fans of all ages.
Progress Tracker
0% Complete
— Body of Harry & Ron :
Magic Ring :
With black yarn, make 6sc in a magic ring
Row 2 :
(1sc, 1 inc) x 6 (18)
Row 3 :
(2sc, 1 inc) x 6 (24)
Row 4 :
(1st row of the body): 24sc
Row 6 :
Using Dark grey yarn: (3sc, 1 inc) x 6 (30)
Row 7 :
(2sc, 1 inc, 2sc) x 6 (36)
Row 8 :
(5sc, 1 inc) x 6 (42)
Info :
Sew the button onto the base
Row 9 to 11 :
42sc in each row
Row 12 & 13 :
(Using Ruby yarn): 42sc in each row
Row 14 :
(light grey) (5 sc and 1 dec) x 6 (36)
Info :
Work backstitch in yellow yarn between rows 12 & 13
Row 16 :
(2sc, 1 dec, 2sc) x 6 (30)
Row 18 :
(3sc and 1 dec) x 6 (24)
Row 20 :
(2sc and 1 dec) x 6 (18)
Row 21 :
1sc in each stitch (18)
Info :
Fill the body. When working the next rows finish filling firmly
Row 22 :
(white yarn): (1sc, 1 dec) x 6 (12)
Row 23 & 24 :
(skin colour): 12sc in each row
Info :
Using Ruby yarn make back stitch between rows 21 & 22
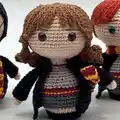
— Body of Hermione :
Magic Ring :
With black yarn, make 6sc in a magic ring
Row 2 :
(1sc, 1 inc) x 6 (18)
Row 3 :
(2sc, 1 inc) x 6 (24)
Row 4 :
(1st row of the body): 24sc
Info :
Cut the yarn and change to skin colour
Row 6 :
BLO (in the back loop only): (3sc, 1 inc) x 6 (30)
Row 7 :
(2sc, 1 inc, 2sc) x 6 (36)
Info :
Sew the button to the bottom of the base
Row 8 :
(Dark grey): (5sc, 1 inc) x 6 (42)
Row 9 to 11 :
42sc in each row
Row 12 & 13 :
(Ruby yarn): 1sc in each stitch (42)
Row 14 :
(Light grey yarn): (5sc, 1 dec) x 6 (36)
Info :
Work backstitch in yellow between rows 12 and 13
Row 16 :
(2sc, 1 dec, 2sc) x 6 (30)
Row 18 :
(3sc and 1 dec) x 6 (24)
Row 20 :
(2sc and 1 dec) x 6 (18)
Info :
Fill the body. When working the next rows finish filling firmly
Row 22 :
(white yarn): (1sc, 1 dec) x 6 (12)
Row 23 & 24 :
(skin colour): 12sc
Info :
Using Ruby yarn make back stitch between rows 21 & 22
— Head (Same for All 3 Dolls) :
Row 26 :
(3sc, 1 inc) x 6 (30)
Row 27 :
(2sc, 1 inc, 2sc) x 6 (36)
Row 28 :
(5sc, 1 inc) x 6 (42)
Row 29 :
(3sc, 1 inc, 3sc) x 6 (48)
Row 30 :
(7sc, 1 inc) x 6 (54)
Row 31 to 39 :
54sc in each row
Infos :
Place a marker between rows 34 & 35 for Harry's eyes, between rows 35 & 36 for Ron and Hermione. Place eyes after row 39 with 7 stitches between them
Row 40 :
(7sc, 1 dec) x 6 (48)
Row 41 :
(3sc, 1 dec, 3sc) x 6 (42)
Row 42 :
(5sc, 1 dec) x 6 (36)
Row 43 :
(2sc, 1 dec, 2sc) x 6 (30)
Row 44 :
(3sc, 1 dec) x 6 (24)
Info :
Put in the stick and fill the head (if not using stick fill neck very firmly)
Row 45 :
(2sc, 1 dec) x 6 (18)
Row 46 :
(1sc, 1 dec) x 6 (12)
Info :
Cut thread and close remaining stitches using darning needle
— Eyebrows :
Hermione & Harry :
Using Brown (Hermione) and Black (Harry): 1 stitch above eye, make long stitch over 3 stitches
Ron :
Using Rust: 2 stitches above eye, make long stitch over 3 stitches to one side and 1 stitch down
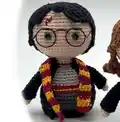
Harry's Scar :
In ruby make scar as shown in photograph
— Harry's Hair (Black) :
Magic Ring :
6sc in magic ring
Row 1 :
(1 inc) x 6 (12sc)
Row 2 :
(1 inc) x 12 (24sc)
Strands :
Make 24 total strands: 11 strands of 16ch, 1 strand of 14ch, 1 strand of 13ch, 1 strand of 12ch, 7 strands of 8ch (fringe), 1 strand of 12ch, 1 strand of 13ch, 1 strand of 14ch
Infos :
Starting in last stitch of 24sc make first strand (16ch). From 2nd chain from hook make 1sc in each chain. Close with sl.st. Continue making strands in next stitches until circle is full
Placement :
Pin center top of hair to head center. Count 8 stitches on each side of eyes and position first 12ch strand. Place all strands as shown, then glue carefully with textile glue (don't glue over scar, only glue strands 12ch-14ch partially for glasses)
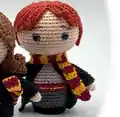
— Ron's Hair (Rust) :
Magic Ring :
6sc in magic ring
Row 1 :
(1 inc) x 6 (12sc)
Row 2 :
(1 inc) x 12 (24sc)
Strands :
Make 24 total strands: 12 strands of 16ch, 2 strands of 14ch, 8 strands of 9ch (fringe), 2 strands of 14ch
Infos :
Starting in last stitch of 24sc make first strand (16ch). From 2nd chain from hook make 1sc in each chain. Close with sl.st. Continue making strands until circle is full
Placement :
Pin center top of hair to head center. Place 1st fringe strand 6 stitches above eye, work same on other side with 4 strands each side. Glue strands with textile glue (can leave some partially glued)
— Hermione's Hair (Brown) :
Magic Ring :
6sc in magic ring
Row 1 :
(1 inc) x 6 (12sc)
Row 2 :
(1 inc) x 12 (24sc)
Strands :
Make 24 total strands: 12 strands of 22ch, 1 strand of 20ch, 1 strand of 19ch, 1 strand of 13ch, 1 strand of 11ch, 4 strands of 7ch (middle fringe), 1 strand of 11ch, 1 strand of 13ch, 1 strand of 19ch, 1 strand of 20ch
Infos :
For longest strands (22, 20, 19ch): make chains, from 2nd chain from hook work 3sc in next 3ch then 1sc in each chain to end. For shortest strands (13, 11, 7ch): from 2nd chain from hook make 1sc in each chain to end. Starting first strand: make 22ch, from 2nd ch work 3sc in next 3ch, continue 1sc in each stitch to end, close with sl.st
Placement :
Pin center of circle to top center of head. Place 4 fringe strands in front and 19ch strands on 5th stitch from each eye. Place strands on back, then glue carefully with textile glue
— Cape :
Starting Chain :
Using black yarn: Leave long thread for sewing, make 19ch. From 2nd chain from hook
Row 2 :
5sc, 1 inc, 6sc, 1 inc, 5sc (20sc)
Row 3 :
10sc, 1 inc, 9sc (21sc)
Row 5 :
(2sc, 1 inc) x 3, 3sc (1 inc, 2sc) x 3 (27sc)
Row 7 :
(3sc, 1 inc) x 6, then 3sc (33sc)
Row 8 to 15 :
33sc in each row
Infos :
End each row with 1ch and turn. Cut yarn and cast off. Place cape below ruby stitching line on jersey, stitch around to attach to body
— Sleeves :
Starting Chain :
Black: Make 8ch and close in cycle with sl.st (leave long thread for sewing)
Row 1 & 2 :
8sc in each row
Row 3 :
(3sc, 1 inc) x 2 (10sc)
Row 4 & 5 :
10sc in each row
Row 6 :
(4sc, 1 inc) x 2 (12sc)
Row 9 :
(5sc, 1 inc) x 2 (14sc)
Row 10 & 11 :
14sc in each row
Info :
Cut yarn and cast off
— Arms :
Magic Ring :
Using skin colour: Make 4sc in magic ring
Row 2 to 9 :
8sc in each row
Infos :
Cut thread and cast off. Pass arm through sleeve using hook to help. Stitch arm to sleeve so it doesn't escape. Position cape on body, find correct sleeve placement and sew in place
— Scarf :
Starting Chain :
Start using Ruby yarn: Make 4ch
Row 1 :
From 2nd ch from hook, work 1sc in each stitch (3sc) 1ch and turn
Row 2 :
3sc and change to yellow, 1ch (in new colour) and turn
Infos :
Repeat 2 rows in yellow, carrying ruby thread behind. Continue repeating 2 rows of each colour, carrying other colour behind until required length (about 18cm). Cast off and sew in ends
This enchanting Mini Harry Potter Trio pattern brings the magic of Hogwarts right into your hands! Designed with love for Potterheads and crochet enthusiasts alike, this pattern captures the essence of Harry, Ron, and Hermione in adorable 12cm form. Each character features unique details that make them instantly recognizable - from Harry's lightning scar and glasses to Ron's ginger locks and Hermione's beautiful curls. The authentic Gryffindor robes and house scarves add that perfect magical finishing touch. Whether you're creating these for yourself or as a gift for a fellow wizard, you'll love watching these beloved characters come to life one stitch at a time. Mischief managed! 🧙♂️✨