🧢 Beautiful ✨ Detailed πŸ’ Adorable

Handy Dandy Lip Balm Holder Pattern

Handy Dandy Lip Balm Holder Pattern
3.9β˜… Rating
1-1.5 Hours Time Needed
3.4K Made This
βœ‚οΈ

Beginner Friendly Level

Perfect for those just starting their sewing journey, with clear instructions and simple techniques

⏱️

Bite-Sized Project

Complete in under 2 hoursβ€”quick, fun, and perfect for a little creative escape.

🧣

Snug Essential

Everyday comfort with practical charm, designed for both functionality and style through changing seasons.

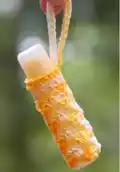
About This Handy Dandy Lip Balm Holder Pattern

Handy Dandy Lip Balm Holder Pattern crochet pattern - detailed view of completed project

The attached loop strap makes it incredibly convenient to clip onto your bag, purse, or keychain, ensuring your lip balm is always within reach. This pattern is perfect for using up yarn scraps and makes wonderful gifts for friends and family!

Why You'll Love This Handy Dandy Lip Balm Holder Pattern

I absolutely love this pattern because it's the perfect combination of cute and functional! It works up so quickly that you can make several in one sitting, which is ideal for craft fairs or gift-giving. I love how it helps me keep track of my lip balm instead of losing it at the bottom of my purse. The customization options are endlessβ€”you can match it to your favorite colors, create seasonal versions, or even add embellishments like beads or buttons. Plus, it's an excellent project for practicing your tension and working in the round, making it both a learning opportunity and a practical accessory you'll actually use every day!

Handy Dandy Lip Balm Holder Pattern step 1 - construction progress Handy Dandy Lip Balm Holder Pattern step 2 - assembly progress Handy Dandy Lip Balm Holder Pattern step 3 - details and accessories Handy Dandy Lip Balm Holder Pattern step 4 - final assembly and finishing

Switch Things Up

I love getting creative with this versatile lip balm holder pattern! One of my favorite ways to personalize it is by adding small embellishments like tiny buttons, beads, or embroidered initials on the front. You could also experiment with different textures by using metallic embroidery floss or variegated yarn for a unique look.

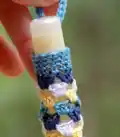
For a more decorative approach, I sometimes add a small crocheted flower or bow to the top of the holder. Another fun variation is creating themed holdersβ€”think holiday colors for Christmas gifts, pastels for spring, or school colors for students. You could even work in stripes by changing colors every two rounds instead of every round.

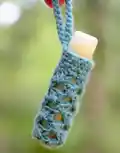
I've also made versions with longer loop straps that can be worn as necklaces, which is especially popular with kids and teens. For a more sophisticated look, try using a single elegant color with a contrasting loop strap. The possibilities are truly endless, and each small change makes your lip balm holder feel completely unique and special!

Common Mistakes & How to Fix Them

βœ— Mistake: Starting with the wrong hook size causing the holder to be too loose or too tight for your lip balm tube βœ— Mistake: Not checking gauge after the first round, resulting in a holder that doesn't fit your specific lip balm brand properly βœ— Mistake: Pulling stitches too tightly during rounds 10-13, making the opening too narrow for easy lip balm insertion and removal βœ— Mistake: Forgetting to fasten off between color changes in the multi-color version, creating messy color transitions and visible yarn tails βœ— Mistake: Not leaving a long enough tail when finishing the loop strap, making it difficult to securely attach to the holder βœ— Mistake: Skipping the turn instruction in round 3, which disrupts the spiral pattern and affects the overall structure of the holder

Handy Dandy Lip Balm Holder Pattern

Create your own adorable crochet lip balm holder with this simple and practical pattern! This charming accessory keeps your lip balm secure and easily accessible, featuring a convenient loop strap that attaches to bags, keychains, or belt loops. Perfect for personal use or as thoughtful handmade gifts, this quick project works up in no time using fingering weight yarn or embroidery floss. Choose between a classic solid color design or a fun multi-color striped version to match your style and personality!

Beginner Friendly 1-1.5 Hours

Materials Needed for Handy Dandy Lip Balm Holder Pattern

β€” Main Fabric

  • 01
    9 yards fingering weight yarn for single color version
  • 02
    3 yards fingering weight yarn in 4 different colors for multi-color version
  • 03
    1 skein embroidery floss for single color version (alternative)
  • 04
    1 skein each of 4 different colors embroidery floss for multi-color version (alternative)

β€” Tools Required

  • 01
    Crochet hook size B (2.25mm)
  • 02
    Small yarn needle
  • 03
    Scissors

Progress Tracker

0% Complete

β€” Solid Color Lip Balm Holder:

Chain 3:

Start with a chain of 3

Round 1:

11 hdc in 3rd ch from hook, join with sl st (12 sts)

Round 2:

Ch 2, 2 hdc in same stitch as ch 2, skip 2, [3 hdc in next st, skip 2] 3 times, join with sl st to the top of the ch 2 (12 sts)

Round 3:

Ch 2, turn, 2 hdc in the last space made before join on previous rnd, [3 hdc in space between next two hdc groups] 3 times, join with sl st to the top of the ch 2 (12 sts)

Rounds 4-9:

Repeat round 3

Round 10:

Ch 1, 1 sc in each stitch in rnd, join with sl st to ch 1 (12 sts)

Rounds 11-13:

Repeat round 10

β€” Loop Strap:

Chain 25:

Ch 25

Row 1:

Sl stitch in 2nd ch from hook, 1 sl st in each remaining ch on strap. Join with slip stitch to the next ch over from start of ch sts, fasten off leaving a 10 inch tail

Info:

Before weaving in ends, fold loop strap in half and attach the loose end of the strap with small yarn needle and your 10 inch tail. When loose end of loop strap is firmly attached weave in remaining ends

β€” Multi Color Lip Balm Holder:

Chain 3:

With main color chain 3

Round 1:

11 hdc in 3rd ch from hook, join with sl st, fasten off (12 sts)

Round 2:

With color 1 and starting in any stitch in rnd ch 2, 2 hdc in same stitch as ch 2, skip 2, [3 hdc in next st, skip 2] 3 times, join with sl st to the top of the ch 2, fasten off (12 sts)

Round 3:

With color 2 and starting in any space between two hdc groups, ch 2, 2 hdc in the same space, [3 hdc in space between next two hdc groups] 3 times, join with sl st to the top of the ch 2, fasten off (12 sts)

Round 4:

Repeat round 3 with color 3

Round 5:

Repeat round 3 with color 4

Round 6:

Repeat round 3 with main color

Round 7:

Repeat round 3 with color 1

Round 8:

Repeat round 3 with color 2

Round 9:

Repeat round 3 with color 3

Round 10:

With color 4 and starting in any stitch in rnd, ch 1, 1 sc in each stitch in rnd, join with sl st to ch 1 (12 sts)

Rounds 11-13:

Repeat round 10

β€” Loop Strap:

Chain 25:

Ch 25

Row 1:

Sl st in 2nd ch from hook, 1 sl st in each remaining ch on strap. Join with slip stitch to the next ch over from start of ch sts. Fasten off leaving a 10 inch tail

Info:

Before weaving in ends, fold loop strap in half and attach the loose end of the strap with small yarn needle and your 10 inch tail. When loose end of loop strap is firmly attached weave in remaining ends

Assembly Instructions

  • Complete the main body of the holder by working through all 13 rounds as instructed in the pattern
  • Create the loop strap by chaining 25 and working slip stitches back along the chain
  • Join the loop strap to the holder at the designated position using a slip stitch
  • Fold the loop strap in half to create a secure loop for attaching to bags or keychains
  • Use the 10-inch tail and yarn needle to firmly sew the loose end of the strap to the base of the loop
  • Weave in all remaining yarn ends securely on the wrong side of the work
  • Insert your lip balm tube to test the fit and ensure it slides in and out smoothly

Important Notes

  • πŸ’‘Always check your gauge after completing round 1 to ensure the holder will fit your lip balm properly
  • πŸ’‘The pattern notes indicate that chain stitches at the beginning of rows count as the first stitch
  • πŸ’‘Pay attention to the pictures provided in the pattern showing where to place stitches in previous rounds
  • πŸ’‘When working the multi-color version, fasten off after each round to create clean color changes
  • πŸ’‘Leave a 10-inch tail when finishing the loop strap as this is essential for secure attachment
  • πŸ’‘The holder should fit snugly but not too tightly around your lip balm tube for easy access

This adorable Handy Dandy Lip Balm Holder pattern is the perfect quick crochet project that combines practicality with charm! Whether you're a beginner looking for an easy afternoon project or an experienced crocheter wanting to make thoughtful handmade gifts, this pattern delivers. The customizable design allows for endless color combinations, making each holder unique. Keep your lip balm safe and accessible wherever you go! 🧢 Happy crocheting! 🧡✨

You ask,

we answer.

FAQs

What size lip balm does this holder fit?

This holder is designed to fit standard lip balm tubes. After completing round 1, check that the circumference matches the bottom of your lip balm. If it's too big, use a smaller hook; if too small, size up your hook.

Can I use regular yarn instead of fingering weight or embroidery floss?

While the pattern specifies fingering weight yarn or embroidery floss, you can experiment with other yarn weights. Just remember to adjust your hook size accordingly and check your gauge to ensure the holder fits your lip balm properly.

How do I prevent the loop strap from coming loose?

Make sure to leave a full 10-inch tail as instructed, and use a yarn needle to securely sew the folded strap end. Weave the tail through multiple stitches and knot it before trimming for maximum security.

What's the difference between the solid color and multi-color versions?

The solid color version uses one continuous yarn throughout, while the multi-color version requires fastening off and changing colors after each round. The multi-color creates beautiful stripes but involves more ends to weave in.

Can I make this holder larger for chapstick or other items?

Yes! You can adapt the pattern by using a larger hook and thicker yarn, or by adding more increase rounds at the beginning to create a wider base. Just be sure to test fit your item as you go.