๐Ÿงถ Beautiful โœจ Detailed ๐Ÿ’ Adorable

Mini Seal Amigurumi Pattern

Mini Seal Amigurumi Pattern
4.5โ˜… Rating
3-4 Hours Time Needed
3.9K Made This
โœ‚๏ธ

Intermediate Level

Ideal for those with basic knitting experience, featuring slightly more advanced stitches and techniques to expand your skills.

โฑ๏ธ

Weekend Treat

Takes 5-7 hours, making it an enjoyable project to finish over a couple of days.

๐Ÿพ

Pocket Pal

A mini friend to carry anywhere, providing comfort and companionship in a perfectly portable size.

About This Mini Seal Amigurumi Pattern

This Mini Seal pattern creates an endearing 6-inch marine companion that's perfect for ocean lovers and amigurumi enthusiasts alike. The pattern features a continuous construction from head to body with an innovative tail fin design that adds realistic movement and charm. Special attention to the sunken eye technique gives your seal a sweet, soulful expression that truly brings the character to life. With detailed embroidery options for eyebrows and sleepy eyes, you can customize your seal's personality to make it uniquely yours.

Mini Seal Amigurumi Pattern crochet pattern - detailed view of completed project

The pattern includes helpful assembly instructions with visual references and even links to video tutorials for tricky techniques like the sunken eye effect. You'll love how the flipper construction creates authentic dimension and movement for your finished seal.

Why You'll Love This Mini Seal Amigurumi Pattern

I absolutely love this pattern because it transforms simple stitches into such an expressive little creature! The sunken eye technique might seem intimidating at first, but once you master it, you'll be amazed at how much personality it adds to your seal. I find the continuous construction method so satisfying because you can watch your seal take shape seamlessly from nose to tail. The optional details like sleepy eyes and embroidered eyebrows let you get creative and make each seal truly one-of-a-kind. Plus, at just 6 inches, it's the perfect portable project that works up quickly and makes an absolutely precious gift for anyone who loves marine life or adorable amigurumi friends.

Mini Seal Amigurumi Pattern step 1 - construction progress Mini Seal Amigurumi Pattern step 2 - assembly progress Mini Seal Amigurumi Pattern step 3 - details and accessories Mini Seal Amigurumi Pattern step 4 - final assembly and finishing

Switch Things Up

I love experimenting with this seal pattern to create unique variations! Try using variegated yarn for a spotted seal effect, or go bold with unnatural colors like pastel pink or mint green for a kawaii aesthetic. You could even create a whole seal family by using different yarn weights - make a mama seal with bulky yarn and baby seals with fingering weight for an adorable display.

For a more realistic approach, I've added white or cream yarn for the belly area starting around round 25, switching colors to create that authentic seal coloring. You can also experiment with the facial expression by adjusting eyebrow placement - higher and more arched for surprised, lower and angled for sleepy or content.

I've made holiday versions too! Add a tiny crocheted Santa hat for Christmas, a small bow tie for formal occasions, or even a flower crown for spring. Some makers have success adding wire into the tail fins before stuffing to make them poseable. The embroidered details offer endless creativity - try adding whiskers with fishing line or embroidery thread, or create different mouth expressions with strategic stitching.

Common Mistakes & How to Fix Them

โœ— Placing eyes too far apart or too close together disrupts the sweet facial expression so always count the exact 10 holes between them โœ— Skipping the sunken eye technique results in a flatter face so take time with the threading process for that authentic soulful look โœ— Overstuffing the body makes it stiff and misshaped while understuffing creates a floppy seal so aim for firm but gentle filling โœ— Forgetting to use stitch markers when working in continuous rounds leads to lost count and uneven shaping throughout the entire piece โœ— Rushing through the tail fin division without carefully counting stitches causes asymmetrical fins that throw off the seal's balance and appearance

Mini Seal Amigurumi Pattern

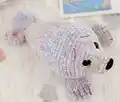
Create your own adorable mini seal with this charming crochet pattern! This delightful 6-inch sea creature features sweet sunken eyes, a gentle expression, and realistic flippers that bring personality to life. Perfect for marine animal lovers, this pattern guides you through creating a cuddly companion complete with embroidered details and optional sleepy eyes. Whether you're crafting for yourself or as a heartfelt gift, this mini seal will steal hearts with its irresistible charm and huggable softness.

Intermediate 3-4 Hours

Materials Needed for Mini Seal Amigurumi Pattern

โ€” Main Fabric

  • 01
    Worsted Weight #4 yarn, approximately 100g of gray (main color)
  • 02
    Less than 50g of accent colors as needed
  • 03
    I Love This Yarn Light Gray recommended for main color

โ€” Tools Required

  • 01
    Crochet hook size D (3.25mm)
  • 02
    18mm safety eyes
  • 03
    18mm safety nose
  • 04
    Scissors
  • 05
    Sewing needle
  • 06
    Stitch markers
  • 07
    Fiberfill stuffing
  • 08
    Black embroidery thread for details
  • 09
    Red crayon or blush for cheeks (optional)

Progress Tracker

0% Complete

โ€” Head and Body :

Round 1 :

Make 6 sc into a magic ring (6)

Round 2 :

Increase in each st around (12)

Round 3 :

(sc, inc) x 6 (18)

Round 4-6 :

sc in each st around (18)

Round 7 :

2 sc, (sc, inc) x 6, 4 sc (24)

Round 8 :

2 sc, (2 sc, inc) x 6, 4 sc (30)

Round 9 :

2 sc, (3 sc, inc) x 6, 4 sc (36)

Round 10 :

2 sc, (4 sc, inc) x 6, 4 sc (42)

Round 11 :

2 sc, (5 sc, inc) x 6, 4 sc (48)

Infos :

Place eyes between rounds 9 and 10, leaving 10 holes between them. Place the 1st eye after the 2nd increase. Count 10 holes after that and place the 2nd eye. If you want the sunken eye look, do not place the backs of the eyes on until round 21. Place the nose between rounds 2 and 3, in between the eyes.

Round 12-17 :

sc in each st around (48)

Round 18 :

(dec, 10 sc) x 4 (44)

Round 19-20 :

sc in each st around (44)

Round 21 :

(dec, 9 sc) x 4 (40)

Info :

Now for the eyes. Stuff the head well. Cut a long piece of yarn and remove the eyes. Place the needle in the hole where the first eye was and insert the needle into a hole next to the eye hole. Go back and forth between each eye hole repeating the process from the first eye. Pull slightly on the yarn after going through each hole. Do this about 3 times on each side until you reach the look you want. To place the backs of the eyes you will need to remove most of the stuffing to place the washers on the eyes then re stuff it.

Round 22-23 :

sc in each st around (40)

Round 24 :

(dec, 8 sc) x 4 (36)

Info :

Stuff the body as you work

Round 25-26 :

sc in each st around (36)

Round 27 :

(dec, 7 sc) x 4 (32)

Round 28-29 :

sc in each st around (32)

Round 30 :

(dec, 6 sc) x 4 (28)

Round 31 :

sc in each st around (28)

Round 32 :

(dec, 5 sc) x 4 (24)

Round 33 :

sc in each st around (24)

Round 34 :

(dec, 6 sc) x 3 (21)

Round 35 :

(dec, 5 sc) x 3 (18)

Round 36 :

(dec, 4 sc) x 3 (15)

Round 37 :

(dec, 3 sc) x 3 (12)

Info :

Work 5 sc, you are going to sc the round in half. Work a sc to the opposite side of the circle. You will now have two rounds that are 6 sc each.

โ€” Tail Fins :

Info :

Continue around one of the circles

Round 1 :

Increase in each st around (12)

Round 2 :

(3 sc, inc) x 3 (15)

Round 3 :

(4 sc, inc) x 3 (18)

Round 4-5 :

sc in each st around (18)

Info :

Stuff the fins as you work

Round 6 :

(sc, dec) x 6 (12)

Round 7 :

sc in each st around (12)

Round 8 :

dec x 6 (6)

Info :

F/O and sew the hole closed. Attach the yarn to a stitch on the 2nd circle. Repeat rounds 1-8. F/O and sew the hole closed.

โ€” Fins (Make 2) :

Setup :

Ch 7

Round 1 :

inc in 2nd ch from hook, 4 sc, inc3, working on the opposite side of the chain: 4 sc, inc (15)

Round 2 :

inc x 2, 4 sc, inc x 3, 5 sc, inc (21)

Round 3-4 :

sc in each st around (21)

Info :

Do not stuff the fins

Round 5 :

dec, 9 sc, dec, 8 sc (19)

Round 6 :

dec, 8 sc, dec, 7 sc (17)

Round 7 :

sc in each st around (17)

Round 8 :

dec, 7 sc, dec, 6 sc (15)

Round 9 :

(dec, 3 sc) x 3 (12)

Round 10-11 :

sc in each st around (12)

Round 12 :

(dec, 2 sc) x 3 (9)

Round 13-14 :

sc in each st around (9)

Info :

Work 2 sc, fold the fins in half and sc the opening closed. F/O and leave a long tail for sewing

Assembly Instructions

  • Take a long strand of black thread and embroider eyebrows by inserting the needle into a hole above the eyes and bringing it to a hole a few rounds above the eye
  • For sleepy eyes (optional), thread your needle with gray yarn, insert between the eyes, bring to inside corner of eye, wrap around front and insert into outside hole, pull tightly and repeat
  • Thread your needle with black embroidery thread and embroider lines on the back of each fin between rounds 5 and 6, spacing lines one hole apart
  • Turn the body upside down and pin the fins onto the body approximately between rounds 16 and 20
  • Sew the fins securely onto the body using the long tail left from crocheting
  • Add optional cheeks with blush or red crayon for extra sweetness
  • Weave in all remaining yarn tails to finish your seal

Important Notes

  • ๐Ÿ’กUse a stitch marker to mark the beginning of each round since you work in continuous spirals
  • ๐Ÿ’กThe sunken eye technique requires patience but creates the signature sweet expression
  • ๐Ÿ’กProper stuffing is crucial - stuff firmly but not too tightly for the best seal shape
  • ๐Ÿ’กPin all parts before sewing to ensure proper placement and symmetry
  • ๐Ÿ’กWatch the linked YouTube video tutorial for help with the sunken eye technique
  • ๐Ÿ’กEye and nose placement can be adjusted if using different sizes than recommended

This enchanting Mini Seal pattern brings the magic of the ocean into your hands with its irresistibly sweet expression and huggable design. Created with love by Sweet Oddity Art, this pattern combines accessible techniques with special touches like sunken eyes and embroidered details that elevate your finished piece from cute to extraordinary. Whether you're expanding your amigurumi menagerie or crafting a thoughtful gift for a marine life enthusiast, this 6-inch companion promises to charm everyone who meets it. The clear instructions and helpful video resources make even advanced techniques achievable for dedicated crocheters. ๐ŸŒŠ๐Ÿฆญโœจ

You ask,

we answer.

FAQs

What if I can't achieve the sunken eye look?

The sunken eye technique is optional! You can simply place the safety eye backs on immediately after positioning the eyes for a more traditional rounded look. The seal will still be adorable without the sunken effect.

Can I use different yarn weights for this pattern?

Yes! You can use different yarn weights, but you'll need to adjust your hook size accordingly and your finished seal will be a different size. You may also need to use different sized safety eyes and nose to match the new scale.

Why are my tail fins uneven?

Make sure you're dividing the body rounds exactly in half (6 stitches each side) at round 37. Count carefully and use a stitch marker to mark where you split the round to ensure symmetry.

Do I need to stuff the side fins?

No, the pattern specifically states not to stuff the side fins. Leaving them unstuffed allows them to lay flat and look more realistic like actual seal flippers.

How do I work on the opposite side of the chain for the fins?

After working stitches across the top of your foundation chain, flip the chain over and work into the bottom bumps of the same chain stitches. The pattern includes helpful diagrams on page 11 to guide you through this technique.