🧶 Beautiful ✨ Detailed 💝 Adorable

Fox Granny Square Crochet Pattern

Fox Granny Square Crochet Pattern
4.1★ Rating
1.5-2 Hours Time Needed
1.2K Made This
✂️

Beginner Friendly Level

Perfect for those just starting their sewing journey, with clear instructions and simple techniques

⏱️

Bite-Sized Project

Complete in under 2 hours—quick, fun, and perfect for a little creative escape.

🐰

Whimsical Buddy

Playful characters full of personality, designed to spark imagination and become cherished playtime favorites.

About This Fox Granny Square Crochet Pattern

This fox granny square pattern combines traditional crochet techniques with adorable animal features to create something truly special. Starting with a classic circular base, you'll build up the square structure before adding sweet fox details like perky ears, expressive eyes, and a charming nose area. The pattern uses lightweight acrylic yarn in white, orange, black, and dark green to capture the fox's natural coloring perfectly.

Fox Granny Square Crochet Pattern crochet pattern - detailed view of completed project

Each component is worked separately and then assembled onto the square base, making it easy to adjust placement until you're happy with your fox's expression. The finished square measures 11cm by 11cm, perfect for joining with others or using as a standalone piece.

Why You'll Love This Fox Granny Square Crochet Pattern

I absolutely love how this pattern transforms a basic granny square into something so full of character! The fox's personality really shines through those little black eyes and sweet orange face. What I appreciate most is how beginner-friendly it is—you're working with fundamental stitches but creating something that looks impressively detailed. The separate assembly approach means you can play around with the fox's expression until it feels just right, and there's something magical about watching those individual pieces come together into a complete woodland friend.

Fox Granny Square Crochet Pattern step 1 - construction progress Fox Granny Square Crochet Pattern step 2 - assembly progress Fox Granny Square Crochet Pattern step 3 - details and accessories Fox Granny Square Crochet Pattern step 4 - final assembly and finishing

Switch Things Up

I love experimenting with color combinations on this fox pattern! While the traditional orange and white coloring is absolutely adorable, I've discovered that switching things up can create entirely different woodland creatures or fantastical fox friends. Try using gray and white for an arctic fox vibe, or go bold with purple and pink for a magical fantasy fox that kids absolutely adore.

You could also play with the facial features—making the eyes slightly larger creates a more kawaii appearance, perfect for children's items. I've even added tiny embroidered details like whiskers using black thread or a little smile on the nose area for extra personality. Some crafters in my community have experimented with adding a fluffy yarn for the ear tips to give more texture and dimension.

For a seasonal twist, consider incorporating holiday colors: red and white for a Christmas fox, or pastels for spring-themed projects. The beauty of this pattern is that the basic structure remains the same, so once you've mastered it, the creative possibilities are truly endless. I've seen people create entire rainbow collections of foxes in different colors, each one unique yet recognizably part of the same adorable family!

Common Mistakes & How to Fix Them

✗ Forgetting to tighten the magic ring properly on the face area, causing a visible hole in the center ✗ Placing the ears too far from the corners, making the fox look unbalanced or disproportionate ✗ Not leaving long enough tails for stitching components, making assembly difficult and frustrating ✗ Skipping the color change at Round 4, which throws off the entire color pattern for the square

Fox Granny Square Crochet Pattern

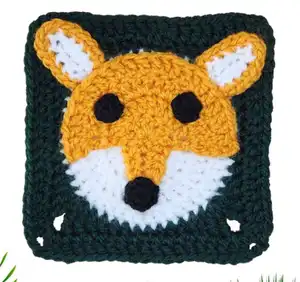
Create an adorable fox granny square with this charming crochet pattern! This delightful design combines classic granny square techniques with playful fox features including pointy ears, a sweet face, and a cute button nose. Perfect for blankets, cushions, or as a standalone decorative piece, this 11cm square brings woodland charm to any project. The pattern uses simple color changes and basic stitches to create a fox face that's both recognizable and endearing. Whether you're making a baby blanket or adding personality to home decor, this fox granny square is sure to bring smiles.

Beginner Friendly 1.5-2 Hours

Materials Needed for Fox Granny Square Crochet Pattern

— Main Fabric

  • 01
    Lightweight acrylic yarn in white color
  • 02
    Lightweight acrylic yarn in orange color
  • 03
    Lightweight acrylic yarn in black color
  • 04
    Lightweight acrylic yarn in dark green color

— Tools Required

  • 01
    4mm crochet hook
  • 02
    Yarn needle
  • 03
    Scissors

Progress Tracker

0% Complete

— Square :

Info :

Using the white yarn

Round 1 :

MR, ch2, 12dc inside MR (12)

Info :

Tighten the MR by pulling on the tail and then sl st in the 1st dc (skip the ch2)

Round 2 :

ch2, *dc inc* all around (24)

Round 3 :

ch2, *dc, dc inc* all around (36)

Round 4 :

ch2, *2dc, dc inc* all around (48)

Infos :

Color Change: at the end of Round 4, you will need to do a color change. Method 1: change color at the last dc of Round 4. Method 2: after Round 4 finish off with an invisible stitch and then attach the new color

Round 5 :

ch1, *3sc, 2hdc, 2dc, [2tc + ch2 + 2tc] in the same stitch, 2dc, 2hdc* all around (68)

Info :

Sl st in the 1st sc that you did at the beginning of Round 5

Round 6 :

ch2, *dc* all around and [2dc + ch2 + 2dc] in the ch2 space (84)

Info :

At the end of the round, finish off and weave in any excess yarn

— Face Area :

Info :

Using the orange yarn

Round 1 :

MR, ch3 (counts as a dc), 5dc in MR (6)

Info :

Pull on the tail of your yarn to tighten the MR

Round 2 :

ch3 (counts as a dc), turn, dc in the same st, *dc inc* all around the remaining stitches (12)

Round 3 :

ch3 (counts as a dc), turn, dc inc, *dc, dc inc* all around the remaining stitches (18)

Round 4 :

ch3 (counts as a dc), turn, dc, dc inc, *2dc, dc inc* all around the remaining stitches (24)

Info :

Cut the yarn, and finish off. Leave a long tail for stitching

— Nose Area :

Info :

Using the orange yarn

Round 1 :

slip knot, ch7, skip the first 4 chains (count as a dc), hdc in the 5th ch away from the hook, sc, 4sc in 1 st (allowing you to turn and start crocheting on the back of the chains), sc, hdc, dc (10)

Info :

Cut the yarn, and finish off. Leave a long tail for stitching

— Nose :

Info :

Using the black yarn

Round 1 :

MR, ch1, 8sc in the MR (8)

Info :

Tighten the MR, cut the yarn, and finish off. Leave a long tail for stitching

— Ears x2 :

Info :

Using the white yarn

Round 1 :

slip knot, ch6 (last 3 count as a hdc) hdc in the 4th ch away from the hook, hdc, 4sc in one stitch, 3hdc across (10), change color to orange at the last hdc

Round 2 :

3sc across, 4inc, 3sc across (14)

Info :

Cut the yarn, and finish off. Leave a long tail for stitching

— Eyes x2 :

Info :

Using the black yarn

Round 1 :

MR, ch1, 5sc in MR (5)

Info :

Close the MR, finish off, and leave a long tail for stitching

Assembly Instructions

  • Place all face components on the completed square base before stitching to ensure proper positioning
  • Align the ears to the corners of the square at the [2tc + ch2 + 2tc] space at the edge of Round 4
  • Position the Face Area aligned to the circular base of the square in the center area
  • Place the Nose Area exactly next to the Face Area with the tip (where the 4sc are) directed downwards
  • Stitch the Nose on top of the tip of the Nose Area using the black yarn tail
  • Stitch the eyes on top of the Face Area at Round 3 position using the long tails left from each piece
  • Use the yarn tails from each component to securely stitch everything in place, weaving in ends when complete

Important Notes

  • 💡The chains at the beginning of each round/row do not count as a stitch unless specifically stated otherwise
  • 💡Work through the entire stitch (back loop and front loop) unless the pattern instructs otherwise
  • 💡You can use any yarn weight to make this square, but using a larger hook and thicker yarn will create a bigger square
  • 💡Leave long tails when finishing off each component to make assembly easier and more secure
  • 💡The invisible stitch method provides a cleaner finish for color changes, but use whichever method you prefer
  • 💡Pin all components in place before final stitching to test different facial expressions for your fox

This charming Fox Granny Square pattern brings woodland magic to your crochet projects! With its sweet face, perky ears, and adorable details, this square is perfect for creating one-of-a-kind blankets, pillows, or decorative pieces. The pattern cleverly combines traditional granny square construction with separately crafted facial features that you assemble at the end, giving you creative control over your fox's personality. It's a delightful way to add character to any project! 🦊🧶✨

You ask,

we answer.

FAQs

Can I use different yarn weights for this pattern?

Yes! The pattern is designed for lightweight acrylic yarn with a 4mm hook, but you can use any yarn weight. Just remember that using a larger hook and heavier yarn will create a bigger square, while finer yarn will make a smaller square.

What's the best way to do the color change at Round 4?

The pattern offers two methods: Method 1 involves changing color at the last dc of Round 4, while Method 2 uses an invisible stitch technique. The invisible stitch provides a cleaner finish, but both methods work well—choose whichever you're more comfortable with.

How do I make sure my fox's face looks balanced?

The key is to place all components on the square before stitching anything permanently. The pattern specifies that ears should align with the corners at the [2tc + ch2 + 2tc] spaces, and eyes should be positioned on Round 3 of the Face Area. Take time to pin everything in place first.

Can I make multiple squares and join them together?

Absolutely! This fox granny square is perfect for joining with other squares to create blankets, cushion covers, or even a fox-themed wall hanging. You can make all fox squares or alternate with plain granny squares for variety.

Why do I need to leave long tails when finishing each piece?

The long tails are essential for stitching all the face components onto the square base during assembly. Having sufficient tail length makes the stitching process much easier and ensures your pieces are securely attached.