🧢 Beautiful ✨ Detailed πŸ’ Adorable

Mini Batman Amigurumi Pattern

Mini Batman Amigurumi Pattern
4.5β˜… Rating
3-4 Hours Time Needed
2.9K Made This
βœ‚οΈ

Intermediate Level

Ideal for those with basic knitting experience, featuring slightly more advanced stitches and techniques to expand your skills.

⏱️

Bite-Sized Project

Complete in under 2 hoursβ€”quick, fun, and perfect for a little creative escape.

🧸

Cute Companion

An adorable friend to cherish, handcrafted with love to bring comfort and joy for years to come.

About This Mini Batman Amigurumi Pattern

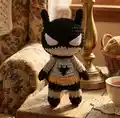
This Mini Batman amigurumi pattern brings the legendary superhero to life in a pocket-sized form that's perfect for fans of all ages. The pattern features detailed instructions for creating Batman's signature look, including his gray bodysuit with the iconic yellow utility belt, black boots and gloves, and a dramatic flowing cape. With a finished height of about 12cm, this little hero is the perfect size for display or play.

Mini Batman Amigurumi Pattern crochet pattern - detailed view of completed project

The pattern includes color-changing techniques to create Batman's classic costume details and an embroidered logo on the chest. You'll love how the pointed ears and cape give this tiny caped crusader an authentic superhero appearance.

Why You'll Love This Mini Batman Amigurumi Pattern

I absolutely love this Batman pattern because it captures the essence of one of the most iconic superheroes in such a compact and adorable way! The color transitions between gray, yellow, and black create that classic Batman look we all recognize instantly. I find it so satisfying to embroider that tiny Batman logo on the chest and watch the character truly come to life. The cape adds such a dramatic touch, and those pointed ears are just too cute! It's a quick project that delivers big results, making it perfect for gift-giving or building your own superhero collection. Plus, there's something really special about holding a handmade version of the Dark Knight in your hands.

Mini Batman Amigurumi Pattern step 1 - construction progress Mini Batman Amigurumi Pattern step 2 - assembly progress Mini Batman Amigurumi Pattern step 3 - details and accessories Mini Batman Amigurumi Pattern step 4 - final assembly and finishing

Switch Things Up

I love experimenting with different variations of this Batman pattern to create unique versions! Try using a darker charcoal gray for a more modern Batman look, or go vintage with lighter gray and blue tones. You could even create a whole Justice League by adapting this pattern with different colors and symbols.

For a fun twist, make the cape removable by using small snaps or Velcro instead of sewing it permanently. This allows you to display Batman with or without his cape! I've also experimented with adding a tiny utility belt with actual pouches by creating small beige rectangles sewn onto the yellow belt area.

Consider making the arms poseable by inserting thin wire before closing them up completely. This lets you position Batman in action poses! Another idea I absolutely love is creating a whole Bat-family by scaling the pattern up or down and modifying details for Robin, Batgirl, or even Nightwing.

For seasonal fun, try adding holiday-themed accessories like a tiny Santa hat for Christmas Batman or a small pumpkin accessory for Halloween. The possibilities are truly endless, and each variation brings its own unique personality to this beloved character!

Common Mistakes & How to Fix Them

βœ— Forgetting to stuff the legs and body firmly as you go, which can make positioning difficult later on βœ— Not using a stitch marker to track rounds, leading to misaligned decreases and uneven shaping throughout the pattern βœ— Making the color changes too loose, causing gaps where the filling shows through between the gray and yellow sections βœ— Skipping the beige face oval placement, which throws off the symmetry of the entire head and facial features βœ— Embroidering the Batman logo too large or off-center on the chest, affecting the overall character appearance and proportion

Mini Batman Amigurumi Pattern

Create your own adorable Dark Knight with this charming Mini Batman amigurumi pattern! Standing approximately 12cm tall, this caped crusader features his iconic gray suit, yellow utility belt, and flowing black cape. Perfect for superhero fans and crochet enthusiasts alike, this pattern combines simple amigurumi techniques with fun character details to bring Gotham's hero to life in miniature form. Whether you're making it as a gift or adding to your collection, this little Batman will stand guard on any shelf with style and personality.

Intermediate 3-4 Hours

Materials Needed for Mini Batman Amigurumi Pattern

β€” Main Fabric

  • 01
    YarnArt Jeans yarn (160m in 50g, 55% cotton/45% polyacryl) in gray, yellow, beige, black and white colors
  • 02
    Cotton or acrylic yarn suitable for amigurumi in gray, yellow, beige, black and white

β€” Tools Required

  • 01
    Crochet hook 2.00mm (Clover Soft Touch recommended)
  • 02
    Toy stuffing/fiberfill
  • 03
    Tapestry needle
  • 04
    Scissors
  • 05
    Stitch marker
  • 06
    Pins

Progress Tracker

0% Complete

β€” Leg 1 :

Info :

Start working with black yarn

Round 1 :

5 sc MR (5)

Round 2 :

5 inc (10)

Round 3-5 :

10 sc (10)

Info :

Continue on with gray

Round 6-8 :

10 sc (10)

Info :

Close and break the yarn

β€” Leg 2 + Body :

Info :

Start working with black yarn

Round 1 :

5 sc MR (5)

Round 2 :

5 inc (10)

Round 3-5 :

10 sc (10)

Info :

Continue on with gray

Round 6-8 :

10 sc (10)

Info :

Continue on with black. Crochet 2 sc. Move the marker to the last loop. Stuff the legs.

Round 9 :

2 ch, 10 sc, 2 sc, 10 sc (24)

Round 10-11 :

24 sc (24)

Info :

Continue on with yellow

Round 12-13 :

24 sc (24)

Info :

Continue on with gray

Round 14-15 :

24 sc (24)

Info :

Stuff the body

Round 16 :

(2 sc, dec)x6 (18)

Round 17-19 :

18 sc (18)

Round 20 :

(1 sc, dec)x6 (12)

Round 21 :

12 sc (12)

Info :

Stuff the body firmly. Close and break the yarn.

β€” Head :

Info :

Crochet with black yarn

Round 1 :

6 sc MR (6)

Round 2 :

6 inc (12)

Round 3 :

(1 sc, inc)x6 (18)

Round 4 :

(2 sc, inc)x6 (24)

Round 5 :

(3 sc, inc)x6 (30)

Round 6 :

(4 sc, inc)x6 (36)

Round 7 :

(5 sc, inc)x6 (42)

Round 8-13 :

42 sc (42)

Round 14 :

(5 sc, dec)Ρ…2, 2 sc, BEIGE 3 sc, dec, 5 sc, dec, 4 sc, BLACK 1 sc, dec, 5 sc, dec (36)

Round 15 :

(4 sc, dec)Ρ…2, 2 sc, BEIGE 2 sc, dec, 4 sc, dec, 4 sc BLACK dec 4 sc, dec (30)

Round 16 :

(3 sc, dec)Ρ…2, 2 sc, BEIGE 1 sc, dec, 3 sc, dec, 3 sc, BLACK dec, 3 sc, dec (24)

Round 17 :

(2 sc, dec)x2, 2 sc, BEIGE dec, 2 sc, dec, 2 sc, BLACK dec, 2 sc, dec (18)

Info :

Continue on with gray

Round 18 :

(sc, dec)x6 (12)

Info :

Add stuffing. Leave the thread for sewing.

β€” Arm (Make 2) :

Info :

Crochet with black yarn

Round 1 :

6 sc MR (6)

Round 2-4 :

6 sc (6)

Info :

Continue on with gray

Round 5-11 :

6 sc (6)

Info :

Do not stuff the arm. Close. Break the yarn and leave a long tail to sew arms to body.

β€” Ear (Make 2) :

Info :

Crochet with black yarn

Round 1 :

4 sc MR (4)

Round 2 :

4 inc (8)

Round 3-4 :

8 sc (8)

Round 5 :

(1 sc, inc)x4 (12)

Round 6 :

12 sc (12)

Round 7 :

6 sc (12)

Info :

Leave the thread for sewing

β€” Raincoat :

Info :

Crochet with black yarn

Round 1 :

16 ch, starting from second ch from hook, 15 sc (15)

Round 2-6 :

ch, turn, 15 hdc (15)

Round 7 :

ch, turn, dec, 11 hdc, dec (13)

Round 8 :

ch, turn, dec, 9 hdc, dec (11)

Round 9 :

ch, turn, dec, 7 hdc, dec (9)

Round 10 :

ch, turn, dec, 5 hdc, dec (7)

Info :

Using black, SC evenly around the raincoat. Crochet 12 ch to fix a raincoat on a neck. Close and break the yarn, leaving a little tail.

Assembly Instructions

  • Sew the head to the body using the gray yarn tail left from the head
  • Sew the arms to the body symmetrically at shoulder height
  • Embroider the eyes with white thread on the beige face area
  • Sew the ears to the head at the top corners to create Batman's signature pointed appearance
  • Embroider the Batman logo onto the chest with black thread or create it using yellow and black felt
  • Sew the raincoat (cape) onto the back of the body at neck level using the chain attachment

Important Notes

  • πŸ’‘Use a stitch marker to keep track of your rounds, especially during color changes between black, gray, yellow, and beige
  • πŸ’‘Stuff the legs and body firmly as you work to ensure proper shaping and stability
  • πŸ’‘When changing colors for the face detail, carry the yarn carefully to avoid visible color bleeding
  • πŸ’‘Crochet tightly enough so the filler is not visible through the holes between loops
  • πŸ’‘Pin all parts in place before sewing to ensure correct positioning and symmetry
  • πŸ’‘The cape should be positioned to flow naturally down the back without pulling the head forward

This adorable Mini Batman pattern was designed to bring Gotham's legendary Dark Knight to life in the most huggable way possible! The pattern combines simple amigurumi techniques with fun superhero details like the iconic utility belt, flowing cape, and those unmistakable pointed ears. Whether you're a Batman fan or just love creating cute characters, this pattern delivers big superhero energy in a compact, display-worthy package. πŸ¦‡ Happy crocheting! 🧢✨

You ask,

we answer.

FAQs

What size will my finished Batman be?

Using YarnArt Jeans yarn and a 2.00mm hook, your Batman will be approximately 12cm (4.7 inches) tall. The size may vary depending on your yarn choice, hook size, and tension.

Can I use different yarn colors?

Absolutely! While the pattern calls for Batman's classic gray, yellow, beige, and black color scheme, you can customize it to create different Batman versions or even other superhero characters.

How do I embroider the Batman logo?

You can either embroider the bat symbol directly onto the yellow chest area using black thread, or cut the shape from black and yellow felt and sew it on for a more defined look.

Do I need to stuff the arms?

No, the pattern specifically states not to stuff the arms. This allows them to be more flexible and poseable against the body.

What's the best way to attach the cape?

The raincoat (cape) attaches at the neck using the 12-chain strap created at the end of the cape construction. Position it so it drapes naturally down the back.