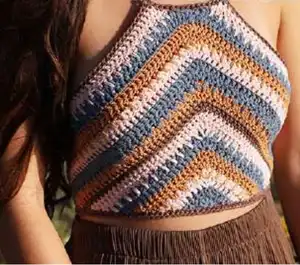
Create your perfect warm-weather wardrobe staple with this vibrant summer halter top pattern. This stunning piece features colorful stripes created with four coordinating colors and adjustable tie-back straps for a custom fit. The pattern includes detailed instructions for six sizes from Small to 3XL, making it accessible for various body types. With its flattering silhouette and customizable lacing system, you'll love how this top drapes beautifully while providing comfortable coverage. Perfect for beach days, festivals, or casual summer outings, this halter top combines style with functionality in every stitch.
Progress Tracker
0% Complete
— STEP 1 – BODY
Row 1 :
Color A – ch 4 (1st ch is the foundation ch, next 3 chs will count as a dc), next 6 dc into the 4th ch from the hook, turn. 7 dc.
Row 2 :
Color A – ch 3 (counts as a dc throughout pattern), dc in very 1st st, dc into the next 2 st, 5 dc in the next st, dc in the next 2 st, 2 dc in the last st, turn. 13 dc.
Row 3 :
Color B – regular dc row – total: 19 dc.
Row 4 :
Color B – regular dc row – total: 25 dc.
Row 5 :
Color C – spike dc row – total: 31 dc.
Row 6 :
Color C – regular dc row – total: 37 dc.
Row 7 :
Color A – regular dc row – total: 43 dc.
Row 8 :
Color A – regular dc row – total: 49 dc.
Row 9 :
Color B – spike dc row – total: 55 dc.
Row 10 :
Color B – regular dc row – total: 61 dc.
Row 11 :
Color D – regular dc row – total: 67 dc
Row 12 :
Color C – regular dc row – total: 73 dc.
Row 13 :
Color C – regular dc row – total: 79 dc.
Row 14 :
Color A – spike dc row #2 – total: 85 dc.
Row 15 :
Color A – regular dc row – total 91 dc.
Row 16 :
Color B – regular dc row – total: 97 dc.
Row 17 :
Color B – regular dc row – total: 103 dc.
Row 18 :
Color C – spike dc row #2 – total: 109 dc.
Row 19 :
Color C – regular dc row – total: 115 dc.
Row 20 :
Color A – regular dc row – total: 121 dc.
Info :
After row 20, sizes will break off into their own sections. Follow instructions for your specific size.
— STEP 2 – TRIM
Info :
Connect color D with a sl st at the bottom left corner to begin the finishing trim.
Rnd 1 (Size S) :
ch 2, hdc into the 1st st, hdc across the bottom of the panel, 4 hdc in the corner to make the first turn, hdc across the side of the panel until you reach the marker, [hdc, ch-1 sp, hdc] in the top right corner (for strap placement), hdc across the top of the panel until you reach the next marker, [hdc, ch-1 sp, hdc] in the top left corner, hdc across the side of the panel until you reach the bottom left corner, 2 hdc in the same st where you began the trim, join with a sl st, fasten off.
Rnd 1 (Sizes M, L, XL, 2XL, 3XL) :
ch 2, hdc into the 1st st, hdc across the bottom of the panel, 4 hdc in the corner to make the first turn, [hdc2tog, hdc in the next st] repeat across the side of the panel, [hdc, ch-1 sp, hdc] in the top right corner of the panel (for strap placement), hdc across the top of the panel, [hdc, ch-1 sp, hdc] in the top left corner, [hdc2tog, hdc in the next st] repeat across the side of the panel until you reach the bottom left corner, 2 hdc in the same st where you began the trim, join with a sl st, fasten off.
— STEP 3 – NECK STRAPS + TIE BACK
Neck Straps :
Cut 5 yarn pieces of color D at 70' (72', 76', 80', 84', 86') each depending on your size. Insert them into the ch-1 sp at one of the top corners of the halter top, pull the yarn through until the ends meet and it's folded in half. You will have 10 pieces. Separate the pieces of yarn into 3 strands with 3-4 pieces in each strand. Braid the yarn until there is 2' remaining. Make a large knot and trim ends to 1' to create a simple and clean tassel. Repeat this process to make a 2nd strap on the opposite side.
Tie Back Strap :
Cut 9 yarn pieces of color D at 110' (112', 116', 120', 124', 128') each depending on your size. Make a large knot with 2' of ends. Separate the pieces of yarn into 3 strands with 3 pieces in each strand. Braid the yarn until there is 2' remaining. Be sure to pull on a strand as you go to keep the strands untangled. Make a large knot and trim both ends to 1' to create 2 simple and clean tassels. Tape down your knot at the beginning to make the braiding easier.
Info :
Insert the strap on both sides into the last dc row, about 12 dc from the end of the row. You can use a hook to help get the strap through. Cross it once from top to bottom and then insert the straps into the opposite sides before the last dc. You can easily change and customize the way you lace it according to the fit you're going for.
This stunning summer halter top pattern combines vibrant color work with comfortable, adjustable construction to create the perfect warm-weather essential. The unique panel design grows from a small starting point into a beautiful chevron shape that flatters all body types. With six size options and customizable straps, you can create a truly personalized garment that fits your style and body perfectly. Whether you're heading to the beach, a festival, or just enjoying summer days, this versatile top will become your go-to handmade piece. The colorful stripes and textured spike stitches add visual interest while keeping the construction approachable for intermediate crocheters. Happy crocheting! 🧶✨