Get ready to create the ultimate tabletop gaming companion! This mimic isn't just a monster; it's a fully functional treasure chest that's perfect for guarding your favorite set of dice. You'll use structured techniques like plastic canvas to give it a sturdy, professional feel, and the hidden eyeball detail adds a wonderful layer of mystery. It's a rewarding project that combines classic crochet with clever assembly to bring a bit of fantasy to your craft room.
Progress Tracker
0% Complete
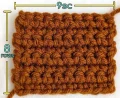
— 1. Short Side (Make 2) :
Info :
Start with your brown yarn for the main chest body.
Row 1 :
ch10, then sc in the second chain from the hook and across (9)
Row 2-8 :
ch1, turn your work, and sc in every stitch across (9)
Info :
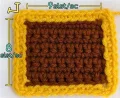
Fasten off and turn the piece. Reattach your gold trim yarn at the corner to begin the border in BLO.
Round 9a :
Working in BLO, slst around the entire rectangle, making sure to ch2 at each corner to allow for the turn (38)
Round 9b :
Working in BLO, sc in every stitch around, placing an inc into each of the ch2 corner spaces (42)
Info :
Fasten off and leave a long gold tail for sewing.
— 2. Long Side (Make 2) :
Row 1 :
ch13, then sc in the second chain from the hook and across (12)
Row 2-8 :
ch1, turn your work, and sc in every stitch across (12)
Round 9a :
Reattach gold yarn at the corner. Working in BLO, slst around the piece with a ch2 at each corner (44)
Round 9b :
Working in BLO, sc around the piece, placing an inc into each ch2 corner space (48)
Info :
Fasten off and leave a long tail for assembly.
— 3. Bottom Panel (Make 1) :
Row 1 :
ch13, then sc in the second chain from the hook and across (12)
Row 2-9 :
ch1, turn your work, and sc in every stitch across (12)
Round 10a :
Reattach gold yarn at the corner. Working in BLO, slst around the rectangle with a ch2 at each corner (46)
Round 10b :
Working in BLO, sc around the piece, placing an inc into each ch2 corner space (50)
Info :
Fasten off and leave a tail. Mark this piece as the bottom so you don't confuse it with the long sides.
— 4. Top Lid Panel (Make 1) :
Row 1 :
ch13, then sc in the second chain from the hook and across (12)
Row 2-16 :
ch1, turn your work, and sc in every stitch across (12)
Round 17a :
Reattach gold yarn at the corner. Working in BLO, slst around the rectangle with a ch2 at each corner (60)
Round 17b :
Working in BLO, sc around the piece, placing an inc into each ch2 corner space (64)
Info :
Fasten off and leave a long tail for sewing.
— 5. Top Side (Make 2) :
Round 1 :
Work 3 sc into a magic ring (3)
Round 2 :
ch1, turn, and inc in every stitch across (6)
Round 3 :
ch1, turn, *1 sc, inc* repeat across (9)
Round 4 :
ch1, turn, *2 sc, inc* repeat across (12)
Round 5 :
ch1, turn, *3 sc, inc* repeat across (15)
Round 6a :
Turn and reattach gold yarn. Using BLO, slst across the curved edge (15)
Round 6b :
Without turning, work in BLO and repeat *4 sc, inc* across (18)
— 6. Handles (Make 2) :
Row 1 :
ch8, start in second chain: 2 sc, 3 consecutive inc, 2 sc (10)
Info :
Fasten off and leave a tail for attaching to the chest sides.
— 7. Mouth Top :
Row 1 :
Using red yarn, ch14, then sc in the second chain from the hook and across (13)
Row 2-15 :
ch1, turn, and sc in every stitch across (13)
Info :
Fasten off. Now you will work the sides directly onto the raw edges of this panel.
Side 1 Row 1 :
Attach red yarn to the raw edge and sc 15 across (15)
Side 1 Row 2 :
ch1, turn, 3 dec, 3 sc, 3 dec (9)
Side 1 Row 3 :
ch1, turn, 2 dec, 1 sc, 2 dec (5)
Side 1 Row 4 :
ch1, turn, 1 dec, 1 sc, 1 dec (3)
Info :
Repeat rows 1-4 of the side instructions on the opposite raw edge of the panel. This will cause the piece to curl.
— 8. Mouth Bottom :
Round 1 :
ch5, starting in third chain: 2 sc, 3 sc in the last ch, rotate to work other side of chain, 2 sc, 3 sc in the starting ch space (10)
Round 2 :
2 sc, 3 inc, 2 sc, 3 inc (16)
Round 3 :
3 sc, 2 inc, 1 sc, 2 inc, 3 sc, 2 inc, 1 sc, 2 inc (24)
Round 4 :
4 sc, 2 inc, 3 sc, 2 inc, 5 sc, 2 inc, 3 sc, 2 inc, 1 sc (32)
Round 5 :
5 sc, 2 inc, 5 sc, 2 inc, 7 sc, 2 inc, 5 sc, 2 inc, 2 sc (40)
Round 6-9 :
sc in every stitch around (40)
Round 10 :
6 sc, 2 inc, 7 sc, 2 inc, 9 sc, 2 inc, 7 sc, 2 inc, 3 sc (48)
Round 11-15 :
sc in every stitch around (48)
Round 16 :
In BLO: 11 hdc, {1 hdc, ch1, 1 hdc}, 9 hdc, {1 hdc, ch1, 1 hdc}, 13 hdc, {1 hdc, ch1, 1 hdc}, 9 hdc, {1 hdc, ch1, 1 hdc}, 2 hdc
— 9. Long Brace :
Round 1 :
Using gold yarn, ch32. Starting in second ch: 30 sc, {1 sc, ch1, 1 sc, ch1, 1 sc} in the last ch, then 30 sc along the other side (63)
— 10. Keyhole :
Round 1 :
Work 6 sc into a magic ring (6)
Round 2 :
inc in every stitch around (12)
Round 3 :
*1 sc, inc* repeat around (18)
Info :
Embroider a black keyhole shape in the center.
— 11. Eyeball :
Round 1 :
Using red yarn, work 5 sc into a magic ring (5)
Round 2 :
inc in every stitch around (10)
Round 3a :
Switch to white. In BLO, slst around (10)
Round 3b :
Working through the BLO of both the white and red rounds, repeat *1 sc, inc* around (15)
— 12. Teeth :
Row 1 :
Using white, ch22. Starting in second ch: slst, then repeat *[ch3, slst in second ch, 1 sc in next ch], slst in next 2 ch* across
Row 2 :
Switch to pink. Work along the opposite side of the chain: *BLO slst, slst, sc* repeat across (22)
— 13. Tongue :
Row 1 :
Using pink, ch32. Starting in second ch: 30 sc, {1 sc, ch2, 1 sc} in the last ch, 30 sc along other side (62)
Row 2 :
ch1, turn, 31 sc, {4 sc} in the ch2 space, 31 sc along the other side (66)
Info :
Using red yarn, reattach at the base center and slst through the tongue up to the tip to create a detail line.
You've done it! You've brought a legendary mimic to life. This project is a true testament to your skill, blending structural assembly with detailed amigurumi work. Whether he's guarding your d20s or just sitting on your desk looking menacingly cute, he's sure to be a conversation starter. I hope you enjoyed the process of building this little monster as much as I did. Don't forget to share your finished mimic with your gaming group—just warn them not to get too close to those teeth! Happy crafting, and may all your rolls be natural 20s! 🧶🎲✨