🧢 Beautiful ✨ Detailed πŸ’ Adorable

Wall Hanging Panda Decor Pattern

Wall Hanging Panda Decor Pattern
4.2β˜… Rating
8-10 Hours Time Needed
1.4K Made This
βœ‚οΈ

Intermediate Level

Ideal for those with basic knitting experience, featuring slightly more advanced stitches and techniques to expand your skills.

⏱️

All-Day Adventure

Requires 8-10 hours, ideal for a full day of immersive knitting.

🏑

Cozy Accent

A warm touch for your space that transforms ordinary corners into inviting nooks filled with handmade charm.

About This Wall Hanging Panda Decor Pattern

This delightful panda wall hanging pattern brings together classic tapestry crochet with dimensional amigurumi details to create a truly unique piece of home decor. The main canvas features a color-blocked design worked in rows with color changes, creating the iconic panda silhouette against a soft baby blue background. What makes this pattern special is the addition of 3D elements like stuffed ears, eye spots, and a protruding muzzle that give the panda personality and depth.

Wall Hanging Panda Decor Pattern crochet pattern - detailed view of completed project

The pattern includes complete instructions for creating tassels with wooden beads and attaching everything to a wooden dowel for easy wall hanging. You can personalize your panda with either a handsome bow for a boy or beautiful crocheted flowers with leaves for a girl.

Why You'll Love This Wall Hanging Panda Decor Pattern

I absolutely love this pattern because it's such a creative blend of techniques that keeps the crocheting interesting from start to finish. The tapestry crochet canvas teaches you professional color-changing methods while the dimensional details let you practice your amigurumi skills. What really makes my heart sing is how customizable it isβ€”you can choose your own color scheme and decide whether to add flowers or a bow. The finished piece isn't just cute, it's actually a conversation starter that showcases multiple crochet techniques in one adorable project. Plus, there's something incredibly satisfying about seeing that sweet panda face come to life as you attach each dimensional piece to the canvas.

Wall Hanging Panda Decor Pattern step 1 - construction progress Wall Hanging Panda Decor Pattern step 2 - assembly progress Wall Hanging Panda Decor Pattern step 3 - details and accessories Wall Hanging Panda Decor Pattern step 4 - final assembly and finishing

Switch Things Up

If you want to make this pattern your own, there are so many fun ways to customize it! I love experimenting with different color combinations for the background - imagine a soft pink or mint green instead of baby blue for a different mood entirely. You could also swap the baby blue for a seasonal color like orange for fall or red for Christmas.

For the decorative elements, don't feel limited to just flowers or a bow. I've seen makers add little crocheted bamboo leaves, hearts, or even tiny butterflies around the panda's head. You could create a whole theme by adding small amigurumi companions hanging from the bottom of the canvas alongside the tassels.

Another idea I absolutely love is making this in different animal faces using the same canvas technique - a brown bear with honey pots, a gray koala with eucalyptus leaves, or even a rainbow unicorn version. The tapestry crochet method works beautifully for any simple graphic design.

If you're feeling adventurous, try adding texture to the white parts of the panda's face using bobble stitches or loop stitches to give it a fluffy appearance. You could also experiment with the tassel colors - using rainbow colors or ombre effects creates a totally different vibe.

Common Mistakes & How to Fix Them

βœ— Not maintaining consistent tension during color changes can create gaps or puckering in the canvas, so practice your color-changing technique on a swatch first and keep yarn tension even throughout βœ— Forgetting to weave in yarn tails on the wrong side as you go leads to a messy back and tedious finishing work, so secure and trim ends after every color section βœ— Overstuffing the muzzle makes it look bulky instead of gently rounded, so add small amounts of fiberfill and check the shape frequently until it has a subtle natural curve βœ— Skipping the ironing step for the canvas results in uneven edges and wavy fabric that won't hang straight, so always steam or iron your finished canvas before assembly

Wall Hanging Panda Decor Pattern

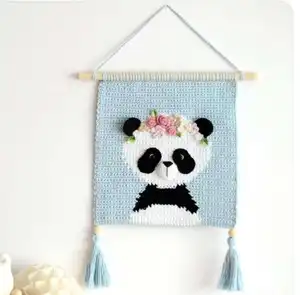
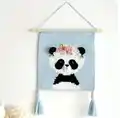
Transform your space with this charming wall hanging panda pattern that combines tapestry crochet techniques with adorable 3D details. This intermediate-level project features a beautiful canvas design with a sweet panda face, complete with dimensional ears, muzzle, and decorative elements. Perfect for nursery decor or as a heartfelt handmade gift, this wall hanging measures approximately 46 stitches by 53 rounds and includes customizable options for both boy and girl versions with bow or floral embellishments.

Intermediate 8-10 Hours

Materials Needed for Wall Hanging Panda Decor Pattern

β€” Main Fabric

  • 01
    Yarnart Jeans Plus (100g/160m) in white color (#62) for main canvas
  • 02
    Yarnart Jeans Plus (100g/160m) in black color (#53) for main canvas
  • 03
    Drops Paris (50g/75m) in baby blue color (#29) for main canvas
  • 04
    Yarnart Jeans (50g/160m) in black color (#53) for ears and eye spots
  • 05
    Yarnart Jeans (50g/160m) in white color (#62) for muzzle
  • 06
    Small amount of dark brown yarn for nose (embroidery floss or Iris)
  • 07
    Any yarn remains in suitable colors for flowers or bow decoration
  • 08
    Optional beads and sequins for decorating flowers

β€” Tools Required

  • 01
    Crochet hook 3.5mm (US E)
  • 02
    Crochet hook 1.75mm or 1.6mm
  • 03
    Safety eyes 8mm (optional, eyes can be embroidered)
  • 04
    Yarn needle for sewing details
  • 05
    Toy stuffing: polyester fiberfill (small amount)
  • 06
    Round wooden stick or dowel (diameter 13mm, 6cm longer than canvas)
  • 07
    2 wooden beads (optional for tassels)
  • 08
    Scissors
  • 09
    Iron for blocking canvas

Progress Tracker

0% Complete

β€” Canvas :

Size :

46 sc Γ— 53 rounds

Info :

Turn work after every row and crochet from right to left. Odd rows on canvas pattern calculate from right to left, even rows (wrong rows) from left to right. Do not cut yarn or stretch under different color. Use separate skein for each colored part.

Row 1 :

With baby blue yarn (Drops Paris #29) and 3.5mm hook, make 47 ch. Work sc into 3rd ch, work 10 more sc and change yarn to white (Yarnart Jeans Plus #62). Crochet 22 sc and change to baby blue again using second skein. Work last 12 sc. Every row starts with 2 turning chains counted as first sc.

Rows 2-53 :

Continue crocheting according to canvas pattern, changing colors as shown. Work last sc of each row into turning chain from previous row.

Finishing :

Fasten off last stitch, leaving thread tail 2.5m in length for attaching canvas to wooden stick. Weave in all unnecessary threads at wrong side and iron the canvas.

β€” Ears (Make 2) :

Materials :

Yarnart Jeans black color #53, hook 1.6mm

Rd 1 :

6 sc in MR (6 sts)

Rd 2 :

(inc) Γ— 6 (12 sts)

Rd 3 :

(1 sc, inc) Γ— 6 (18 sts)

Rds 4-7 :

18 sc (18 sts)

Finishing :

Fold ear in half and crochet 8 sc through two layers. Fasten off leaving long tail for sewing.

β€” Eye Spots :

Materials :

Yarnart Jeans black color #53, hook 1.6mm. Crochet in a circle.

Rd 1 :

4 ch, sc in 2nd ch from hook, 1 sc, inc (3 sc in one stitch), 2 sc, inc (3 sc in one stitch) (10 sts)

Rd 2 :

2 sc, inc, inc (3 sc in one stitch), inc, 2 sc, inc, inc (3 sc in one stitch), inc (18 sts)

Rd 3 :

3 sc, (inc) Γ— 5, 4 sc, (inc) Γ— 5, sc (28 sts)

Rd 4 :

4 sl st, 1 sc, 1 hdc, (inc dc) Γ— 5, 1 hdc, 1 sc, 15 sl st (33 sts)

Finishing :

Fasten off leaving long tail for sewing.

β€” Muzzle :

Materials :

Yarnart Jeans white color #62, hook 1.6mm

Rd 1 :

6 sc in MR (6 sts)

Rd 2 :

(inc) Γ— 6 (12 sts)

Rd 3 :

(1 sc, inc) Γ— 6 (18 sts)

Rd 4 :

(2 sc, inc) Γ— 6 (24 sts)

Rd 5 :

24 sc, sl st (24 sts)

Finishing :

Fasten off leaving long tail for sewing.

β€” Nose Embroidery :

Info :

Take brown yarn, secure at wrong side of muzzle and embroider the nose as shown in pattern diagram.

β€” Boy Version Bow :

Materials :

Any yarn of choice. After each row, make 2 ch (turning chain, counts as first hdc) and turn crochet.

Rd 1 :

17 ch, hdc in 3rd ch from hook, 14 hdc (16 sts)

Rds 2-8 :

2 ch, 15 hdc (16 sts)

Edging :

Crochet along edges of bow and make 3 sc into one stitch at corners. Fasten off and hide yarn.

Finishing :

Tie around middle of bow with thread and sew to canvas.

β€” Girl Version Little Flower :

Pattern :

Crochet in MR: (3 ch, hdc in 1st ch, sl st in MR) repeat 5 times to get 5 petals.

β€” Girl Version Bigger Flower :

Rd 1 :

5 sc in MR (5)

Rd 2 :

In 1st sc (sl st, 2 ch, 2 dc, 2 ch, sl st) repeat 5 times in each sc to get 5 petals.

β€” Girl Version Little Rose :

Rd 1 :

16 ch, dc in 3rd ch, 2 dc in each of next stitch.

Finishing :

Roll rose in spiral and sew with needle.

β€” Girl Version Bigger Rose :

Rd 1 :

17 ch, dc in 3rd ch, 2 dc in each next stitch (30)

Rd 2 :

1 ch, 1 sc, 1 skip, 5 dc in one stitch, (1 skip, 2 sc, 1 skip, 5 dc in one stitch) repeat 4 times, 1 sc in last stitch. You should get 6 petals.

Finishing :

Roll rose in spiral and sew with needle.

β€” Leaves :

Rd 1 :

8 ch, 1 sl st in 2nd ch, 1 sc, 1 hdc, inc dc, 1 dc, 1 hdc, 3 sc in last stitch. On other side of chain: 1 hdc, 1 dc, 1 sc, inc dc, 1 hdc, 1 sc, 1 sl st.

β€” Hanging Loop :

Pattern :

Make ch 60 and tie ends to ends of wooden stick forming loop for hanging to wall.

β€” Tassels (Make 2) :

Info :

Make two tassels about 10cm long, leave long tail to attach tassels to canvas. Trim tassels to make them even and neat. Add wooden beads to threads and attach tassels to canvas.

Assembly Instructions

  • Sew the muzzle to canvas between rows 18 and 25 (count down from head top), stuffing lightly with fiberfill to make it slightly protruding.
  • Sew the ears to the top of the panda head on the canvas at appropriate positions.
  • Embroider the nose on the muzzle using brown yarn, securing it at the wrong side first.
  • Use white yarn to embroider eye whites on the canvas where shown in pattern.
  • Place safety eyes between rows 13-14, separated by 4 sc, and secure at wrong side. If eyes are correctly positioned, sew black eye spots to canvas around them.
  • For girl version: Sew flowers and leaves on head, decorating with beads and sequins. For boy version: Sew bow to canvas at neck area.
  • Take wooden stick (6cm longer than canvas). Using the 2.5m thread tail left from canvas, attach canvas to wooden stick by wrapping and securing thread.
  • Create hanging loop by making 60 chains and tying ends to ends of wooden stick. Attach completed tassels with wooden beads to bottom corners of canvas.

Important Notes

  • πŸ’‘The canvas pattern shows color placement visually - follow the chart carefully for accurate color blocking.
  • πŸ’‘Keep separate skeins for each color section to avoid cutting and rejoining yarn constantly.
  • πŸ’‘Iron or steam block the canvas after completion to ensure straight edges and proper draping.
  • πŸ’‘When changing colors, bring the new color through on the last yarn over of the previous stitch for clean color transitions.
  • πŸ’‘Stuff the muzzle sparingly - it should be gently rounded, not overly plump.
  • πŸ’‘The wooden stick should extend 3cm beyond each side of the canvas for proper proportions.
  • πŸ’‘Safety eyes must be inserted before sewing on the black eye spots for best positioning.

This adorable Panda Wall Hanging pattern was designed to bring warmth and whimsy to any space while teaching you valuable tapestry crochet techniques! The combination of flat canvas work with dimensional amigurumi elements creates a unique decorative piece that's perfect for nurseries, children's rooms, or any space that needs a touch of handmade charm. The customizable boy or girl options make this an ideal personalized gift that will be treasured for years to come. 🐼🧢✨

You ask,

we answer.

FAQs

Can I use different yarn brands than specified?

Yes! You can substitute with any worsted weight yarn. If using Yarnart Jeans instead of Jeans Plus, crochet with two strands held together. The main requirement is achieving a tight, even tension for the canvas so colors don't show through.

How do I manage multiple yarn colors without tangling?

Use separate small skeins or wind separate balls for each color section. Don't cut the yarn between color changes - carry it loosely along the wrong side and pick it up when needed again. This technique is clearly shown in the pattern photos.

What if I don't have safety eyes?

The pattern notes that safety eyes are optional. You can embroider the eyes using black yarn instead, creating a safer option for young children and a completely different look.

Is blocking the canvas really necessary?

Yes, blocking is essential for this project! Without ironing or steaming the canvas, your wall hanging will have wavy edges and won't hang straight. Blocking also helps even out tension and makes color transitions look cleaner.

Can I adjust the size of the wall hanging?

While you can use different hook and yarn sizes to change the overall scale, keep in mind you'll need to adjust the wooden stick length accordingly. The pattern's proportions work best when keeping the 46Γ—53 stitch count.