🧢 Beautiful ✨ Detailed πŸ’ Adorable

Plush Ballerina Bear Amigurumi Pattern

Plush Ballerina Bear Amigurumi Pattern
4.2β˜… Rating
3-4 Hours Time Needed
2.2K Made This
βœ‚οΈ

Beginner Friendly Level

Perfect for those just starting their sewing journey, with clear instructions and simple techniques

⏱️

Weekend Treat

Takes 5-7 hours, making it an enjoyable project to finish over a couple of days.

🧸

Cute Companion

An adorable friend to cherish, handcrafted with love to bring comfort and joy for years to come.

About This Plush Ballerina Bear Amigurumi Pattern

This charming ballerina bear pattern combines the softness of plush yarn with delightful details that bring personality to life. The pattern features a complete outfit including a purple tutu-style dress with layered ruffles and a decorative flower accessory. With clear round-by-round instructions and helpful tips throughout, you'll create a bear that's both huggable and display-worthy. The finished toy stands at about 23 cm tall, making it the perfect size for little hands to hold or as a decorative piece in any room.

Plush Ballerina Bear Amigurumi Pattern crochet pattern - detailed view of completed project

This pattern uses basic crochet stitches and techniques, making it accessible for beginners while still creating an impressive finished piece. The dress is worked directly onto the body, and the pattern includes guidance on proper stuffing and assembly for the best results.

Why You'll Love This Plush Ballerina Bear Amigurumi Pattern

I absolutely love this pattern because it creates such a sweet and elegant character that feels special to make. The plush yarn gives the bear an incredibly soft, cuddly texture that makes you want to squeeze it immediately. I appreciate how the dress is integrated into the design, creating beautiful layers without complicated construction. The size is just rightβ€”not too small to be fiddly, but compact enough to finish in a reasonable time. The little details like the embroidered face and the flower accessory add so much personality, and I find the process of watching this ballerina come to life genuinely satisfying and rewarding.

Plush Ballerina Bear Amigurumi Pattern step 1 - construction progress Plush Ballerina Bear Amigurumi Pattern step 2 - assembly progress Plush Ballerina Bear Amigurumi Pattern step 3 - details and accessories Plush Ballerina Bear Amigurumi Pattern step 4 - final assembly and finishing

Switch Things Up

I love experimenting with different color combinations for this ballerina bear! Instead of purple, I've tried making the dress in soft pink with white accents for a classic ballet look, or even a sparkly gold yarn for a truly show-stopping performance bear. You could also switch up the flower accessory by making multiple smaller flowers or adding a tiny crocheted crown for a princess bear variation.

For a boy version, I've transformed this pattern by eliminating the dress and instead creating little shorts and a vest using the same construction technique. The body structure works beautifully for any gender presentation you want to create. Consider adding a bow tie or a tiny scarf for extra personality.

If you want to make this bear more interactive for children, try using different textured yarns for the dress while keeping the body in plush yarn. I've also added small ribbons or bells to the dress hem for sensory play. For a larger version, simply use a thicker yarn and bigger hookβ€”I've successfully made 35cm versions using super bulky chenille yarn with a 6mm hook.

Common Mistakes & How to Fix Them

βœ— Mistake: Not stuffing the head firmly enough in the lower part, causing the head to wobble or lose shape over time βœ— Mistake: Placing the arms asymmetrically when attaching them to the body, resulting in an unbalanced appearance that's noticeable when finished βœ— Mistake: Making the ears too large by following all rounds when crocheting loosely, which can overpower the bear's sweet facial proportions βœ— Mistake: Skipping the back loops only instruction in the dress section, which eliminates the layered effect and ruffled texture βœ— Mistake: Attaching safety eyes too loosely or in the wrong position, affecting the bear's expression and overall character

Plush Ballerina Bear Amigurumi Pattern

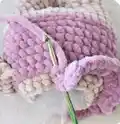
Create an enchanting plush ballerina bear with this delightful amigurumi pattern! Standing at approximately 23 cm tall, this adorable teddy features a charming purple tutu dress and a sweet flower accessory. Made with soft plush yarn, this cuddly companion combines simplicity with elegance, making it perfect for gifting or adding to your handmade collection. The pattern includes detailed instructions for crafting the bear's body, head, arms, legs, and a beautiful layered dress that captures the grace of a ballerina.

Beginner Friendly 3-4 Hours

Materials Needed for Plush Ballerina Bear Amigurumi Pattern

β€” Main Fabric

  • 01
    Plush yarn in beige (Himalaya Dolphin Baby 80301) - 100g/120m
  • 02
    Plush yarn in purple (Himalaya Dolphin Baby 80317) - 100g/120m
  • 03
    Dark brown embroidery thread for facial features (YarnArt Jeans 70 or similar)

β€” Tools Required

  • 01
    Crochet hook 4.00 mm
  • 02
    Safety eyes 12 mm
  • 03
    Polyester fiber fill stuffing
  • 04
    Yarn needle for sewing
  • 05
    Scissors
  • 06
    Stitch markers
  • 07
    Pink blush for cheeks

Progress Tracker

0% Complete

β€” ARMS :

Info :

Crochet with the beige yarn. Stuff only lower half of the arm.

Round 1 :

6 sc into a magic ring (6)

Round 2 :

6 inc (12)

Round 3-4 :

12 sc (2 rounds)

Round 5 :

(4 sc, dec)*2 (10)

Round 6 :

10 sc

Round 7 :

(3 sc, dec)*2 (8)

Round 8 :

8 sc

Round 9 :

Flatten the arm and crochet 4 sc through both sides. Fasten off and cut the yarn.

β€” LEGS :

Info :

Crochet with the beige yarn. Stuff as you go.

Round 1 :

8 sc into a magic ring (8)

Round 2 :

8 inc (16)

Round 3 :

16 sc

Round 4 :

4 sc, 4 dec, 4 sc (12)

Round 5 (Left Leg) :

7 sc, place additional marker, 5 sc (12). Make a sl st, fasten off and cut the yarn.

Round 5 (Right Leg) :

12 sc (12). Don't cut the yarn, we will continue with the body.

β€” BODY :

Info :

Continue crocheting with the beige yarn. Stuff as you go.

Round 1 :

Crochet 5 sc more on the right leg. Make chain 3 and attach the yarn to the left leg where you placed the additional marker. Crochet 12 sc on the left leg; 3 sc on the front of the chain; 12 sc on the right leg; 3 sc on the back of the chain (30). Place the marker here, it will be the new start. (The marker should be in the back)

Round 2 :

12 sc, 3 inc, 12 sc, 3 inc (36)

Round 3 :

(11 sc, inc)*3 (39)

Round 4 :

39 sc. Change the yarn to purple color.

Round 5 :

39 sc

Round 6 :

Back loops only: 39 sc

Round 7-8 :

39 sc (2 rounds)

Round 9 :

(11 sc, dec)*3 (36)

Round 10 :

36 sc

Round 11 :

(4 sc, dec)*6 (30)

Info :

Check if the marker is exactly in middle of the back. If not - crochet 1-2 sc more to correct it. Now we will join the arms.

Round 12 :

6 sc, 4 sc through the first arm and the body, 10 sc, 4 sc through the second arm and the body, 6 sc (30). Check if the arms are symmetrical. If not, correct the stitches. Change the yarn to beige color. Don't cut the purple yarn - move it to the front of your work.

Round 13 :

Back loops only: (3 sc, dec)*6 (24)

Round 14 :

24 sc. Don't cut the beige yarn, we will continue with the head, but first we need to finish the dress.

β€” DRESS :

Info :

Take the purple yarn and crochet in the front loops of round 13 with the body turned upside down.

Round 1 :

((sc, chain 1, sc) in one stitch)*24 (72). Make a sl st, fasten off and cut the yarn. Hide the thread inside the body.

Info :

Now attach the purple yarn to back in the front loops of round 6. Crochet with the body turned upside down.

Round 1 :

ch 2, (2 dc in one st, 2 dc in one st, 3 dc in one st)*13, sl st (91)

Round 2 :

91 sc. Make a sl st, fasten off and cut the yarn. Hide the thread inside the body.

β€” HEAD :

Info :

Continue crocheting with the beige yarn. Stuff as you go.

Round 1 :

(sc, inc)*12 (36)

Round 2 :

(2 sc, inc)*12 (48)

Round 3 :

(7 sc, inc)*6 (54)

Round 4 :

4 sc, inc, (8 sc, inc)*5, 4 sc (60)

Round 5-7 :

60 sc (3 rounds)

Round 8 :

4 sc, dec, (8 sc, dec)*5, 4 sc (54)

Round 9-11 :

54 sc (3 rounds)

Info :

Insert the safety eyes between rounds 6 and 7 with 8 stitches between them (6 stitches visible).

Round 12 :

(7 sc, dec)*6 (48)

Round 13 :

3 sc, dec, (6 sc, dec)*5, 3 sc (42)

Round 14 :

(5 sc, dec)*6 (36)

Round 15 :

2 sc, dec, (4 sc, dec)*5, 2 sc (30)

Round 16 :

(3 sc, dec)*6 (24)

Round 17 :

sc, dec, (2 sc, dec)*5, sc (18)

Round 18 :

(sc, dec)*6 (12)

Round 19 :

6 dec (6)

Info :

Make sure that the head is stuffed firmly, especially in the lower part. Close the opening and hide the yarn inside.

β€” EARS :

Info :

Crochet with the beige yarn. Don't stuff.

Round 1 :

7 sc into a magic ring (7)

Round 2 :

7 inc (14)

Round 3-4 :

14 sc (2 rounds)

Info :

If you crochet wider and it looks like the ears are too big, just skip round 4 and make them only 3 rounds. Make a sl st, fasten off and cut the yarn, leaving a tail for sewing. Sew the ears to the head in rounds 10-14. Sew the ears 5 st away from the end of the eyebrows (counted in round 10). That's 23 st total between the ears in their lower end. The ears should be slightly curved.

β€” MUZZLE :

Info :

Crochet with the beige yarn. Stuff lightly.

Round 1 :

6 sc into a magic ring (6)

Round 2 :

6 inc (12)

Round 3 :

(3 sc, inc)*3 (15)

Info :

Make a sl st, fasten off and cut the yarn, leaving a tail for sewing. Sew the muzzle to the head in rounds 3-6.

β€” EMBROIDERING :

Infos :

With a brown thread embroider the nose, as it's shown in the pictures. It's between rounds 2 and 3 of the muzzle and is 2 st wide. The toy looks cuter if the nose is smaller. The vertical line on the muzzle must be 2 rounds long. Embroider the eyebrows in round 10. They are 2 st wide and with 8-9 st between them. Color the cheeks with pink blush.

β€” FLOWER :

Info :

Crochet with the purple yarn. Make a magic ring and crochet in it: (2 ch, dc, 2 ch, sl st)*5. Tighten the magic ring, fasten off and cut the yarn, leaving a long thread for sewing. Sew the flower to the head near one of the ears.

Assembly Instructions

  • The legs are joined together with chain stitches to form the base of the body, creating a seamless connection between both legs.
  • Arms are attached during round 12 of the body by crocheting through both the arm and body simultaneously for a secure connection.
  • The dress is worked in two parts: the upper ruffle is crocheted in the front loops of round 13, and the lower skirt in the front loops of round 6.
  • Ears should be sewn to the head in rounds 10-14, positioned 5 stitches away from the eyebrows with slight curving for a natural look.
  • The muzzle is sewn to the head in rounds 3-6 after being lightly stuffed to create dimension.
  • Safety eyes are inserted between rounds 6 and 7 with 8 stitches between them before the head opening is closed.
  • The decorative flower is sewn near one of the ears after all other assembly is complete for the finishing touch.

Important Notes

  • πŸ’‘Use plush yarn for the softest, most cuddly texture that makes this bear extra huggable and perfect for children
  • πŸ’‘Stuff the head very firmly in the lower portion to prevent wobbling and maintain proper shape throughout the bear's life
  • πŸ’‘Mark your rounds carefully, especially when changing colors between beige and purple to ensure neat transitions
  • πŸ’‘Work the dress sections with the body turned upside down as instructed for the proper ruffled effect and layered appearance
  • πŸ’‘If crocheting loosely, consider skipping round 4 of the ears to prevent them from appearing oversized on the finished bear
  • πŸ’‘Pin the ears and muzzle in place before final sewing to ensure symmetrical placement and the desired facial expression
  • πŸ’‘Keep purple yarn attached when switching to beige at round 13 of the body to easily return for dress completion

This adorable Plush Ballerina Bear pattern brings elegance and sweetness together in one cuddly package! Designed with beginners in mind, the pattern guides you through creating a charming bear complete with a beautiful layered tutu dress and delicate flower accessory. The use of plush yarn ensures an irresistibly soft texture that makes this bear perfect for gifting or keeping as a treasured handmade companion. Every detail, from the embroidered face to the ruffled dress, adds personality and charm to this delightful creation. πŸ§ΆπŸ’œβœ¨

You ask,

we answer.

FAQs

Can I use different yarn than Himalaya Dolphin Baby for this pattern?

Yes, you can use any plush or chenille yarn with similar thickness. Just ensure your gauge matches to achieve the approximate 23 cm size, or adjust your hook size accordingly.

How do I prevent the head from being too floppy?

Stuff the head very firmly, especially in the lower part near the neck. The pattern emphasizes this because proper stuffing ensures the head stays upright and maintains its shape over time.

What if my ears look too big after crocheting all the rounds?

The pattern suggests skipping round 4 if you crochet loosely. Making the ears only 3 rounds instead of 4 will give you smaller, more proportionate ears for the bear's head.

Can I make the dress in a different color?

Absolutely! Feel free to customize the dress color to create your own unique ballerina bear. Just substitute the purple yarn with any color you prefer.

Do I need to stuff the arms completely?

No, the pattern specifically instructs to stuff only the lower half of the arms. This creates a more natural drape and allows the arms to pose better.

How do I attach the safety eyes securely?

Insert the safety eyes between rounds 6 and 7 with 8 stitches between them (6 visible stitches). Make sure to push the backing on firmly before closing the head opening completely.