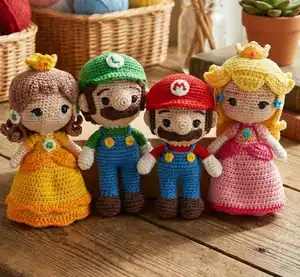
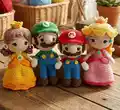
Create your favorite video game characters with this comprehensive Mario Bros amigurumi collection! This detailed pattern includes step-by-step instructions for crafting Mario, Luigi, Princess Peach, and Princess Daisy. Each character features authentic details like iconic caps with embroidered letters, overalls with buttons, mustaches, and crowns for the princesses. Perfect for Nintendo fans and amigurumi enthusiasts, these adorable plushies measure between 5-7 inches tall and make wonderful gifts or collectible displays. Bring the Mushroom Kingdom to life with your crochet hook!
Progress Tracker
0% Complete
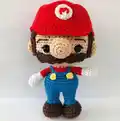
— MARIO - Shoes & Legs (make 2):
Round 1:
Using light brown color: Magic ring (6)
Round 2:
2sc in each st (12)
Round 3:
1sc in the next 1st, 1inc x 6 (18)
Info:
Change to dark brown color
Round 4:
1sc in the next 2st, 1inc x 6 (24)
Round 5-6:
1sc in each st (24)
Round 7:
1sc in the next 5st, 1dec in the next 5st, 1sc in the next 7st, 1dec (18)
Round 8:
1sc in the next 1st, 1dec x 6 (12)
Info:
Change to blue color
Round 9:
1sc in each st (12)
Round 10:
Working behind the ch. 1sc in each st (12)
Round 11-14:
1sc in each st (12)
Info:
First leg: fasten off and cut yarn. For the second leg: don't cut the yarn, you'll connect it to the other leg and start the body. Stuff the legs with fiber fill.
— MARIO - Body:
Info:
Keep using blue color
Round 1:
1sc in the next 9st (1 leg), 1sc in the next 12st of the other leg, 1sc in the next 3st (24)
Round 2:
1sc, 1inc x 8 (36)
Round 3-6:
1sc in each st (36)
Round 7:
1sc in the next 4st, 1dec x 6 (30)
Round 8:
1sc in each st (30)
Round 9:
Working at the back ch. 1sc in the next 3st, 1dec x 6 (24)
Round 10:
1sc in each st (24)
Round 11:
1sc in the next 1st, 1dec x 6 (16)
Info:
Don't cut the yarn, we'll begin crocheting the head, CHANGE to peach color
— MARIO - Head:
Round 1:
1sc in each st (16)
Round 2:
1sc in the next 1st,1inc x 8 (24)
Info:
Stuff the body with fiber fill up to the neck
Round 3:
1sc in the next 2st, 1inc x 8 (32)
Round 4:
1sc in the next 3st, 1inc x 8 (40)
Round 5:
1sc in the next 5st, 1sc and 1inc x 7, 1sc in the next 5st, 1sc and 1inc x 7, 1inc in the next 2st (56)
Round 6:
1sc in the next 55st, 1inc in next 1st (57)
Round 7-11:
1sc in each st (57)
Round 12:
1sc in the next 17st, 1dec x 3 (54)
Round 13-20:
1sc in each st (54)
Info:
It's time you add the safety eyes, I place them in the 9-10 round with 8st between them. Make sure to place them centered at the front of the head.
Round 21:
1sc in the next 7st, 1dec x 6 (48)
Round 22:
1sc in the next 6st, 1dec x 6 (42)
Round 23:
1sc in the next 5st, 1dec x 6 (36)
Round 24:
1sc in the next 4st, 1dec x 6 (30)
Round 25:
1sc in the next 3st, 1dec x 6 (24)
Info:
Start stuffing the head
Round 26:
1sc in the next 2st, 1dec x 6 (18)
Round 27:
1sc in the next 1st, 1dec x 6 (12)
Round 28:
1dec in the next 6st (6)
Info:
Make sure the head is stuffed and firm before closing it up. Fasten off and hide the end.
— MARIO - Arms (make 2):
Round 2:
2sc in each st (12)
Round 3-5:
1sc in each st (12)
Round 6:
1sc in the next 1st, 1dec x 6 (8)
Round 7:
Working on the front ch. 1sc in each st (8)
Round 8:
Working at the back ch from Round 7. 1sc in each st (8)
Round 9-13:
1sc in each st (8)
Info:
Finish with 1sl st. Break the yarn and leave a long tail to sew the arms to the body. Only stuff the hand area.
— MARIO - Ears (make 2):
Round 2:
2sc in each st (12)
Round 3:
1sc in each st (12)
Info:
Finish with a sl st and leave long tail to sew to the head. Don't stuff the ears.
— MARIO - Moustache:
Info:
In each row you'll make 1ch, turn and start at the 2ch from your hook, unless specified otherwise. Using dark brown color.
Row 2:
1sc in each st (15)
Row 3:
1sc in the next 1st, 2dc in the next 1st, 1sc in the next 1st x 5
Info:
Finish with a sl st. Leave long tail to sew to the face.
— MARIO - Nose:
Round 2:
2sc in each st (12)
Round 3:
1sc in the next 1st, 1inc x 6 (18)
Round 4-5:
1sc in each st (18)
Round 6:
1sc in the next 1st, 1dec x 6 (12)
Info:
Finish with a sl st. Leave long tail to sew to the face. You can stuff the nose or wait until sewed to the face.
— MARIO - Overall Buttons:
Round 1:
Magic Ring (4), 1sl st
Info:
Leave long tail to sew to the overall
— MARIO - Hair:
Info:
Using dark brown color
Round 2:
1inc in each st (14)
Round 3:
1sc in the next 1st, 1inc x 7 (21)
Round 4:
1sc in the next 2st, 1inc x 7 (28)
Round 5:
1sc in the next 3st, 1inc x 7 (35)
Round 6:
1sc in the next 4st, 1inc x 7 (42)
Round 7:
1sc in the next 5st, 1inc x 7 (49)
Round 8:
1sc in the next 6st, 1inc x 7 (56)
Round 9:
1sc in the next 27st, 1inc x 2 (58)
Round 10-15:
1sc in each st (58)
Round 16:
1sc in the next 1st, 8ch, turn and start at the 2ch from the hook, 1hdc in the next 7st and finish with 1sl st (sideburn). 1sc in the next 1st, 2dc in the next 1st, 1sc in the next 1st x 6. 1sc in the next 1st, 8ch, turn and start at the 2ch from the hook, 1hdc in the next 7st and finish with 1sl st (sideburn). 1sc in the next 37st.
Info:
In each row you'll make 1ch, turn and start at the 2ch from your hook, unless specified otherwise
Row 17:
1dec, 1sc in the next 33st, 1dec (35)
Row 18:
1dec, 1sc in the next 31st, 1dec (33)
Row 19:
1sc in the next 1st, 2dc in the next 1st, 1sc in the next 1st x 11
Info:
Finish with 1sl st and leave long tail to sew to the head
— MARIO - Cap:
Round 2:
1inc in each st (14)
Round 3:
1sc in the next 1st, 1inc x 7 (21)
Round 4:
1sc in the next 2st, 1inc x 7 (28)
Round 5:
1sc in the next 3st, 1inc x 7 (35)
Round 6:
1sc in the next 4st, 1inc x 7 (42)
Round 7:
1sc in the next 5st, 1inc x 7 (49)
Round 8:
1sc in the next 6st, 1inc x 7 (56)
Round 9:
1sc in the next 7st, 1inc x 7 (63)
Round 10-19:
1sc in each st (63)
Info:
In each row you'll make 1ch, turn and start at the 2ch from your hook, unless specified otherwise
Row 20:
Working in the front ch. 1sc in the next 18st (18)
Row 21:
1sc in each st (18)
Row 22:
1dec, 1sc in the next 14st, 1dec (16)
Row 23:
1sc in each st (16)
Row 24:
1dec, 1sc in the next 12st, 1dec (14)
Info:
Make your way through the cap with 1sl st. Fasten off and hide the end.
— MARIO - Letter on Cap:
Round 1:
Magic Ring (6), 1sl st and 1ch
Round 2:
Start in the same st. 1inc in each st (12), finish with a sl st and leave long tail to sew to the cap
Info:
Embroider a letter M on the circle with red color. The white circle can be sewed to the cap or you can glue it.
— LUIGI - Shoes & Legs (make 2):
Info:
Using light brown color
Round 2:
2sc in each st (12)
Round 3:
1sc in the next 1st, 1inc x 6 (18)
Info:
Change to dark brown color
Round 4:
1sc in the next 2st, 1inc x 6 (24)
Round 5-6:
1sc in each st (24)
Round 7:
1sc in the next 5st, 1dec in the next 5st, 1sc in the next 7st, 1dec (18)
Round 8:
1sc in the next 1st, 1dec x 6 (12)
Info:
Change to blue color
Round 9:
1sc in each st (12)
Round 10:
Working behind the ch. 1sc in each st (12)
Round 11-17:
1sc in each st (12)
Info:
First leg: fasten off and cut yarn. For the second leg: don't cut the yarn, you'll connect it to the other leg and start the body. Stuff the legs with fiber fill.
— LUIGI - Body:
Info:
Keep using blue color
Round 1:
1sc in the next 11st (1 leg), 1sc in the next 12st of the other leg, 1sc in the next 1st (24)
Round 2:
1sc, 1inc x 8 (36)
Round 3-6:
1sc in each st (36)
Round 7:
1sc in the next 4st, 1dec x 6 (30)
Round 8:
1sc in each st (30)
Info:
Change to green color
Round 9:
Working at the back ch. 1sc in the next 3st, 1dec x 6 (24)
Round 10-11:
1sc in each st (24)
Round 12:
1sc in the next 1st, 1dec x 6 (16)
Info:
Don't cut the yarn, we'll begin crocheting the head, CHANGE to peach color
— LUIGI - Head:
Round 1:
1sc in each st (16)
Round 2:
1sc in the next 1st,1inc x 8 (24)
Info:
Stuff the body with fiber fill up to the neck
Round 3:
1sc in the next 2st, 1inc x 8 (32)
Round 4:
1sc in the next 3st, 1inc x 8 (40)
Round 5:
1sc in the next 5st, 1sc and 1inc x 7, 1sc in the next 5st, 1sc and 1inc x 7, 1inc in the next 2st (56)
Round 6:
1sc in the next 55st, 1inc in next 1st (57)
Round 7-11:
1sc in each st (57)
Round 12:
1sc in the next 17st, 1dec x 3 (54)
Round 13-20:
1sc in each st (54)
Info:
It's time you add the safety eyes, I place them in the 9-10 round with 8st between them. Make sure to place them centered at the front of the head.
Round 21:
1sc in the next 7st, 1dec x 6 (48)
Round 22:
1sc in the next 6st, 1dec x 6 (42)
Round 23:
1sc in the next 5st, 1dec x 6 (36)
Round 24:
1sc in the next 4st, 1dec x 6 (30)
Round 25:
1sc in the next 3st, 1dec x 6 (24)
Info:
Start stuffing the head
Round 26:
1sc in the next 2st, 1dec x 6 (18)
Round 27:
1sc in the next 1st, 1dec x 6 (12)
Round 28:
1dec in the next 6st (6)
Info:
Make sure the head is stuffed and firm before closing it up. Fasten off and hide the end.
— LUIGI - Arms (make 2):
Round 2:
2sc in each st (12)
Round 3-5:
1sc in each st (12)
Round 6:
1sc in the next 1st, 1dec x 6 (8)
Round 7:
Working on the front ch. 1sc in each st (8)
Info:
Change to green color
Round 8:
Working at the back ch from Round 7. 1sc in each st (8)
Round 9-15:
1sc in each st (8)
Info:
Finish with 1sl st. Break the yarn and leave a long tail to sew the arms to the body. Only stuff the hand area.
— LUIGI - Ears (make 2):
Round 2:
2sc in each st (12)
Round 3:
1sc in each st (12)
Info:
Finish with a sl st and leave long tail to sew to the head. Don't stuff the ears.
— LUIGI - Moustache:
Info:
Using dark brown color
Round 2:
1sc in the next 1st, 1inc x 2 (6)
Round 3:
1sc in the next 2st, 1inc x 2 (8)
Round 4:
1sc in the next 3st, 1inc x 2 (10)
Round 5:
1sc in each st (10)
Round 6:
1sc in the next 3st, 1dec x 2 (8)
Round 7:
1sc in the next 2st, 1dec x 2 (6)
Round 8:
1sc in the next 2st, 1inc x 2 (8)
Round 9:
1sc in the next 3st, 1inc x 2 (10)
Round 10:
1sc in each st (10)
Round 11:
1sc in the next 3st, 1dec x 2 (8)
Round 12:
1sc in the next 2st, 1dec x 2 (6)
Round 13:
1sc in the next 1st, 1dec x 2 (4)
Info:
Close it and pass the tail through the middle of the moustache to sew to the face
— LUIGI - Nose:
Round 2:
2sc in each st (12)
Round 3:
1sc in the next 1st, 1inc x 6 (18)
Round 4-5:
1sc in each st (18)
Round 6:
1sc in the next 1st, 1dec x 6 (12)
Info:
Finish with a sl st. Leave long tail to sew to the face. You can stuff the nose or wait until sewed to the face.
— LUIGI - Overall Buttons:
Round 1:
Magic Ring (4), 1sl st
Info:
Leave long tail to sew to the overall
— LUIGI - Hair:
Info:
Using dark brown color
Round 2:
1inc in each st (14)
Round 3:
1sc in the next 1st, 1inc x 7 (21)
Round 4:
1sc in the next 2st, 1inc x 7 (28)
Round 5:
1sc in the next 3st, 1inc x 7 (35)
Round 6:
1sc in the next 4st, 1inc x 7 (42)
Round 7:
1sc in the next 5st, 1inc x 7 (49)
Round 8:
1sc in the next 6st, 1inc x 7 (56)
Round 9:
1sc in the next 27st, 1inc x 2 (58)
Round 10-15:
1sc in each st (58)
Round 16:
1sc in the next 1st, 8ch, turn and start at the 2ch from the hook, 1hdc in the next 7st and finish with 1sl st (sideburn). 1sc in the next 1st, 2dc in the next 1st, 1sc in the next 1st x 6. 1sc in the next 1st, 8ch, turn and start at the 2ch from the hook, 1hdc in the next 7st and finish with 1sl st (sideburn). 1sc in the next 37st.
Info:
In each row you'll make 1ch, turn and start at the 2ch from your hook, unless specified otherwise
Row 17:
1dec, 1sc in the next 33st, 1dec (35)
Row 18:
1dec, 1sc in the next 31st, 1dec (33)
Row 19:
1sc in the next 1st, 2dc in the next 1st, 1sc in the next 1st x 11
Info:
Finish with 1sl st and leave long tail to sew to the head
— LUIGI - Cap:
Round 2:
1inc in each st (14)
Round 3:
1sc in the next 1st, 1inc x 7 (21)
Round 4:
1sc in the next 2st, 1inc x 7 (28)
Round 5:
1sc in the next 3st, 1inc x 7 (35)
Round 6:
1sc in the next 4st, 1inc x 7 (42)
Round 7:
1sc in the next 5st, 1inc x 7 (49)
Round 8:
1sc in the next 6st, 1inc x 7 (56)
Round 9:
1sc in the next 7st, 1inc x 7 (63)
Round 10-19:
1sc in each st (63)
Info:
In each row you'll make 1ch, turn and start at the 2ch from your hook, unless specified otherwise
Row 20:
Working in the front ch. 1sc in the next 18st (18)
Row 21:
1sc in each st (18)
Row 22:
1dec, 1sc in the next 14st, 1dec (16)
Row 23:
1sc in each st (16)
Row 24:
1dec, 1sc in the next 12st, 1dec (14)
Info:
Make your way through the cap with 1sl st. Fasten off and hide the end.
— LUIGI - Letter on Cap:
Round 1:
Magic Ring (6), 1sl st and 1ch
Round 2:
Start in the same st. 1inc in each st (12), finish with a sl st and leave long tail to sew to the cap
Info:
Embroider a letter L on the circle with green color. The white circle can be sewed to the cap or you can glue it.
— PEACH - Shoes & Legs (make 2):
Info:
Start with the pink color yarn
Round 2:
2sc in each st (12)
Round 3:
1sc, 1inc x 6 (18)
Round 4-5:
1sc in each st (18)
Info:
Change to peach color
Round 6:
1sc in the next 3st, 1dec in the next 3st, 1sc and 1dec x 3 (12)
Round 7:
1sc and 1dec x 4 (8)
Round 8-18:
1sc in each st (8)
Info:
First leg: fasten off and cut the yarn. For the second leg: don't cut the yarn, you'll change color to connect it to the other leg and start the body. Stuff the legs with fiber fill.
— PEACH - Body:
Info:
Using pink color. IMPORTANT: Since everyone crochets different stitches (tight or loose) ROUND 1 part is how my legs result. You'll connect the legs with 1sc (16) (use the shoes to guide you, they must be pointing at the same direction).
Round 1:
1sc in the next 4st (1 leg), 1sc in the next 8st of the other leg, 1sc in the next 4st (16)
Round 2:
1sc, 1inc x 8 (24)
Round 3-5:
1sc in each st (24)
Round 6:
Working at the back of the ch. 1sc in each st (24)
Round 7:
1sc in the next 6st, 1dec x 3 (21)
Round 8:
1sc in the next 5st, 1dec x 3 (18)
Round 9:
1sc in each st (18)
Round 10:
1sc in the next 4st, 1dec x 3 (15)
Info:
Change to dark pink color
Round 11:
1sc in the next 3st, 1dec x 3 (12)
Info:
Change to peach color
Round 12:
1sc in the next 1st, 1dec x 3 (8)
Info:
Stuff the body with fiber fill. Don't cut the yarn, we'll begin crocheting the head using the same color. Leave the yarn, and before you start crocheting the head, we'll begin to do the dress.
— PEACH - Dress:
Info:
Using pink color. Turn the doll around and start at the back on the front of the ch you left at Round 6 of the body. Every time you finish a round, you'll make 1sl st and 1ch. Unless specified otherwise.
Round 1:
1hdc in the next 3st, 1inc x 6 (30)
Round 2:
1hdc in the next 4st, 1inc x 6 (36)
Round 3:
1hdc in each st (36)
Round 4:
1hdc in the next 5st, 1inc x 6 (42)
Round 5-6:
1hdc in each st (42)
Round 7:
1hdc in the next 6st, 1inc x 6 (48)
Round 8-9:
1hdc in each st (48)
Round 10:
1hdc in the next 7st, 1inc x 6 (54)
Round 11-13:
1hdc in each st (54)
Info:
Change to dark pink color
Round 14:
1hdc in each st (54)
Info:
Fasten off and hide the ends. Let's go back to the head!
— PEACH - Head:
Round 1:
1sc in each st (8)
Round 2:
2sc in each st (16)
Round 3:
1sc in the next 1st,1inc x 8 (24)
Round 4:
1sc in the next 2st, 1inc x 8 (32)
Round 5:
1sc in the next 3st, 1inc x 8 (40)
Round 6:
1sc in the next 5st, 1sc and 1inc x 7, 1sc in the next 5st, 1sc and 1inc x 7, 1inc in the next 2st (56)
Round 7:
1sc in the next 55st, 1inc in next 1st (57)
Round 8-12:
1sc in each st (57)
Round 13:
1sc in the next 17st, 1dec x 3 (54)
Round 14-21:
1sc in each st (54)
Info:
It's time you add the safety eyes, I place them in the 10-11 round with 8st between them. Make sure to place them centered at the front of the head (use the shoes as your guide).
Round 22:
1sc in the next 7st, 1dec x 6 (48)
Round 23:
1sc in the next 6st, 1dec x 6 (42)
Round 24:
1sc in the next 5st, 1dec x 6 (36)
Round 25:
1sc in the next 4st, 1dec x 6 (30)
Round 26:
1sc in the next 3st, 1dec x 6 (24)
Info:
Start stuffing the head
Round 27:
1sc in the next 2st, 1dec x 6 (18)
Round 28:
1sc in the next 1st, 1dec x 6 (12)
Round 29:
1dec in the next 6st (6)
Info:
Make sure the head is stuffed and firm before closing it up. Fasten off and hide the end.
— PEACH - Arms (make 2):
Round 2-7:
1sc in each st (6)
Info:
Change to peach color
Round 8:
1sc in each st (6)
Info:
Change to pink color
Round 9:
1inc in each st (12)
Round 10-11:
1sc in each st (12)
Round 12:
1sc in the next 1st, 1dec x 4 (8)
Info:
Finish with 1sl st. Break the yarn and leave a long tail to sew the arms to the body. Don't stuff the arms.
— PEACH - Top Skirt (make 2):
Info:
Every time you finish a row, you'll make 1ch, turn and start at the 2nd ch from your hook. Unless specified otherwise. Using dark pink color. Start with 5ch, turn and start at the 2nd ch from your hook.
Row 1:
1hdc in each st (4)
Row 2:
1inc in each st (8)
Row 3:
1inc in each st (16)
Row 4:
1hdc in each st (16)
Info:
Finish off and leave long tail to sew to the waist
— PEACH - Gem Dress and Earrings (make 3):
Info:
Finish with 1sl st and leave long tail to sew to the dress and to the hair
— PEACH - Hair:
Info:
Using yellow color. Every time you finish a round, you'll make 1sl st and 1ch. Unless specified otherwise.
Round 1:
Magic ring hdc (7)
Round 2:
2hdc in each st (14)
Round 3:
1hdc in the next 1st, 2hdc in the next 1st x 7 (21)
Round 4:
1hdc in the next 2st, 2hdc in the next 1st x 7 (28)
Round 5:
1hdc in the next 3st, 2hdc in the next 1st x 7 (35)
— PEACH - Hair Strips:
Info:
Using yellow color. Every time you finish a hair strip, you'll finish with a 1sl st to start the next hair.
Hair Strip:
28ch, turn and start at the 2ch from your hook, 1hdc in each st (27) x 15 (Make as many as you need, you must make sure is like in the photo 5st apart from the eyes, use your doll to keep making hair strips). Leave long tail to sew to the head.
— PEACH - Bangs Sides (make 4):
Info:
Every time you finish a row, you'll make 1ch, turn and start at the 2nd ch from your hook. Unless specified otherwise. Using yellow color. Start with 5ch, turn and start at the 2nd ch from your hook.
Row 1:
1hdc in each st (4)
Row 2:
1inc in each st (8)
Row 3:
1inc in each st (16)
Info:
Finish off and leave long tail to sew to the head/hair
— PEACH - Bangs Front:
Info:
Every time you finish a row, you'll make 1ch, turn and start at the 2nd ch from your hook. Unless specified otherwise. Using yellow color. Start with 17ch, turn and start at the 2nd ch from your hook.
Row 1:
1hdc in each st (16)
Row 2:
1dec, 1hdc in the next 12st, 1dec (14)
Row 3:
1dec, 1hdc in the next 10st, 1dec (12)
Row 4:
1dec, 1hdc in the next 8st, 1dec (10)
Row 5:
1dec, 1hdc in the next 6st, 1dec (8)
Row 6:
1dec, 1hdc in the next 4st, 1dec (6)
Row 7:
1dec, 1hdc in the next 2st, 1dec (4)
Row 8:
1dec in the next 2st (2)
Info:
Make 1sl st in the edge to get to Row 1, finish off and leave long tail to sew to the head/hair
— PEACH - Crown:
Info:
Every time you finish a round, you'll make 1sl st and 1ch. Unless specified otherwise. Using gold color. Make 16ch and attach it to make a ring with 1sl st, make 1ch.
Round 1-2:
1sc in each (16)
Round 3:
1sc and 1hdc in the next 1 st, 2dc in the next 1 st, 1hdc and 1sc in the next 1 st, 1sl st in the next st. Repeat until finish.
Info:
Finish off and leave long tail to sew to the hair. With blue and red color threads, make stitches to the crown to make the gems.
— DAISY - Shoes & Legs (make 2):
Info:
Start with the orange color yarn
Round 2:
2sc in each st (12)
Round 3:
1sc, 1inc x 6 (18)
Round 4-5:
1sc in each st (18)
Info:
Change to peach color
Round 6:
1sc in the next 3st, 1dec in the next 3st, 1sc and 1 dec x 3 (12)
Round 7:
1sc and 1dec x 4 (8)
Round 8-18:
1sc in each st (8)
Info:
First leg: fasten off and cut the yarn. For the second leg: don't cut the yarn, you'll change color to connect it to the other leg and start the body. Stuff the legs with fiber fill.
— DAISY - Body:
Info:
Using yellow color. IMPORTANT: Since everyone crochets different stitches (tight or loose) ROUND 1 part is how my legs result. You'll connect the legs with 1sc (16) (use the shoes to guide you, they must be pointing at the same direction).
Round 1:
1sc in the next 4st (1 leg), 1sc in the next 8st of the other leg, 1sc in the next 4st (16)
Round 2:
1sc, 1inc x 8 (24)
Round 3-5:
1sc in each st (24)
Round 6:
Working at the back of the ch. 1sc in each st (24)
Round 7:
1sc in the next 6st, 1dec x 3 (21)
Round 8:
1sc in the next 5st, 1dec x 3 (18)
Round 9:
1sc in each st (18)
Round 10:
1sc in the next 4st, 1dec x 3 (15)
Info:
Change to white color
Round 11:
1sc in the next 3st, 1dec x 3 (12)
Info:
Change to peach color
Round 12:
1sc in the next 1st, 1dec x 3 (8)
Info:
Stuff the body with fiber fill. Don't cut the yarn, we'll begin crocheting the head using the same color. Leave the yarn, and before you start crocheting the head, we'll begin to do the dress.
— DAISY - Dress:
Info:
Using yellow color. Turn the doll around and start at the back on the front of the ch you left at Round 6 of the body. Every time you finish a round, you'll make 1sl st and 1ch. Unless specified otherwise.
Round 1:
1hdc in the next 3st, 1inc x 6 (30)
Round 2:
1hdc in the next 4st, 1inc x 6 (36)
Round 3:
1hdc in each st (36)
Round 4:
1hdc in the next 5st, 1inc x 6 (42)
Round 5-6:
1hdc in each st (42)
Round 7:
1hdc in the next 6st, 1inc x 6 (48)
Round 8-9:
1hdc in each st (48)
Round 10:
1hdc in the next 7st, 1inc x 6 (54)
Round 11:
Work at the back ch. 1hdc in each st (54)
Round 12-13:
1hdc in each st (54)
Info:
Change to orange color
Round 14:
1hdc in each st (54)
Info:
Fasten off and hide the ends. Still with the doll upside down. At Round 11, we'll use orange color.
Round 1 (at Round 11):
1hdc in the next 8st, 1inc x 6 (60)
Info:
Fasten off and hide the ends. Let's go back to the head!
— DAISY - Head:
Round 1:
1sc in each st (8)
Round 2:
2sc in each st (16)
Round 3:
1sc in the next 1st,1inc x 8 (24)
Round 4:
1sc in the next 2st, 1inc x 8 (32)
Round 5:
1sc in the next 3st, 1inc x 8 (40)
Round 6:
1sc in the next 5st, 1sc and 1inc x 7, 1sc in the next 5st, 1sc and 1inc x 7, 1inc in the next 2st (56)
Round 7:
1sc in the next 55st, 1inc in next 1st (57)
Round 8-12:
1sc in each st (57)
Round 13:
1sc in the next 17st, 1dec x 3 (54)
Round 14-21:
1sc in each st (54)
Info:
It's time you add the safety eyes, I place them in the 10-11 round with 6-7st between them. Make sure to place them centered at the front of the head (use the shoes as your guide).
Round 22:
1sc in the next 7st, 1dec x 6 (48)
Round 23:
1sc in the next 6st, 1dec x 6 (42)
Round 24:
1sc in the next 5st, 1dec x 6 (36)
Round 25:
1sc in the next 4st, 1dec x 6 (30)
Round 26:
1sc in the next 3st, 1dec x 6 (24)
Info:
Start stuffing the head
Round 27:
1sc in the next 2st, 1dec x 6 (18)
Round 28:
1sc in the next 1st, 1dec x 6 (12)
Round 29:
1dec in the next 6st (6)
Info:
Make sure the head is stuffed and firm before closing it up. Fasten off and hide the end.
— DAISY - Arms (make 2):
Round 2-4:
1sc in each st (6)
Info:
Change to peach color
Round 5-7:
1sc in each st (6)
Round 8:
1sc in each st (6)
Info:
Change to yellow color
Round 9:
1inc in each st (12)
Round 10-11:
1sc in each st (12)
Round 12:
1sc in the next 1st, 1dec x 4 (8)
Info:
Finish with 1sl st. Break the yarn and leave a long tail to sew the arms to the body. Don't stuff the arms.
— DAISY - Top Skirt (make 2):
Info:
Every time you finish a row, you'll make 1ch, turn and start at the 2nd ch from your hook. Unless specified otherwise. Using orange color. Start with 5ch, turn and start at the 2nd ch from your hook.
Row 1:
1hdc in each st (4)
Row 2:
1inc in each st (8)
Row 3:
1inc in each st (16)
Row 4:
1hdc in each st (16)
Info:
Finish off and leave long tail to sew to the waist
— DAISY - Gem Dress and Earrings (make 3):
Round 2:
1sc in the next 1st, 1inc x 2 (6)
Info:
Finish with 1sl st and leave long tail to sew to the dress and to the hair
— DAISY - Hair:
Info:
Using brown color. Every time you finish a round, you'll make 1sl st and 1ch. Unless specified otherwise.
Round 1:
Magic ring hdc (7)
Round 2:
2hdc in each st (14)
Round 3:
1hdc in the next 1st, 2hdc in the next 1st x 7 (21)
Round 4:
1hdc in the next 2st, 2hdc in the next 1st x 7 (28)
Round 5:
1hdc in the next 3st, 2hdc in the next 1st x 7 (35)
— DAISY - Hair Strips:
Info:
Using brown color. Every time you finish a hair strip, you'll finish with a 1sl st to start the next hair.
Hair Strip:
30ch, turn and start at the 2ch from your hook, 1hdc in each st (29) x 15 (Make as many as you need, you must make sure is like in the photo 5st apart from the eyes, use your doll to keep making hair strips). Leave long tail to sew to the head.
— DAISY - Bangs:
Info:
Every time you finish a row, you'll make 1ch, turn and start at the 2nd ch from your hook. Unless specified otherwise. Using brown color. Start with 11ch, turn and start at the 2nd ch from your hook.
Row 1:
1sc in each st (10)
Row 2:
1sc in the next 8st, 1dec (9)
Row 3:
1dec, 1sc in the next 7sc (8)
Row 4:
1sc in the next 6st, 1dec (7)
Row 5:
1dec, 1sc in the next 5st (6)
Row 6:
1sc in the next 4st, 1dec (5)
Row 7:
1dec, 1sc in the next 3st (4)
Row 8:
Make 4ch, turn and start at the 2nd ch from your hook, 1sc in the next 1 st, 1hdc in the next 2st
Row 9:
Make 4ch, turn and start at the 2nd ch from your hook, 1sc in the next 1 st, 1hdc in the next 2st
Row 10:
Make 5ch, turn and start at the 2nd ch from your hook, 1inc, 1sc in the next 3st (5)
Row 11:
1sc in the next 4st, 1inc (6)
Row 12:
1inc, 1sc in the next 5st (7)
Row 13:
1sc in the next 6st, 1inc (8)
Row 14:
1inc, 1sc in the next 7st (9)
Row 15:
1sc in the next 8st, 1inc (10)
Row 16:
1inc, 1sc in the next 9st (11)
Row 17:
You'll make 1ch and turn, make 1sc in each st (see photo for guidance). For me it was 20sc
Row 18:
1sc in each st (20)
Row 19:
1dec, 1sc in the next 16st, 1dec (18)
Row 20:
1dec, 1sc in the next 14st, 1dec (16)
Info:
Finish off and leave long tail to sew to the head/hair
— DAISY - Crown:
Info:
Every time you finish a round, you'll make 1sl st and 1ch. Unless specified otherwise. Using gold color. Make 16ch and attach it to make a ring with 1sl st, make 1ch.
Round 1-2:
1sc in each (16)
Round 3:
1sc and 1hdc in the next 1 st, 2dc in the next 1 st, 1hdc and 1sc in the next 1 st, 1sl st in the next st. Repeat until finish.
Info:
Finish off and leave long tail to sew to the hair. With green and red color threads, make stitches to the crown to make the gems.
This charming Mario Bros & Co. collection brings the magic of the Mushroom Kingdom right into your hands! Whether you're a longtime Nintendo fan or simply love creating adorable amigurumi characters, this pattern offers endless fun. The detailed instructions guide you through each character's unique features, from Mario's iconic red cap to Peach's flowing yellow hair. Perfect for gifting to gamers, decorating your craft space, or starting your own video game character collection. Each finished piece captures the heart and personality of these beloved characters in soft, huggable form. 🎮🧶✨