🧶 Beautiful ✨ Detailed 💝 Adorable

Macrame Bat Wall Hanging Pattern

Macrame Bat Wall Hanging Pattern
4.3★ Rating
4-5 Hours Time Needed
2.0K Made This
✂️

Intermediate Level

Ideal for those with basic knitting experience, featuring slightly more advanced stitches and techniques to expand your skills.

⏱️

Weekend Treat

Takes 5-7 hours, making it an enjoyable project to finish over a couple of days.

🎄

Holiday Cheer

Festive fun for the season, bringing handmade magic to celebrations and creating new family traditions.

About This Macrame Bat Wall Hanging Pattern

Macrame Bat Wall Hanging Pattern crochet pattern - detailed view of completed project

Whether you're decorating for Halloween, adding year-round gothic charm, or creating a unique gift for bat enthusiasts, this wall hanging offers a perfect blend of artistry and accessibility. The charcoal cord base with red accents creates dramatic visual impact while remaining versatile enough to complement various interior styles.

Why You'll Love This Macrame Bat Wall Hanging Pattern

I absolutely love how this pattern transforms simple cord into something so full of character and presence. There's something magical about watching the bat take shape as you work through each knot, seeing the wings spread wider and the body come together. I love that it's perfect for Halloween but stylish enough to display all year if you're into gothic or nature-inspired decor. The combination of structural knotwork and flowing fringe gives it such wonderful dimension, and those little red eyes add just the right pop of personality. I also appreciate how forgiving macrame can be—if you make a mistake, you can usually untie and redo without damaging your materials. Plus, there's something deeply satisfying about creating home decor that feels both handmade and professional.

Macrame Bat Wall Hanging Pattern step 1 - construction progress Macrame Bat Wall Hanging Pattern step 2 - assembly progress Macrame Bat Wall Hanging Pattern step 3 - details and accessories Macrame Bat Wall Hanging Pattern step 4 - final assembly and finishing

Switch Things Up

I love experimenting with color variations to give this bat different personalities. Instead of traditional charcoal and red, try making a white or cream bat with blue eyes for a ghostly effect, or go bold with purple cord and green eyes for a more fantastical creature. You could even create an ombre effect by gradually transitioning cord colors from dark to light across the wings.

For added dimension, I sometimes incorporate wooden beads into the fringe before tying the overhand knots, which creates interesting texture and weight. You can also play with fringe length—keeping it shorter gives a more modern, geometric look, while longer fringe adds dramatic bohemian flair.

If you want to personalize it further, consider adding small metal charms or bells to the wing tips, or weaving thin metallic thread through some of the knots for subtle shimmer. I've even seen crafters add tiny LED battery lights behind the bat's body for a glowing effect during Halloween. The gathering knot area is perfect for embellishment too—try wrapping it with contrasting colored cord or adding small fabric flowers for a day-of-the-dead inspired version.

Common Mistakes & How to Fix Them

✗ Not tightening knots consistently throughout the project can result in uneven tension and a sloppy final appearance overall ✗ Forgetting to hold the filler cord at the correct diagonal angle during double half hitch knots creates misaligned rows ✗ Rushing through the Extended Reverse Lark's Head knots without pushing them tightly together leaves visible gaps in the design ✗ Cutting the fringe before completing all knotwork can lead to cords being too short for proper finishing techniques

Macrame Bat Wall Hanging Pattern

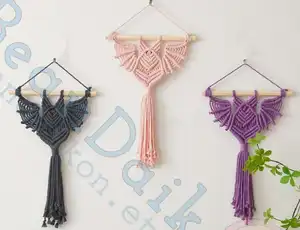
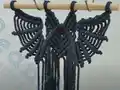
Create a striking Halloween decoration or year-round gothic accent with this stunning macrame bat wall hanging. This pattern guides you through crafting a dramatic 28cm x 45cm bat design featuring spread wings, distinctive red eyes, and elegant fringe details. Perfect for adding a handmade touch to your seasonal decor or gifting to bat lovers, this project combines traditional macrame techniques with a playful, spooky aesthetic that transforms any wall into a statement piece.

Intermediate 4-5 Hours

Materials Needed for Macrame Bat Wall Hanging Pattern

— Main Fabric

  • 01
    3mm macrame cord in charcoal color - seventeen pieces at 72 inches each
  • 02
    3mm macrame cord in charcoal color - two pieces at 20 inches each
  • 03
    3mm macrame cord in red color - two pieces at 8 inches each
  • 04
    10-inch wooden dowel for hanging

— Tools Required

  • 01
    Scissors
  • 02
    Two S hooks for hanging while working
  • 03
    Measuring tape or ruler
  • 04
    Optional: QR code scanner for video tutorial access

Progress Tracker

0% Complete

— Preparation :

Setup :

Hang the wooden dowel on 2 S hooks to work comfortably

— Starting the Body :

Step 1 :

Fold first 72" cord in half, place the loop over the dowel, bring the ends through the loop and tighten (Lark's Head knot)

Step 2 :

Repeat with second 72" cord next to the first

Step 3 :

Add third 72" cord to the right cord using Reverse Lark's Head knot, then create Extended Reverse Lark's Head by bringing right cord behind and over dowel, down through loop and tighten

Step 4 :

Repeat the same process on the left side, push knot next to first knot

Step 5 :

Repeat with one more 72" cord using Extended Reverse Lark's Head technique

Step 6 :

Attach two 72" cords to the second middle cord using the same method

Step 7 :

Cross the two middle cords, use one 72" cord and tie Extended Reverse Lark's Head knot over the crossed cords

— Creating the Head Shape :

Step 8 :

Take left outermost cord as filler cord, hold at diagonal angle and tie Double Half Hitch knots with each cord across (bring cord over and around filler, tighten, repeat second hitch with same cord)

Step 9 :

Continue tying 2 rows with Double Half Hitch knots, holding filler cords at an angle

Step 10 :

Repeat the same process on right side (reversed direction) to create symmetrical head shape

Step 11 :

Use 5 left cords as working cords, use 6th cord as filler cord, tie Double Half Hitch knots on both sides

— Adding the Eyes :

Step 12 :

Fold 8" red cord in half and attach to charcoal cord using Reverse Lark's Head knot

Step 13 :

Repeat with second 8" red cord on the other side for second eye

Step 14 :

Make Square knot with 4 middle cords: cross left cord over 2 middle filler cords and behind right, bring right cord behind 2 middle and up through left loop, tighten

Step 15 :

Complete square knot by reversing: make number 4 with right cord over 2 middles and under left, bring left cord behind 2 middles and up through right loop, tighten

— Creating V Shapes :

Step 16 :

Use 6th left cord as filler cord, next 2 cords as working cords, tie 2 Double Half Hitch knots

Step 17 :

Make same on right side, tie 3 knots to create first V shape

Step 18 :

Repeat the V shape pattern 3 more times for total of 4 V shapes down the body

— Left Wing Construction :

Step 19 :

Fold 72" cord in half, add to wooden dowel by Reverse Lark's Head knot

Step 20 :

Add four 72" cords to the right cord using Extended Reverse Lark's Head knot technique

Step 21 :

Use left outermost cord as filler cord, tie Double Half Hitch knots from left to right across all cords

Step 22 :

Use right outermost cord as filler cord, tie 4 rows with Double Half Hitch knots to shape wing

— Right Wing Construction :

Step 23 :

Use five 72" cords and repeat the same wing construction steps for right side

Step 24 :

Use outermost cords as filler cords, continue tying Double Half Hitch knots to match left wing

— Finishing Gathering Knot :

Step 25 :

Hold 20" charcoal cord in U shape with short side on left

Step 26 :

Start wrapping with long end around all bat body cords, making sure short left side sticks out of top

Step 27 :

Continue wrapping until desired length, don't go past the loop at bottom

Step 28 :

Bring wrapping end through bottom loop

Step 29 :

Pull short cord at top to bring loop halfway up wrapped section

Step 30 :

Cut both ends close to wraps, use scissors end to poke ends under wraps for clean finish

— Final Touches :

Step 31 :

Use Overhand knot to tie end of each cord at desired fringe length

Step 32 :

Cut leftover cords below knots to create even fringe

Assembly Instructions

  • Ensure all Double Half Hitch knots on wings are tightened evenly to maintain symmetrical wing shapes throughout construction
  • The gathering knot should be positioned to gather all body cords together neatly without twisting or bunching the strands
  • Check that red eye cords are placed symmetrically on both sides before proceeding with square knot in center
  • When completing the fringe, measure and mark desired length before tying overhand knots to ensure uniform appearance
  • The wooden dowel should extend slightly beyond the outermost wing cords on each side for proper hanging balance

Important Notes

  • 💡Keep consistent tension throughout all knotwork to ensure the bat maintains its shape and doesn't appear warped or loose
  • 💡The Extended Reverse Lark's Head knots must be pushed tightly together or gaps will show in the finished piece
  • 💡When creating the V shapes in the body, count your cords carefully to maintain symmetry on both sides
  • 💡The gathering knot can be tricky—practice wrapping tension on scrap cord before doing the final piece
  • 💡Trim fringe only after all knotwork is complete to avoid accidentally cutting working cords too short
  • 💡Use the QR code provided to access video tutorial if visual demonstration would help with complex knots

This captivating macrame bat wall hanging pattern brings gothic charm and artisan craftsmanship together in one delightful project. Combining traditional knotting techniques with creative design, you'll create a dimensional bat that's perfect for Halloween decor or year-round alternative home styling. The detailed wings, expressive red eyes, and flowing fringe give this piece wonderful movement and personality. Whether you're expanding your macrame skills or looking for a unique handmade gift, this pattern offers both challenge and satisfaction. 🦇 Happy knotting! ✨

You ask,

we answer.

FAQs

Can I use a different cord thickness for this pattern?

Yes, you can use different cord thickness, but it will change the final dimensions. If using thinner 2mm cord, your bat will be smaller; thicker 4mm cord will create a larger piece. Adjust cord lengths proportionally to your chosen thickness.

What if I don't have red cord for the eyes?

You can substitute any contrasting color cord for the eyes—white, yellow, or even glow-in-the-dark cord would create fun effects. You could also use the same charcoal cord and add felt or painted details later.

How do I prevent my Double Half Hitch knots from looking uneven?

The key is maintaining consistent tension on your filler cord and ensuring each half hitch is tightened the same amount. Hold the filler cord taut at a consistent angle and take your time with each knot, checking alignment frequently.

Can I make the bat wings larger or smaller?

Absolutely! To make larger wings, add more 72-inch cords to each wing section and work additional rows of Double Half Hitch knots. For smaller wings, use fewer cords or fewer rows of knots.

What's the best way to hang the finished piece?

The wooden dowel already built into the pattern makes hanging easy—simply tie cord or fishing line to each end of the dowel and hang from a nail or hook. You can also add decorative ribbon or leather cord for a more finished look.

Do I need prior macrame experience for this pattern?

Basic macrame knowledge is helpful since this uses several different knot types. If you're new to macrame, practice the individual knots (Lark's Head, Double Half Hitch, Square Knot) on scrap cord first before starting the full project.