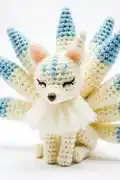
Create your own enchanting nine-tailed kitsune with this detailed amigurumi pattern! This mystical fox features a fluffy neck ruff, adorable closed eyes, and nine beautiful gradient tails in sky blue and white. Standing approximately 11.5cm tall, this magical creature combines intricate color work with brushed yarn techniques to create a stunning display piece. Perfect for mythology lovers and those seeking a rewarding crochet challenge that results in a truly unique handmade treasure.
Progress Tracker
0% Complete
— HEAD :
Round 1 :
6 sc in magic ring (6 sts)
Round 2 :
Sc 3, inc 3 (9 sts)
Round 3 :
Inc 3, sc 6 (12 sts)
Round 4 :
Sc 6, *sc 1, inc,* 3 times (15 sts)
Round 5 :
*Sc 1, inc,* 3 times, sc 9 (18 sts)
Round 7 :
*Sc 1, inc,* 6 times, sc 6 (24 sts)
Round 8 :
*Sc 1, inc,* 9 times, sc 6 (33 sts)
Round 9 :
Sc 4, inc, *sc 10, inc,* 2 times, sc 6 (36 sts)
Round 10 :
*Sc 11, inc,* 3 times (39 sts)
Round 11 :
Sc 5, inc, *sc 12, inc,* 2 times, sc 7 (42 sts)
Round 12 :
*Sc 13, inc,* 2 times, sc 14 (44 sts)
Round 13 :
Sc 4, dec, sc 30, dec, sc 6 (42 sts)
Round 20 :
*Sc 5, dec,* 6 times (36 sts)
Round 21 :
*Sc 4, dec,* 6 times (30 sts)
Round 22 :
*Sc 3, dec,* 6 times (24 sts)
Round 23 :
*Sc 2, dec,* 6 times (18 sts)
Round 24 :
*Sc 1, dec,* 6 times (12 sts)
Round 25 :
Dec around (6 sts)
Info :
Fasten off and leave a tail for sewing
— FRONT LEGS (make 2) :
Round 1 :
6 sc in magic ring (6 sts)
Round 2 :
*Sc 3 in one st, inc, sc 1,* 2 times (12 sts)
Round 6 :
Dec 3, sc 6 (9 sts)
Info :
Fasten off and leave a tail for sewing
— EARS (make 2) :
Round 1 :
6 sc in magic ring (6 sts)
Round 2 :
*Sc 1, inc,* 3 times (9 sts)
Round 3 :
*Sc 2, inc,* 3 times (12 sts)
Round 4 :
*Sc 3, inc,* 3 times (15 sts)
Round 5 :
*Sc 4, inc,* 3 times (18 sts)
Round 6 :
*Sc 5, inc,* 3 times (21 sts)
Info :
Press the ear flat and do not stuff. Fasten off and leave a tail for sewing
— BODY :
Round 1 :
6 sc in magic ring (6 sts)
Round 2 :
2 sc in each st around (12 sts)
Round 3 :
*Sc 1, inc,* 6 times (18 sts)
Round 4 :
*Sc 2, inc,* 6 times (24 sts)
Round 5 :
*Sc 3, inc,* 6 times (30 sts)
Round 9 :
Sc 15, *sc 4, inc,* 3 times (33 sts)
Round 11 :
Sc 15, *sc 5, inc,* 3 times (36 sts)
Info :
Stuff the front legs with fiberfill. In the next round, we will join the front legs with the body
Round 13 :
*Sc 4, dec,* 3 times, sc 4, starting at the next unstitched st of one front leg, sc 7 on the leg, skip 2 sts on the body and sc 4. Continue by joining the other leg, starting at the next unstitched st of the other front leg, sc 7 on the leg, skip 2 sts on the body and sc 7 on the remaining sts of the round on the body (43 sts)
Info :
There will be a gap of two unstitched sts on each leg and the body. Using a yarn needle, sew the gaps close using the yarn ends of the front legs
Round 14 :
Sc 26, dec, sc 15 (42 sts)
Round 15 :
Sc 5, dec, sc 12, dec, sc 4, dec, sc 5, dec, sc 8 (38 sts)
Round 17 :
Sc 17, dec, sc 10, dec, sc 7 (36 sts)
Round 21 :
Sc 4, dec, *sc 10, dec,* 2 times, sc 6 (33 sts)
Round 23 :
*Sc 9, dec,* 3 times (30 sts)
Round 24 :
*Sc 3, dec,* 6 times (24 sts)
Round 25 :
Sc 1, hdc, dc 3, tc 2, dc 3, hdc, sc 1 (12 sts) - left as an incomplete round
Info :
Stuff body. Fasten off and leave a tail for sewing
— HIND LEG - THIGH (make 2) :
Round 1 :
6 sc in magic ring (6 sts)
Round 2 :
2 sc in each st around (12 sts)
Round 3 :
*Sc 1, inc,* 6 times (18 sts)
Info :
Stuff thigh lightly and continue stuffing as you go
Round 10 :
*Sc 1, dec,* 6 times (12 sts)
Round 11 :
Dec around (6 sts)
Info :
Fasten off and leave a tail for sewing
— HIND LEG - FEET (make 2) :
Round 1 :
6 sc in magic ring (6 sts)
Round 2 :
*Sc 1, inc,* 3 times (9 sts)
Info :
Stuff feet. Fasten off and leave a tail for sewing
— TAIL 1 :
Round 1 :
Using sky blue yarn, 4 sc in magic ring (4 sts)
Round 2 :
Sc 1, inc 3 (7 sts)
Round 3 :
Sc 1, *sc 1, inc,* 3 times (10 sts)
Round 4 :
Sc 1, *sc 1, inc,* 4 times, sc 1 (14 sts)
Round 5 :
*Sc 2, inc,* 4 times, sc 2 (18 sts)
Round 6 :
Sc 3, *sc 3, inc,* 3 times, sc 3 (21 sts)
Info :
From R7 onwards, we will start working with both sky blue [blue] and white [white] yarn
Round 7 :
Sc 7, inc, sc 2, change to white yarn [white], sc 1, change to sky blue yarn [blue], sc 1, inc, sc 1, [white] sc 1, [blue] sc 2, inc, [white] sc 1, [blue] sc 2 (24 sts)
Round 8 :
Sc 1, [white] sc 1, [blue] sc 3, [white] sc 1, [blue] sc 2, sc 1 in the next st, [white] sc in the same st (this is an inc with one sky blue and one white st), [blue] sc 2, [white] sc 2, [blue] sc 1, inc, [white] sc 3, [blue] sc 2, sc 1 in the next st, [white] sc in the same st (this is an inc with one sky blue and one white st), sc 2, [blue] sc 1 (27 sts)
Round 9 :
[White] sc 3, [blue] sc 2, [white] sc 2, [blue] sc 1, [white] sc 3, [blue] sc 1, [white] sc 3, [blue] sc 1, [white] sc 5, [blue] sc1, [white] sc 5 (27 sts)
Round 10 :
*Sc 1, dec,* 3 times, *sc 5, inc,* 3 times (27 sts)
Round 12 :
*Sc 1, dec,* 2 times, *sc 5, inc,* 3 times, sc 1, dec (27 sts)
Round 14 :
*Sc 7, dec,* 3 times (24 sts)
Round 15 :
Sc 4, dec, *sc 5, inc,* 2 times, sc 4, dec (24 sts)
Round 17 :
Sc 2, dec, *sc 6, dec,* 2 times, sc 4 (21 sts)
Info :
Stuff the tail, and continue stuffing as you go
Round 19 :
*Sc 5, dec,* 3 times (18 sts)
Round 21 :
*Sc 7, dec,* 2 times (16 sts)
Round 24 :
Sc 2, dec, sc 6, dec, sc 4 (14 sts)
Round 27 :
*Sc 5, dec,* 2 times (12 sts)
Round 31 :
Sc 1, dec, sc 4, dec, sc 3 (10 sts)
Round 33 :
*Sc 3, dec,* 2 times (8 sts)
Round 35 :
*Sc 2, dec,* 2 times (6 sts)
Round 37 :
*Sc 1, dec,* 2 times (4 sts)
Info :
Fasten off and leave a tail for sewing
— TAILS 2 & 3 (make 2) :
Round 1 :
Using sky blue yarn, 4 sc in magic ring (4 sts)
Round 2 :
Sc 1, inc 3 (7 sts)
Round 3 :
Sc 1, *sc 1, inc,* 3 times (10 sts)
Round 4 :
Sc 1, *sc 1, inc,* 4 times, sc 1 (14 sts)
Round 5 :
*Sc 2, inc,* 4 times, sc 2 (18 sts)
Round 6 :
Sc 3, *sc 3, inc,* 3 times, sc 3 (21 sts)
Info :
From R7 onwards, we will start working with both sky blue [blue] and white [white] yarn
Round 7 :
Sc 7, inc, sc 2, change to white yarn [white], sc 1, change to sky blue yarn [blue], sc 1, inc, sc 1, [white] sc 1, [blue] sc 2, inc, [white] sc 1, [blue] sc 2 (24 sts)
Round 8 :
Sc 1, [white] sc 1, [blue] sc 4, [white] sc 1, [blue] sc 3, [white] sc 3, [blue] sc 2, [white] sc 3, [blue] sc 2, [white] sc 3, [blue] sc 1 (24 sts)
Round 9 :
[White] sc 3, [blue] sc 1, dec, [white] sc 2, [blue] sc 1, [white] sc 2, inc, sc 2, [blue] sc 1, [white] sc 2, inc, sc 1, [blue] sc 1, [white] sc 2, dec (24 sts)
Round 11 :
*Sc 1, dec,* 2 times, *sc 4, inc,* 3 times, sc 1, dec (24 sts)
Round 13 :
Sc 2, dec, *sc 6, dec,* 2 times, sc 4 (21 sts)
Round 15 :
Sc 2, dec, *sc 5, inc,* 2 times, sc 3, dec (21 sts)
Info :
Stuff the tail, and continue stuffing as you go
Round 17 :
*Sc 5, dec,* 3 times (18 sts)
Round 19 :
*Sc 7, dec,* 2 times (16 sts)
Round 22 :
Sc 2, dec, sc 6, dec, sc 4 (14 sts)
Round 25 :
*Sc 5, dec,* 2 times (12 sts)
Round 29 :
Sc 1, dec, sc 4, dec, sc 3 (10 sts)
Round 31 :
*Sc 3, dec,* 2 times (8 sts)
Round 33 :
*Sc 2, dec,* 2 times (6 sts)
Round 35 :
*Sc 1, dec,* 2 times (4 sts)
Info :
Fasten off and leave a tail for sewing
— TAILS 4 & 5 (make 2) :
Round 1 :
Using sky blue yarn, 4 sc in magic ring (4 sts)
Round 2 :
Sc 1, inc 3 (7 sts)
Round 3 :
Sc 1, *sc 1, inc,* 3 times (10 sts)
Round 4 :
Sc 1, *sc 1, inc,* 4 times, sc 1 (14 sts)
Round 5 :
*Sc 2, inc,* 4 times, sc 2 (18 sts)
Round 6 :
Sc 3, *sc 3, inc,* 3 times, sc 3 (21 sts)
Info:
From R7 onwards, we will start working with both sky blue [blue] and white [white] yarn
Round 7 :
Sc 7, inc, sc 2, change to white yarn [white], sc 1, change to sky blue yarn [blue], sc 1, inc, sc 1, [white] sc 1, [blue] sc 2, inc, [white] sc 1, [blue] sc 2 (24 sts)
Round 8 :
Sc 1, [white] sc 1, [blue] sc 4, [white] sc 1, [blue] sc 3, [white] sc 3, [blue] sc 2, [white] sc 3, [blue] sc 2, [white] sc 3, [blue] sc 1 (24 sts)
Round 9 :
[White] sc 1, dec, [blue] sc 1, dec, [white] sc 1, dec, [blue] sc 1, [white] sc 3, sc 1 in the next st, [blue] sc in the same st (this is an inc with one white and one sky blue st), [white] sc 4, sc 1 in the next st, [blue] sc in the same st (this is an inc with one white and one sky blue st), [white] sc 4, inc (24 sts)
Round 11 :
Sc 2, dec, sc 6, dec, 2 times, sc 4 (21 sts)
Round 12 :
Sc 2, dec, sc 5, inc, 2 times, sc 3, dec (21 sts)
Info :
Stuff the tail, and continue stuffing as you go
Round 14 :
Sc 5, dec, 3 times (18 sts)
Round 16 :
Sc 7, dec, 2 times (16 sts)
Round 18 :
Sc 2, dec, sc 6, dec, sc 4 (14 sts)
Round 21 :
Sc 5, dec, 2 times (12 sts)
Round 24 :
Sc 1, dec, sc 4, dec, sc 3 (10 sts)
Round 26 :
Sc 3, dec, 2 times (8 sts)
Round 28 :
Sc 2, dec, 2 times (6 sts)
Round 30 :
Sc 1, dec, 2 times (4 sts)
Info :
Fasten off and leave a tail for sewing
— TAILS 6 & 7 (make 2) :
Round 1 :
Using sky blue yarn, 4 sc in magic ring (4 sts)
Round 2 :
Sc 1, inc 3 (7 sts)
Round 3 :
Sc 1, sc 1, inc, 3 times (10 sts)
Round 4 :
Sc 1, sc 1, inc, 4 times, sc 1 (14 sts)
Round 5 :
Sc 2, inc, 4 times, sc 2 (18 sts)
Info :
From R6 onwards, we will start working with both sky blue [blue] and white [white] yarn
Round 6 :
Sc 6, inc, sc 2, [white] sc 1, [blue] inc, sc 2, [white] sc 1, [blue] inc, sc 1, [white] sc 1, [blue] sc 1 (21 sts)
Round 7 :
Sc 2, [white] sc 1, [blue] sc 3, [white] sc 1, [blue] sc 2, [white] sc 3, [blue] sc 2, [white] sc 3, [blue] sc 2, [white] sc 2 (21 sts)
Round 8 :
[Blue] sc 1, [white] dec, sc 1, [blue] dec, [white] sc 1, [blue] dec, [white] sc 3, inc, [blue] sc 1, [white] sc 2, inc, sc 3 inc (21 sts)
Info :
Stuff the tail, and continue stuffing as you go
Round 10 :
Sc 5, dec, 3 times (18 sts)
Round 12 :
Sc 7, dec, 2 times (16 sts)
Round 14 :
Sc 2, dec, sc 6, dec, sc 4 (14 sts)
Round 16 :
Sc 5, dec, 2 times (12 sts)
Round 18 :
Sc 1, dec, sc 4, dec, sc 3 (10 sts)
Round 20 :
Sc 3, dec, 2 times (8 sts)
Round 22 :
Sc 2, dec, 2 times (6 sts)
Round 24 :
Sc 1, dec, 2 times (4 sts)
Info :
Fasten off and leave a tail for sewing
— TAILS 8 & 9 (make 2) :
Round 1 :
Using sky blue yarn, 4 sc in magic ring (4 sts)
Round 2 :
Sc 1, inc 3 (7 sts)
Round 3 :
Sc 1, sc 1, inc, 3 times (10 sts)
Round 4 :
Sc 1, sc 1, inc, 4 times, sc 1 (14 sts)
Round 5 :
Sc 1, dec, sc 3, inc, 2 times, sc 1, dec (14 sts)
Info :
From R6 onwards, we will start working with both sky blue [blue] and white [white] yarn
Round 6 :
Sc 2, [white] sc 1, [blue] sc 3, [white] sc 1, [blue] sc 3, [white] sc 1, [blue] sc 2, [white] sc 1 (14 sts)
Round 7 :
[Blue] sc 1, [white] sc 3, [blue] sc 1, [white] sc 3, [blue] sc 1, [white] sc 3, [blue] sc 1, [white] sc 1 (14 sts)
Info :
Stuff the tail, and continue stuffing as you go
Round 11 :
Sc 5, dec, 2 times (12 sts)
Round 12 :
Sc 1, dec, sc 4, dec, sc 3 (10 sts)
Round 14 :
Sc 3, dec, 2 times (8 sts)
Round 16 :
Sc 2, dec, 2 times (6 sts)
Round 18 :
Sc 1, dec, 2 times (4 sts)
Info :
Fasten off and leave a tail for sewing
— FACIAL FEATURES :
Nose :
Using brown embroidery thread, sew the outline of a small triangle measuring approximately 0.5 x 0.5 x 0.5 cm on the tip of the muzzle. Fill the triangle by sewing vertical lines within
Eyes :
Using brown embroidery thread, sew a straight line around twice, starting at Round 6 and ending at Round 10. Gently tug the straight line upwards at Round 9, to create an arch near the end of the eyes. Separate one strand of the brown embroidery thread used for the eyes and bring the strand to sew over the arch to hold the arch in place. Repeat with the other eye. The inside corners of the eyes should be about 5 stitches apart
Head markings :
Use the sky blue yarn to embroider the head markings. Sew a straight line in the middle of the head starting at Round 8 and ending at Round 12. Skip one stitch to the left of the line you just sew. Sew a shorter straight line starting at Round 8 and ending at Round 10. Repeat sewing another short line to the right of the middle line. Sew each line around one more time
Inside of the ears :
Using red or pink makeup blush, colour the ear flaps
This enchanting Kitsune pattern brings the magic of Japanese folklore into your hands with nine beautifully crafted tails, each featuring unique sky blue and white gradient patterns. The combination of brushed yarn techniques for the fluffy neck ruff and intricate embroidered facial details creates a truly special display piece that captures the mystical essence of the nine-tailed fox. Perfect for fantasy lovers and those seeking an advanced crochet challenge that results in a stunning handmade treasure! 🦊✨