🧶 Beautiful ✨ Detailed 💝 Adorable

Loafie the Bread Amigurumi Pattern

Loafie the Bread Amigurumi Pattern
4.1★ Rating
3-4 Hours Time Needed
2.4K Made This
✂️

Intermediate Level

Ideal for those with basic knitting experience, featuring slightly more advanced stitches and techniques to expand your skills.

⏱️

Bite-Sized Project

Complete in under 2 hours—quick, fun, and perfect for a little creative escape.

🧸

Cute Companion

An adorable friend to cherish, handcrafted with love to bring comfort and joy for years to come.

About This Loafie the Bread Amigurumi Pattern

Loafie the Bread is a delightfully quirky amigurumi pattern that transforms everyday bread into an adorable companion. This pattern features unique construction techniques including working in back loops only to create dimensional texture, bobble stitches for authentic bread detail, and color changes between cream and tan yarns for that perfect golden crust effect. The loaf is constructed in two pieces that are whip-stitched together and stuffed to create a plump, huggable shape.

Loafie the Bread Amigurumi Pattern crochet pattern - detailed view of completed project

The pattern includes charming details like tiny arms that can be positioned however you like, expressive safety eyes, and an embroidered smile. Loafie's dimensional construction creates a realistic loaf shape that stands beautifully on display.

Why You'll Love This Loafie the Bread Amigurumi Pattern

I absolutely love this pattern because it combines humor with technical skill in such a delightful way. There's something so charming about taking an everyday object like bread and turning it into a character with personality. I enjoy how the pattern teaches you to work three-dimensionally, creating depth and shape through strategic stitch placement and back loop only techniques. The bobble stitches add such authentic texture that really makes Loafie look like actual bread. Plus, those little flapping arms are irresistibly cute and add so much character. It's a quick, satisfying project that always brings a smile to people's faces when they see it.

Loafie the Bread Amigurumi Pattern step 1 - construction progress Loafie the Bread Amigurumi Pattern step 2 - assembly progress Loafie the Bread Amigurumi Pattern step 3 - details and accessories Loafie the Bread Amigurumi Pattern step 4 - final assembly and finishing

Switch Things Up

I love experimenting with this pattern to create different bread varieties! Try using darker brown yarn for the crust and cream for the inside to make a pumpernickel or rye bread version. You could even add small black seed beads to the tan sections to create a sesame seed loaf effect.

For a fun twist, consider making mini versions using sport weight yarn and a smaller hook—these make adorable keychains or bag charms. I've also tried adding a light blush to the cheeks using chalk pastels for an even cuter expression.

If you want to create a whole bread basket collection, make multiple Loafies in different sizes by adjusting your starting chain length and number of rows. You could also experiment with the arm placement—try positioning them in different poses or even making longer arms for a more animated look.

For seasonal variations, add a tiny crocheted Santa hat for Christmas or little felt hearts for Valentine's Day. I've even seen makers add small wire inside the arms to make them poseable, which opens up endless display possibilities!

Common Mistakes & How to Fix Them

✗ Forgetting to push out the bobble stitches after completing them, leaving them inverted on the wrong side of the work ✗ Not using a stitch marker when crocheting around the bread pieces, making it difficult to track where rounds begin and end ✗ Failing to check that feet are facing the correct direction before assembling, resulting in feet popped through to the wrong side ✗ Whip stitching through both loops instead of only the back loops of row 10, creating visible and messy seams on the finished loaf ✗ Stuffing too firmly or not firmly enough, affecting the bread's shape and causing fiberfill to show through stitches or creating a flat appearance

Loafie the Bread Amigurumi Pattern

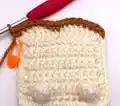
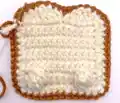
Create your own adorable Loafie the Bread amigurumi with this charming crochet pattern! This delightful bread loaf character features a cream-colored body with a golden tan crust, sweet safety eyes, and tiny arms that give it personality. Perfect for bread lovers and amigurumi enthusiasts alike, Loafie makes a wonderful gift or decorative piece for your kitchen. The pattern includes detailed instructions for creating the dimensional loaf shape with textured bobble stitches and a realistic rounded top. With clear step-by-step guidance, you'll enjoy bringing this whimsical bread buddy to life stitch by stitch.

Intermediate 3-4 Hours

Materials Needed for Loafie the Bread Amigurumi Pattern

— Main Fabric

  • 01
    Worsted weight yarn in cream color
  • 02
    Worsted weight yarn in tan color

— Tools Required

  • 01
    3.5 mm crochet hook
  • 02
    8 mm safety eyes
  • 03
    Stitch marker
  • 04
    Scissors
  • 05
    Sewing needle
  • 06
    Fiber fill stuffing
  • 07
    Black thread for embroidery

Progress Tracker

0% Complete

— Arms (Make 2) :

Starting Instructions :

Using cream, ch 6, slst in the 2nd ch from hook and in remaining ch spaces (5), f/o and leave a long tail for attaching

— Front of Loaf :

R1 :

Starting with cream, ch 13, sc across starting in the 2nd ch from the hook (12) ch 1 and turn

R2 :

sc 2, BO, sc 6, BO, sc 2. ch 1 and turn

R3-10 :

sc across. (12) ch 1 and turn

R11 (top of the loaf) :

2 HDC in one st, dc, dc, tr, tr, dc & HDC in one st, HDC and dc in one st, tr, tr, dc, dc, 2 HDC in last st (16)

Crocheting Around the Piece :

ch 1 and put a st marker in the ch 1 (it counts as a st) then sc 9 down the side, inc in corner, sc 10 across bottom, inc in corner, sc 10 up the other side

Change to Tan :

Before finishing your last st in cream pull the tan yarn through to finish the st. inc in the first st along the top, sc in the next 14 sts, inc in the last st

Finishing with Tan :

sc 10 down the side, inc in corner, sc 12 across the bottom, inc in corner, sc 10 up the other side (54 sts total around entire bread—do not fasten off)

— Facial Features :

Info :

Place safety eyes between rows 7&8, approx. 3 sts apart

Info :

Embroider mouth

Info :

Attach arms to edge of bread, between rows 5&6

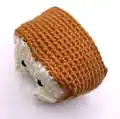
— Forming the Loaf :

Info :

Remove your st marker and place it in the beginning st of this next row. Ensure correct side is facing out—stitches should look like little v's. If feet are facing wrong way on front piece, push them with end of crochet hook so they're popped out on right side.

R1 :

Still using tan, sc around in the BLO (54)

R2-10 :

sc around (54) f/o and weave in yarn tail

— Back of Loaf :

R1 :

Starting with cream, ch 13, sc across starting in the 2nd ch from the hook (12) ch 1 and turn

R2-10 :

sc across. (12) ch 1 and turn

R11 (top of the loaf) :

2 HDC in one st, dc, dc, tr, tr, dc & HDC in one st, HDC & dc in one st, tr, tr, dc, dc, 2 HDC in last st (16)

Crocheting Around the Piece :

ch 1 and put a st marker in the ch 1 (it counts as a st) then sc 9 down the side, inc in corner, sc 10 across bottom, inc in corner, sc 10 up the other side

Change to Tan :

inc in the first st along the top, sc in the next 14 sts, inc in the last st

Finishing with Tan :

sc 10 down the side, inc in corner, sc 12 across the bottom, inc in corner, sc 10 up the other side (54 sts total around entire bread). F/O and leave a long tail for sewing.

— Attaching Back to Front :

Assembly Instructions :

Line up the front with the back and whip stich through the BLO of row 10 on the loaf and both loops on the back. The easiest way to line up the front and back is to look at them from above. Whip stitch through both loops of the back of the loaf and the back loop only of the main piece when attaching. Ensure correct side is facing out and border stitches look like little v's.

Info :

Stuff as you go as firmly as you prefer

— Finishing Touches :

Shaping the Loaf :

Poke the needle between rows 8&9 and up through the back through rows 4&5, centered. Repeat twice. Pull both tails tight—but not too tight (you don't want to see fiber fill poking out). Tie ends together and knot at the bottom then weave in the tails

Info :

If you don't like his arms flapping around and looking crazy, sew or glue them in the position you like

Assembly Instructions

  • Attach the small arms to the edge of the bread between rows 5 and 6 using the long tails left from making them.
  • Place safety eyes between rows 7 and 8, approximately 3 stitches apart, before closing up the loaf.
  • Embroider the mouth using black thread to give Loafie a sweet expression.
  • Line up the front and back pieces by viewing them from above to ensure proper alignment before whip stitching.
  • Whip stitch through the back loop only of row 10 on the front piece and both loops on the back piece to create invisible seams.
  • Stuff the loaf firmly as you sew, adjusting the amount of fiberfill to achieve your desired plumpness.
  • Shape the loaf by threading through rows 8-9 and up through rows 4-5 at the center, pulling tight to create dimension and tying off securely at the bottom.

Important Notes

  • 💡Remember to push out bobble stitches after completing them or they will remain inverted on the wrong side
  • 💡Use stitch markers throughout to track your rounds and avoid getting lost, especially during the color change sections
  • 💡Always check that your feet and arms are facing the correct direction before final assembly
  • 💡When whip stitching pieces together, only go through back loops of row 10 on the main piece for cleaner seams
  • 💡Stuff gradually as you assemble rather than waiting until the end for better shape control
  • 💡The shaping technique at the end using the needle through specific rows is crucial for achieving the authentic loaf shape
  • 💡If arms are too floppy, you can add a small amount of glue or extra stitches to secure them in your preferred position

This adorable Loafie the Bread pattern brings a smile to everyone who sees it! Combining simple construction with clever dimensional techniques, this pattern teaches you how to create realistic bread texture using bobble stitches and strategic color changes. The whimsical character with his tiny arms and sweet face makes a perfect gift for food lovers, kitchen decoration, or just as a quirky companion. It's a fun way to practice working three-dimensionally while creating something absolutely delightful. 🍞 Happy crocheting! 🧶✨

You ask,

we answer.

FAQs

What is a bobble stitch and how do I make sure it's on the right side?

A bobble stitch is created by working multiple incomplete double crochets into the same stitch, then pulling through all loops at once. The key trick mentioned in this pattern is to push the bobble out after completing it, as it will naturally be inverted on the wrong side. Simply use your finger or hook to pop it through to the correct side.

Why do I need to work in back loops only for some rounds?

Working in the back loop only (BLO) creates a ridge effect and allows the fabric to have more dimension and flexibility. In this pattern, it's used to create the texture of the bread crust and to allow the pieces to curve properly when assembled into the three-dimensional loaf shape.

How do I change colors smoothly between cream and tan?

The pattern instructs you to change colors by pulling the new color yarn through when finishing the last stitch of the previous color. This creates a smooth transition. Make sure to carry the yarn you're not using along the inside of your work and weave in ends securely later.

Can I make Loafie in different colors or sizes?

Absolutely! You can use any worsted weight yarn colors you like—try white and brown for whole wheat bread, or get creative with rainbow colors for a fantasy loaf. To change the size, use a smaller or larger hook with corresponding yarn weight, though you'll need to adjust your safety eye size accordingly.

How firmly should I stuff the bread?

The pattern suggests stuffing as firmly as you prefer, but warns not to stuff so tight that fiberfill shows through the stitches. A medium-firm stuffing usually works best to maintain the loaf shape while keeping it soft and huggable. Stuff gradually as you assemble for best results.