🧢 Beautiful ✨ Detailed πŸ’ Adorable

Adorable Spaniel in a Dog Bed Amigurumi Pattern

Adorable Spaniel in a Dog Bed Amigurumi Pattern
4.5β˜… Rating
5-7 Hours Time Needed
2.6K Made This
βœ‚οΈ

Intermediate Level

Ideal for those with basic knitting experience, featuring slightly more advanced stitches and techniques to expand your skills.

⏱️

Weekend Treat

Takes 5-7 hours, making it an enjoyable project to finish over a couple of days.

🧸

Cute Companion

An adorable friend to cherish, handcrafted with love to bring comfort and joy for years to come.

About This Adorable Spaniel in a Dog Bed Amigurumi Pattern

This delightful spaniel amigurumi pattern captures the essence of everyone's favorite floppy-eared friend. With intricate details including color-changing techniques for the characteristic spaniel markings, embroidered facial features, and charming accessories like a pink headband, this pattern creates a truly special handmade toy. The included dog bed adds an extra touch of cuteness, featuring a circular base, curved side walls, and a soft pillow for your spaniel to snuggle into.

Adorable Spaniel in a Dog Bed Amigurumi Pattern crochet pattern - detailed view of completed project

The pattern uses sport weight yarn in beautiful coordinating colors and incorporates special techniques like jacquard color-work for the head markings and tightening cheeks for dimensional features. Both the spaniel and dog bed are worked primarily in single crochet with clear round-by-round instructions.

Why You'll Love This Adorable Spaniel in a Dog Bed Amigurumi Pattern

I absolutely love how this pattern brings together so many charming elements into one complete project! The satisfaction of watching the spaniel's personality emerge as you add those sweet droopy ears and embroider the expressive face is incredibly rewarding. What really makes this pattern special is the adorable dog bed that gives your creation a cozy home. I appreciate the clear instructions for color changes and the helpful photos showing exactly how to achieve those dimensional cheeks and perfect facial features. It's the kind of project that makes you smile with every stitch, knowing you're creating something truly special that will be treasured for years to come.

Adorable Spaniel in a Dog Bed Amigurumi Pattern step 1 - construction progress Adorable Spaniel in a Dog Bed Amigurumi Pattern step 2 - assembly progress Adorable Spaniel in a Dog Bed Amigurumi Pattern step 3 - details and accessories Adorable Spaniel in a Dog Bed Amigurumi Pattern step 4 - final assembly and finishing

Switch Things Up

I love how versatile this spaniel pattern really is! While the original design features those gorgeous beige and white spaniel markings, you could easily transform this into your own dream dog breed. Try working the entire body in solid brown for a chocolate spaniel, or use grey and white for a completely different look.

The ears are another area where I get creative - you could make them shorter and more upright for a different breed vibe, or keep them long but try different color combinations in the inner ear. I've even experimented with adding spots or patches by switching colors mid-round on the body.

For the dog bed, I personally love mixing up the color scheme to match home decor or the recipient's favorite colors. Instead of purple and pink, try sophisticated grey and cream, or fun turquoise and yellow combinations. You could also add embroidered details or appliquΓ©s to the pillow for extra personality.

Don't forget about accessories! Beyond the headband, I've added tiny crocheted collars with bells, miniature toys, or even a small bone next to the bed. These little touches make each creation completely unique and special to its new owner.

Common Mistakes & How to Fix Them

βœ— Miscounting stitches during color changes in the jacquard technique on the head can throw off the pattern - use stitch markers carefully βœ— Not stuffing the paws and body firmly enough before closing can result in a floppy spaniel - stuff as you go for better structure βœ— Placing safety eyes incorrectly affects the entire expression - always count carefully and pin in place before securing permanently to check positioning βœ— Forgetting to leave long tails for sewing pieces together makes assembly difficult - leave at least 12 inches for major pieces like ears and head

Adorable Spaniel in a Dog Bed Amigurumi Pattern

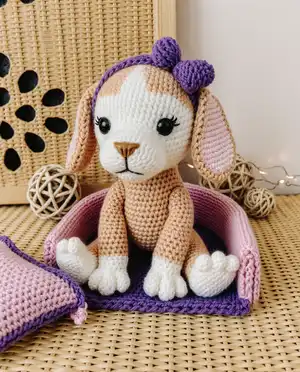
Create your very own lovable spaniel companion complete with a cozy dog bed! This charming crochet pattern guides you through making an adorable 6.1-inch spaniel featuring sweet droopy ears, embroidered details, and an optional pink headband. The pattern also includes instructions for crafting a perfectly sized purple and pink dog bed with a soft pillow where your spaniel can rest. Perfect for dog lovers and amigurumi enthusiasts, this delightful project combines multiple color-work techniques to bring this precious pup to life with personality and charm.

Intermediate 5-7 Hours

Materials Needed for Adorable Spaniel in a Dog Bed Amigurumi Pattern

β€” Main Fabric

  • 01
    Sport weight 4ply yarn Yarn Art Jeans (50g/160m) in white (N01)
  • 02
    Sport weight 4ply yarn Yarn Art Jeans in light pink (N18)
  • 03
    Sport weight 4ply yarn Yarn Art Jeans in pink (N20)
  • 04
    Sport weight 4ply yarn Yarn Art Jeans in purple (N50)
  • 05
    Sport weight 4ply yarn Yarn Art Jeans in beige (N83)
  • 06
    Sport weight 4ply yarn Yarn Art Jeans in brown (N71)

β€” Tools Required

  • 01
    2 mm crochet hook
  • 02
    Safety eyes 14 mm
  • 03
    Stuffing material, fiberfill
  • 04
    Needle for sewing pieces
  • 05
    Stitch markers
  • 06
    Scissors

Progress Tracker

0% Complete

β€” Spaniel

β€” Tail

Info :

With white yarn

Round 1 :

4sc in MR. Place row marker here

Round 2 :

(1sc, inc) *2 (6)

Round 3 :

6sc

Round 4 :

Change color to beige. 6sc

Round 5 :

6sc

Round 6 :

4sc, dec (5)

Info :

Fold in half and crochet 2sc through both sides. Fasten off, cut the yarn, weave in the yarn ends

β€” Paws (make 4)

Info :

With beige yarn

Round 1 :

6sc in MR. Place row marker here

Round 2 :

6inc (12)

Round 3 :

Change color to white. (1sc, inc) *6 (18)

Round 4 :

Change color to beige. (1sc, 4dc in one stitch)*4, 10sc (30)

Round 5 :

(1sc, dc4tog) *4, 10sc (18)

Round 6 :

(1sc, dec) *6 (12)

Rounds 7-13 :

12sc (7 rounds)

Info :

Stuff the paws with fiberfill. Fold in half and crochet 6sc through both sides. Fasten off, cut the yarn, weave in the yarn ends

β€” Body

Info :

With beige yarn

Round 1 :

6sc in MR. Place row marker here

Round 2 :

6inc (12)

Round 3 :

(1sc, inc) *6 (18)

Round 4 :

(2sc, inc) *6 (24)

Round 5 :

(3sc, inc) *6 (30)

Round 6 :

(4sc, inc) *6 (36)

Round 7 :

(5sc, inc) *6 (42)

Round 8 :

You will turn two pieces: body and tail into one: 1sc, 2sc with the tail and body together; 39sc (42)

Round 9 :

42sc

Round 10 :

You will turn three pieces: body and two paws into one: 13sc, 6sc with the paw and body together; 6sc; 6sc with the second paw and body; 11sc (42)

Round 11 :

(1sc, dec) *3, 24sc, (1sc, dec) *3 (36)

Rounds 12-14 :

36sc (3 rounds)

Round 15 :

(4sc, dec) *6 (30)

Rounds 16-17 :

30sc (2 rounds)

Round 18 :

(4sc, inc) *6 (36)

Rounds 19-20 :

36sc (2 rounds)

Round 21 :

You will turn three pieces: body and two paws into one: 10sc, 6sc with the third paw and body together; 6sc; 6sc with the fourth paw and body; 8sc (36)

Round 22 :

(4sc, dec) *6 (30)

Round 23 :

30sc

Round 24 :

(3sc, dec) *6 (24)

Round 25 :

(2sc, dec) *6 (18)

Round 26 :

(1sc, dec) *6 (12)

Info :

Stuff the body with fiberfill

Round 27 :

6dec. Fasten off, cut the yarn, weave in the ends

β€” Head

Info :

With white yarn

Round 1 :

6sc in MR. Place row marker here

Round 2 :

6inc (12)

Round 3 :

3inc, 3sc, 3inc, 3sc (18)

Round 4 :

(1sc, inc) *2, 3sc, (inc, 1sc) *3, 4sc, inc (24)

Round 5 :

(2sc, inc) *2, 4sc, (inc, 2sc) *3, 4sc, inc (30)

Rounds 6-8 :

30sc (3 rounds)

Round 9 :

Change color to beige. Attention! Crochet in jacquard technique from Rnd 9 to 12. Add white yarn (these stitches are highlighted in red). (4sc, inc)*3, 4sc, inc, (4sc, inc)*2 (36)

Round 10 :

(5sc, inc)*3, 4sc, sc, inc, (5sc, inc)*2 (42)

Round 11 :

(6sc, inc)*3, 4sc, 2sc, inc, (6sc, inc)*2 (48)

Round 12 :

(7sc, inc)*3, 4sc, 3sc, inc, (7sc, inc)*2 (54)

Rounds 13-20 :

With beige yarn. 54sc (8 rounds)

Info :

Insert the eyes between rounds 11-12 at a distance of 14-16 stitches

Round 21 :

(7sc, dec)*6 (48)

Round 22 :

(6sc, dec)*6 (42)

Round 23 :

(5sc, dec)*6 (36)

Round 24 :

(4sc, dec)*6 (30)

Round 25 :

(3sc, dec) *6 (24)

Round 26 :

(2sc, dec) *6 (18)

Round 27 :

(1sc, dec) *6 (12)

Info :

Stuff the head with fiberfill

Round 28 :

6dec. Fasten off, cut the yarn, weave in the ends

β€” Ears (make 2)

Info :

Crochet 2 pieces in beige and 2 pieces in light pink color

Row 1 :

Chain 13. Start in the second chain from the hook: 11sc, 4dc in one stitch, 11sc, turn (26)

Row 2 :

Ch1, 7sc, 4dc, 4dcinc, 4dc, 7sc, turn (30)

Row 3 :

Ch1, 4sc, 7dc, 8dcinc, 7dc, 4sc (38)

Info :

Cut the yarn on the light pink pieces. Continue crocheting from beige piece. Apply the beige part and crochet with beige yarn: (3sc in one stitch, sl st)*19. Leave a long tail for sewing

β€” Face Details

Info :

Tighten cheeks following pictures in pattern

Info :

Embroider the corners of the eyes with white

Info :

Embroider the eyebrows with white yarn

Info :

Embroider the nose with brown yarn

β€” Assembly Instructions for Spaniel

Step 1 :

Sew the head to the body

Step 2 :

Sew the ears to the head

β€” Headband

Info :

Crochet the Headband with pink yarn

Row 1 :

Chain 70. Start in the third chain from the hook: 70sc. Cut the yarn and fasten off

Info :

Tie the headband on the head

Info :

Embroider the mouth with brown yarn

β€” Dog Bed

β€” Base

Info :

With purple yarn

Round 1 :

6sc in MR. Place row marker here

Round 2 :

6inc (12)

Round 3 :

(1sc, inc) *6 (18)

Round 4 :

(2sc, inc) *6 (24)

Round 5 :

(3sc, inc) *6 (30)

Round 6 :

(4sc, inc) *6 (36)

Round 7 :

(5sc, inc) *6 (42)

Round 8 :

(6sc, inc) *6 (48)

Round 9 :

(7sc, inc) *6 (54)

Round 10 :

(8sc, inc) *6 (60)

Round 11 :

(9sc, inc) *6 (66)

Round 12 :

(10sc, inc) *6 (72)

Round 13 :

(11sc, inc) *6 (78)

Round 14 :

(12sc, inc) *6 (84)

Info :

Cut the yarn and fasten off

β€” Side Wall

Info :

With pink yarn

Round 1 :

Chain 6. Start in the second chain from the hook: inc, 3sc, 3sc in the last chain, 4sc (12)

Round 2 :

2inc, 3sc, 3inc, 3sc, inc (18)

Round 3 :

2inc, 6sc, 3inc, 6sc, inc (24)

Rounds 4-85 :

24sc (82 rounds)

Info :

Stuff with fiberfill in the process

Round 86 :

2dec, 6sc, 3dec, 6sc, dec (18)

Round 87 :

2dec, 3sc, 3dec, 3sc, dec (12)

Info :

Cut the yarn and fasten off

Info :

Sew the side wall in a circle to the bottom of the bed. Cut the yarn and fasten off

β€” Pillow

Info :

Crochet 2 pieces in pink color

Row 1 :

Chain 15. Start in the second chain from the hook: 14sc, turn (14)

Rows 2-11 :

Ch1, 14sc, turn (10 rounds)

Info :

Apply the pink part and crochet with purple yarn: 14sc, inc in the corner, 11sc, inc in the corner, 14sc, inc in the corner, 11sc, inc in the corner. Stuff with fiberfill in the process. Fasten off, cut the yarn, weave in the yarn ends

Assembly Instructions

  • Sew the head securely to the body, ensuring it sits at a natural angle
  • Attach the ears to the sides of the head positioned symmetrically
  • Tighten the cheeks by following the threading technique shown in pattern photos for dimensional features
  • Embroider the nose with brown yarn in the center of the face below the eyes
  • Embroider white highlights at the corners of the eyes and white eyebrows above the eyes for expression
  • Create the pink headband by chaining 70 and working single crochet back, then tie around the head between the ears
  • Sew the completed side wall around the circular base of the dog bed, stuffing as you go to maintain shape

Important Notes

  • πŸ’‘Use stitch markers consistently to track your place, especially during the long dog bed side wall construction
  • πŸ’‘The jacquard technique on rounds 9-12 of the head requires working with two colors simultaneously - keep tension consistent
  • πŸ’‘Insert safety eyes between rounds 11-12 with 14-16 stitches between them before stuffing and closing the head
  • πŸ’‘Leave generous yarn tails (at least 12 inches) when fastening off pieces that need to be sewn together
  • πŸ’‘Stuff firmly but not too tightly to maintain the spaniel's soft, huggable quality while keeping good shape
  • πŸ’‘The side wall of the dog bed requires 82 rounds of continuous crocheting - use a comfortable grip and take breaks as needed

This enchanting Spaniel in a Dog Bed pattern was lovingly designed to capture the sweet essence of our favorite floppy-eared companions! The combination of detailed embroidery work, dimensional facial features, and the adorable coordinating dog bed creates a complete scene that tells a story. Whether displayed on a shelf or gifted to someone special, this project showcases your crochet skills while bringing pure joy to everyone who sees it. Happy crocheting and enjoy watching your spaniel friend come to life! 🧢🐢✨

You ask,

we answer.

FAQs

What size will my finished spaniel be?

Using the recommended 2mm hook and sport weight 4ply Yarn Art Jeans, your spaniel will measure approximately 15.5 cm (6.1 inches) tall, and the dog bed will have a diameter of 15.0 cm (5.9 inches).

What is the jacquard technique mentioned in the head section?

Jacquard crochet is a color-work technique where you work with two colors in the same round to create patterns. For the spaniel's head, you'll work primarily in beige while adding white stitches for the characteristic spaniel face markings. Carry the unused color along inside your work.

Can I use different yarn weights for this pattern?

Yes, you can use different yarn weights, but your finished spaniel and dog bed will be larger or smaller depending on your yarn choice. Just make sure to adjust your hook size accordingly and use safety eyes appropriate for your finished size.

Do I need to know special techniques for this pattern?

You should be comfortable with basic amigurumi techniques including magic ring, working in continuous rounds, increases and decreases, color changes, and joining pieces while crocheting. The pattern also uses double crochet stitches in the ears and requires basic embroidery skills for facial features.

How do I attach the paws to the body?

The paws are actually crocheted directly into the body as you work! The pattern instructs you to crochet through both the paw and body together at specific rounds, creating a seamless attachment without sewing.

Is the headband optional?

Yes, the pink headband is a cute optional accessory that adds extra personality to your spaniel. You can skip it or customize it with different colors or embellishments to match your style.