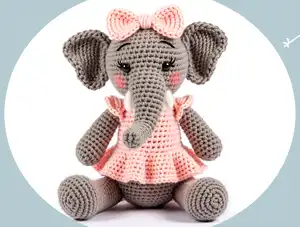
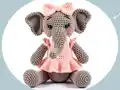
Create your own adorable Little Elephant with this charming amigurumi crochet pattern! Standing at 20cm tall, this sweet grey elephant features a delightful pink skirt, adorable bow accessory, and expressive embroidered details. Perfect for gifting or adding a touch of handmade whimsy to any nursery or playroom, this cuddly companion combines classic amigurumi techniques with beautiful finishing touches. The pattern includes detailed instructions for creating every element, from the trunk to the tiny feet, making it a rewarding project for intermediate crocheters looking to expand their skills.
Progress Tracker
0% Complete
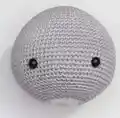
— HEAD :
Round 1 :
8sc in the MR [8]
Round 2 :
inc in each st around [16]
Round 3 :
(1sc, inc) x 8 [24]
Round 4 :
1sc, inc, (2sc, inc) x 7, 1sc [32]
Round 5 :
(3sc, inc) x 8 [40]
Round 7 :
2sc, inc, (4sc, inc) x 7, 2sc [48]
Round 9 :
(5sc, inc) x 8 [56]
Round 11 :
3sc, inc, (6sc, inc) x 7, 3sc [64]
Round 13 :
(7sc, inc) x 8 [72]
Round 14-23 :
72sc [10 rounds]
Info :
Place safety eyes between round 22 with 15 sc between
Round 24 :
(7sc, dec) x 8 [64]
Round 26 :
3sc, dec, (6sc, 1 dec) x 7, 3sc [56]
Round 27-28 :
56sc [2 rounds]
Round 29 :
(5sc, dec) x 8 [48]
Round 31 :
2sc, dec, (4sc, dec) x 7, 2sc [40]
Round 33 :
(3sc, dec) x 8 [32]
Round 34 :
(2sc, dec) x 8 [24]
Info :
Fill some more. Insert the Crochet stitch marker. Cut the Yarn and hide.
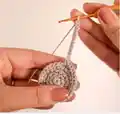
— EARS (Make 2) :
Info :
Use grey yarn. Do not fill and leave a long yarn to sew.
Round 1 :
6sc in the MR [6]
Round 2 :
2sc in each st around [12]
Round 3 :
(1sc, inc) x 6 [18]
Round 4 :
1sc, inc, (2sc, inc) x 5, 1sc [24]
Round 5 :
(3sc, inc) x 6 [30], continue without cutting the yarn and do: 11 chains, back doing 10sc in the second chain from the hook.
Round 6 :
30sc in the circle, and in the chains of the lower ear: 9sc, inc, 9sc [50]
Round 7-9 :
50sc [3 rounds]
Round 10 :
4sc, dec, (8sc, dec) x 4, 4sc [45]
Round 11-12 :
45sc [2 rounds]
Round 13 :
(7sc, dec) x 5 [40]
Round 14 :
3sc, dec, (6sc, dec) x 4, 3sc [35]
Round 15 :
(5sc, dec) x 5 [30]
— TRUNK :
Info :
Use grey yarn. Fill and leave a long yarn to sew.
Round 1 :
6sc in the MR [6]
Round 2 :
2sc in each st around [12]
Round 3 :
(1sc, inc) x 6 [18]
Round 4 :
18sc (back loop only)
Round 5-13 :
18sc [9 rounds]
Round 14-19 :
inc, 8sc, dec, 7sc [6 rounds]
Round 20 :
(2sc, inc) x 6 [24]
Round 21-24 :
24sc [4 rounds]
— BOW :
Round 1 :
starting at the second chain from the hook with 16sc, 1 chain and turn the work.
Round 2-12 :
16 sc, 1 chain and turn [11 rounds]
Round 13 :
Do slts all around the bow.
Second Part :
Do 17 chains
Round 1 :
starting at the second chain from the hook with 16sc, 1 chain and turn the work.
Round 2-5 :
16sc, 1 chain and turn [3 rounds]
Round 6 :
Do slts all around the bow.
Chains :
Leave a piece of yarn before you start, do 12 chains, leave a piece of yarn to pass around the bow.
— BODY :
Info :
Use grey yarn. Fill and leave a long yarn to sew.
Round 1 :
6sc in the MR [6]
Round 2 :
2sc in each st around [12]
Round 3 :
(1sc, inc) x 6 [18]
Round 4 :
1sc, inc, (2sc, inc) x 5, 1sc [24]
Round 5 :
(3sc, inc) x 6 [30]
Round 6 :
2sc, inc, (4sc, inc) x 5, 2sc [36]
Round 7 :
(5sc, inc) x 6 [42]
Round 8 :
3sc, inc, (6sc, inc) x 5, 3sc [48]
Round 9 :
(7sc, inc) x 6 [54]
Round 10 :
4sc, inc, (8sc, inc) x 5, 4sc [60]
Round 11 :
(9sc, inc) x 6 [66]
Round 12-20 :
66sc [9 rounds]
Round 21 :
(9sc, dec) x 6 [60]
Round 22-23 :
60sc [2 rounds]
Round 24 :
4sc, dec, (8sc, dec) x 5, 4sc [54]
Info :
Change color to pink.
Round 26 :
54sc (back loop only)
Round 27 :
(7sc, dec) x 6 [48]
Round 29 :
3sc, dec, (6sc, dec) x 5, 3sc [42]
Round 30-31 :
42sc [2 rounds]
Round 32 :
(5sc, dec) x 6 [36]
Round 34 :
2sc, dec, (4sc, dec) x 5, 2sc [30]
Round 36 :
(3sc, dec) x 6 [24]
— ARMS (Make 2) :
Info :
Start with light pink yarn. Fill the arm halfway.
Round 1 :
6sc in the MR [6]
Round 2 :
inc each st around [12]
Round 3 :
(1sc, inc) x 6 [18]
Round 4 :
1sc, inc, (2sc, inc) x 5, 1sc [24]
Info :
Change color to grey.
Round 5 :
24sc (back loop only)
Round 6-10 :
24sc [5 rounds]
Round 11 :
(4sc, dec) x 4 [20]
Round 12-18 :
20sc [7 rounds]
Round 19 :
(3sc, dec) x 4 [16]
Round 20-22 :
16sc [4 rounds]
Info :
Change color to pink.
Round 24 :
16sc (back loop only)
Round 25-27 :
16sc [3 rounds]
Info :
Sc in the front loops of round 24 with pink color. Fold the arm in half and make 8 sc joining both sides.
— FOOT (Make 2) :
Info :
Start with light pink yarn. Spiral work: Fill and leave a long yarn to sew.
Info :
Do 7 chains and starting at the second chain from the hook:
Round 1 :
5sc, inc, 5sc [12]
Round 2 :
(1sc, inc) x 6 [18]
Round 3 :
1sc, inc, (2sc, inc) x 5, 1sc [24]
Round 4 :
(3sc, inc) x 6 [30]
Round 5 :
2sc, inc, (4sc, inc) x 5, 2sc [36]
Info :
Change color to grey.
Round 6 :
36sc (back loop only)
Round 7-11 :
36sc [5 rounds]
Round 12 :
14sc, (dec) x 4, 14sc [32]
Round 13 :
14sc, (dec) x 2, 14sc [30]
Round 14-15 :
30sc [2 rounds]
Round 16 :
(3sc, dec) x 6 [24]
Round 17-18 :
24sc [2 rounds]
— SKIRT :
Info :
Start with light pink yarn.
Round 1 :
front loop only in the round 26: HDC inc [108]
Round 2 :
1 slt in the first stitch of the round 1, 1 chain, 108 HDC [108]
Round 3-7 :
repeat 108 HDC working spiral.
Round 8 :
108 slts all round.
This precious Little Elephant pattern was lovingly designed to create a timeless keepsake that combines classic amigurumi techniques with charming feminine details. The ruffled skirt adds movement and whimsy, while the carefully positioned bow and sweet embroidered face bring personality to life. Whether you're crafting for a nursery, a special gift, or your own collection, this 20cm companion is sure to steal hearts. The v-shape single crochet technique creates beautiful texture throughout, making every stitch count toward something truly special. Happy crocheting! 🐘💕✨