🧶 Beautiful ✨ Detailed 💝 Adorable

Bobby the Bighorn Sheep Amigurumi Pattern

Bobby the Bighorn Sheep Amigurumi Pattern
4.5★ Rating
3-4 Hours Time Needed
3.7K Made This
✂️

Beginner Friendly Level

Perfect for those just starting their sewing journey, with clear instructions and simple techniques

⏱️

Bite-Sized Project

Complete in under 2 hours—quick, fun, and perfect for a little creative escape.

🐏

Charming Critter

Delightful animal designs with sweet details that capture the essence of your favorite woodland and farmyard friends.

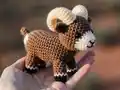
About This Bobby the Bighorn Sheep Amigurumi Pattern

Bobby the Bighorn Sheep Amigurumi Pattern crochet pattern - detailed view of completed project

The pattern includes clear assembly instructions and helpful placement guides for eyes and facial features. With basic stitches and straightforward construction, you'll have your bighorn sheep completed in just a few hours of enjoyable crocheting.

Why You'll Love This Bobby the Bighorn Sheep Amigurumi Pattern

I absolutely love this Bobby the Bighorn Sheep pattern because it's one of those rare amigurumi designs that looks impressive but comes together surprisingly quickly! The color transition from white snout to brown body happens so smoothly and creates that authentic sheep appearance without any complicated colorwork. What really excites me is how the horns curl backward—they start off looking a bit silly during assembly, but once you roll them into position, the whole character just comes to life! I appreciate the clever penny-weighted base that makes Bobby actually stand on his own, which means he's not just a toy but a proper decorative piece. The satisfaction of seeing those little black hooves against the brown legs, and that sweet embroidered nose and mouth, makes this project feel special and worthwhile every single time.

Bobby the Bighorn Sheep Amigurumi Pattern step 1 - construction progress Bobby the Bighorn Sheep Amigurumi Pattern step 2 - assembly progress Bobby the Bighorn Sheep Amigurumi Pattern step 3 - details and accessories Bobby the Bighorn Sheep Amigurumi Pattern step 4 - final assembly and finishing

Switch Things Up

I love experimenting with Bobby's design because there are so many creative possibilities! One of my favorite variations is making him in different sheep breeds—try using all white or cream yarn for a classic sheep look, or go with dark brown and black for a more dramatic mountain ram appearance. You could even create a whole flock with different color combinations!

I've also played with the horn size by adding or removing rounds to create younger lambs with smaller horns or massive adult rams with impressively curled horns. Adding extra rounds to the horn pattern and really emphasizing that backward curl makes for a stunning display piece.

For a softer, fluffier appearance, I sometimes use fuzzy or boucle yarn for the body which gives Bobby that authentic woolly texture. It makes him even more cuddly and adds wonderful tactile interest, though be aware it can make counting stitches a bit trickier.

I've experimented with facial expressions too—positioning the eyes slightly differently or adding embroidered eyebrows can give Bobby different personalities, from sweet and innocent to wise and majestic. A few strategically placed stitches can completely change his character!

Another fun modification is making seasonal versions—add a tiny crocheted scarf for winter Bobby, or a flower crown for spring. I've even created a Christmas version with a small Santa hat perched between his horns. The simple construction makes it easy to add accessories without overwhelming the basic design. Bobby's versatility makes him perfect for any season or occasion!

Common Mistakes & How to Fix Them

✗ Not stuffing the head firmly enough before closing causes the face to look flat and distorted instead of rounded and dimensional ✗ Forgetting to add the penny weight to the body before closing makes Bobby unable to stand properly on his own ✗ Placing eyes too far apart or at wrong rows ruins the sweet facial expression that makes Bobby recognizable as a sheep ✗ Not rolling the horns backward properly during assembly leaves them sticking out awkwardly instead of curving naturally behind the head ✗ Changing colors too early or late in the head disrupts the white face marking and makes the color transition look messy

Bobby the Bighorn Sheep Amigurumi Pattern

Create your own adorable Bobby the Bighorn Sheep with this charming amigurumi pattern! This delightful woolly friend features realistic curved horns, a sweet white face, and sturdy little legs that allow him to stand independently. Perfect for wildlife enthusiasts and nature lovers, this pattern guides you through crafting a cuddly sheep with authentic bighorn details including gradient coloring from white face to brown body. The weighted base ensures Bobby stands proudly on display, while the textured horns and careful color transitions bring this mountain dweller to life. Whether you're expanding your amigurumi zoo or creating a gift for an animal lover, Bobby will capture hearts with his gentle expression and huggable charm.

Beginner Friendly 3-4 Hours

Materials Needed for Bobby the Bighorn Sheep Amigurumi Pattern

— Main Fabric

  • 01
    Worsted weight yarn in beige color
  • 02
    Worsted weight yarn in brown color
  • 03
    Worsted weight yarn in white color
  • 04
    Worsted weight yarn in black color (for stitching mouth details)
  • 05
    Fiber fill/polyester stuffing

— Tools Required

  • 01
    3mm crochet hook (for horns only)
  • 02
    3.5mm crochet hook (main hook)
  • 03
    6mm black safety eyes
  • 04
    Scissors
  • 05
    Stitch markers or stitch counter
  • 06
    Sewing needle for assembly and facial details
  • 07
    One penny (for weighted base)

Progress Tracker

0% Complete

— Head

Info:

Start using white yarn

Round 1:

6 SC in MC (6)

Round 2:

INC X 6 (12)

Info:

On the last stitch change color to brown, the remainder of the head will be made using brown yarn

Round 3-4:

SC around (12)

Round 5:

6 SC, 6 INC (18)

Round 6:

SC around (18)

Round 7:

(2SC, INC) X 6 (24)

Round 8:

(3SC, INC) X 6 (30)

Info:

Stop and put eyes in and using your needle stitch in the nose

Round 9:

SC around (30)

Round 10:

(3SC, DEC) x 6 (24)

Round 11:

(2SC, DEC) x 6 (18)

Info:

Stop and lightly stuff head

Round 12:

(SC, DEC) x 6 (12)

Info:

Continue stuffing so head will stay nice and firm

Round 13:

SC around (6)

Info:

SL, close up hole and leave long tail of yarn for sewing onto body

Infos:

Eyes should be placed in between rows 5 & 6 and be 8 stitches apart. The top of the nose should start between rows 2 and 3 and the bottom should be in the middle of the original magic circle

— Body

Info:

Use brown yarn

Round 1:

6 SC in MC (6)

Round 2:

INC X 6 (12)

Round 3:

(SC, INC) X 6 (18)

Round 4:

(2SC, INC) x 6 (24)

Round 5-14:

24 around (24)

Info:

On last stitch change to white yarn. At this point you lightly stuff and add a penny inside to weigh it down

Round 15:

(2SC, DEC) x 6 (18)

Round 16:

(SC, DEC) x 6 (12)

Info:

Stop and stuff generously so it will stay nice and firm

Round 17:

DEC x 6 (6), SL and close up hole

— Legs

Info:

Make 4, start off using black yarn

Round 1:

5SC in MC (5)

Round 2:

SC around in BLO (change to brown yarn in 5th stitch)

Round 3:

INC, 4SC (6)

Round 4:

SC around (6)

Round 5:

(2 SC, INC) X 2 (8)

Round 6-7:

SC around (8)

Info:

SL, stuff with fiber fill and leave long tail for sewing onto body

— Tail

Info:

Use brown yarn

Chain:

Chain 4

Continue:

SC in 2nd chain from hook and next two stitches, SL in last stitch. Leave tail for sewing onto body

— Horns

Info:

Make 2, use Beige Yarn & 3mm hook

Round 1:

4SC in MC (4)

Round 2:

3SC, INC (5)

Round 3:

4SC, INC (6)

Round 4:

6 around (6)

Round 5:

(2 SC, INC) X 2 (8)

Round 6-7:

SC around (8)

Round 8:

(3SC, INC) X 2 (10)

Round 9:

SC around (10)

Round 10:

4SC, INC X 2 (12)

Round 11:

12 around (12)

Round 12:

(2 SC, DEC) X 3 (9)

Round 13:

SC around (9)

Info:

Finish off and leave a long tail for sewing onto head. Lightly stuff your horns

Assembly Instructions

  • Attach head to body between rows 4 and 5 using the long tail left from head construction
  • Sew tail onto the back of body 2 rows up from the bottom for proper placement
  • Attach horns between rows 8 and 9 of the head (they will look silly at first)
  • Roll the horns backward and attach them properly to head to create the curved bighorn sheep appearance
  • Sew front legs between rows 4-6 of the body ensuring even spacing
  • Attach back legs between rows 11-13 of the body for balanced standing position
  • Ensure Bobby stands on his own with all four legs properly positioned and balanced

Important Notes

  • 💡This pattern uses US crochet terminology throughout all instructions
  • 💡Crochet using a tight stitch tension and stuff generously so Bobby keeps his shape properly
  • 💡The bighorn sheep can be made smaller by using thinner yarn and reducing hook size accordingly
  • 💡Use stitch markers or stitch counter to keep track of rounds, especially during color changes
  • 💡Remember to add the penny weight inside the body before closing for proper standing stability
  • 💡Eyes should be placed between rows 5 and 6, separated by 8 stitches for correct facial proportions
  • 💡The nose embroidery starts between rows 2-3 and ends in the center of the original magic circle

This adorable Bobby the Bighorn Sheep pattern brings a touch of wildlife charm to your amigurumi collection! With his curved horns, sweet white face, and sturdy standing pose, Bobby captures the majestic nature of mountain sheep in the most huggable way. The simple construction combined with thoughtful details like the weighted base and color transitions makes this pattern perfect for beginners ready to try character-building techniques. Whether displayed on a nature lover's shelf or gifted to someone special, Bobby is sure to bring smiles and mountain adventures to any space. 🧶 Happy crocheting! 🐏✨

You ask,

we answer.

FAQs

Why do my horns look silly during assembly?

Don't worry—this is completely normal! The pattern specifically mentions they'll look silly at first. The key is to roll them backward after attaching them to the head. Once you curve them properly, they'll create that authentic bighorn sheep look with horns curving behind the head.

Can I make Bobby without the penny weight inside?

While you can skip the penny, it's highly recommended for best results. The weight provides stability that allows Bobby to stand independently on all four legs. Without it, he may tip over or need to lean against something for support.

How do I create the color transition from white to brown on the face?

Start the head with white yarn for rounds 1-2, then change to brown on the last stitch of round 2. This creates Bobby's distinctive white snout and face area while the rest of the head is brown, mimicking real bighorn sheep coloring.

What size will my finished Bobby be?

Using 3.5mm hook with worsted weight yarn, Bobby will be a small, palm-sized amigurumi, approximately 3-4 inches tall when standing. You can make him smaller by using thinner yarn and a smaller hook as noted in the pattern.

Why use a different hook size for the horns?

The 3mm hook creates tighter, more delicate stitches for the horns, giving them a refined appearance and proper scale compared to the body. This size difference helps the horns look more realistic and proportionate to Bobby's head.

How do I embroider the nose and mouth details?

Using black yarn and a sewing needle, create a small triangle or inverted Y-shape for the nose starting between rows 2-3 of the head, with the bottom point ending at the center of the original magic circle. Add a simple curved line for the mouth if desired.