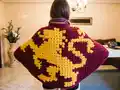
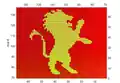
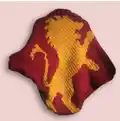
Transform your crochet skills into wearable art with this stunning Lion Graphgan Cocoon Cardigan. This unique pattern combines the beautiful corner-to-corner technique with a majestic lion design, creating a cozy cardigan that's both fashionable and comfortable. The intricate graphgan features a detailed lion motif in rich claret red and vibrant gold colors, worked diagonally to create a mesmerizing visual effect. Perfect for intermediate crocheters looking to expand their skills beyond traditional blankets, this pattern guides you through creating a stylish cocoon-style cardigan with ribbed sleeves and a sophisticated collar finish.
Progress Tracker
0% Complete
— Part I: The Graphgan
Row 1 :
ch4, hdc in 3rd chain from hook, hdc in next (and last) chain (1 block)
Row 2 :
ch4, turn. Hdc in 3rd chain from hook, hdc in next (and last) chain. Slst into the chain space created in row 1 (1st block of this row is now done). Ch2, hdc2 into the chain space (2nd block of the row done) (2 blocks)
Row 3 :
ch4, turn. Hdc in 3rd chain from hook, hdc in next (and last) chain (1st block of this row done). Slst into the chain space created by the 2nd block of row 2. Ch2, hdc2 into the chain space (2nd block of this row done). Slst into the chain space created by the 1st block of row 2. Ch2, hdc2 into the chain space (3rd block of this row done) (3 blocks)
Rows 4-27 :
Continue small C2C pattern in color A until row 27 (until there are 27 block points on the most recently finished row)
Info :
Color changes start now. For even rows, keep yarn ends to the front (the wrong side). For odd rows, keep yarn ends to the back (the right side). Sew in ends after each row. Even number sides begin on the bottom/left and end on the right/top. Odd number sides begin on the right/top and end on the bottom/left
Row 28 :
5 blocks in color A, 1 block in color B, 22A to end (28 blocks)
Row 29 :
22A, 2B, 5A to end (29 blocks)
Row 30 :
5A, 2B, 23A to end (30 blocks)
Row 31 :
23A, 3B, 5A to end (31 blocks)
Row 32 :
5A, 3B, 25A to end (32 blocks)
Row 33 :
25A, 2B, 6A to end (33 blocks)
Row 34 :
6A, 3B, 25A to end (34 blocks)
Row 35 :
26A, 2B, 7A to end (35 blocks)
Row 36 :
7A, 3B, 26A to end (36 blocks)
Row 37 :
27A, 2B, 8A to end (37 blocks)
Row 38 :
8A, 3B, 27A to end (38 blocks)
Row 39 :
28A, 2B, 9A to end (39 blocks)
Row 40 :
4A, 1B, 4A, 3B, 28A to end (40 blocks)
Row 41 :
28A, 3B, 4A, 2B, 4A to end (41 blocks)
Row 42 :
4A, 2B, 4A, 4B, 28A to end (42 blocks)
Row 43 :
28A, 4B, 4A, 3B, 4A to end (43 blocks)
Row 44 :
4A, 3B, 4A, 6B, 27A to end (44 blocks)
Row 45 :
27A, 6B, 4A, 3B, 5A to end (45 blocks)
Row 46 :
5A, 3B, 4A, 7B, 14A, 2B, 11A to end (46 blocks)
Row 47 :
11A, 3B, 13A, 7B, 4A, 3B, 6A to end (47 blocks)
Row 48 :
6A, 3B, 6A, 6B, 12A, 3B, 12A to end (48 blocks)
Row 49 :
12A, 4B, 12A, 6B, 5A, 3B, 7A to end (49 blocks)
Row 50 :
8A, 3B, 5A, 6B, 11A, 4B, 13A to end (50 blocks)
Row 51 :
14A, 3B, 11A, 7B, 4A, 3B, 9A to end (51 blocks)
Row 52 :
9A, 4B, 3A, 8B, 10A, 4B, 14A to end (52 blocks)
Row 53 :
15A, 3B, 11A, 7B, 2A, 5B, 10A to end (53 blocks)
Row 54 :
11A, 5B, 1A, 8B, 10A, 3B, 10A to end (54 blocks)
Row 55 :
16A, 3B, 10A, 14B, 12A to end (55 blocks)
Row 56 :
12A, 15B, 9A, 3B, 17A to end (56 blocks)
Row 57 :
18A, 3B, 5A, 18B, 13A to end (57 blocks)
Row 58 :
14A, 20B, 2A, 3B, 19A to end (58 blocks)
Row 59 :
20A, 24B, 15A to end (59 blocks)
Row 60 :
17A, 23B, 20A to end (60 blocks)
Row 61 :
21A, 22B, 18A to end (61 blocks)
Row 62 :
19A, 22B, 21A to end (62 blocks)
Row 63 :
21A, 22B, 20A to end (63 blocks)
Row 64 :
20A, 24B, 20A to end (64 blocks)
Row 65 :
20A, 25B, 20A to end (65 blocks)
Row 66 :
20A, 2B, 1A, 23B, 20A to end (66 blocks)
Row 67 :
20A, 23B, 2A, 1B, 21A to end (67 blocks)
Row 68 :
21A, 2B, 3A, 23B, 19A to end (68 blocks)
Row 69 :
18A, 23B, 5A, 1B, 22A to end (69 blocks - This is the biggest row)
Info :
The remaining rows are decreases. Instead of ch4, hdc2 at the start of each row, to start a new row: (no chain) turn, slst3 across the last block from the previous row into the chain space, then ch2 hdc2 in the chain space as normal, and finish the rest of the row as normal as well
Row 70 :
21A, 2B, 6A, 23B, 16A (68 blocks total wide)
Row 71 :
15A, 6B, 2A, 15B, 6A, 2B, 21A (67 blocks)
Row 72 :
21A, 2B, 7A, 13B, 3A, 6B, 14A (66 blocks)
Row 73 :
13A, 6B, 3A, 13B, 7A, 2B, 21A (65 blocks)
Row 74 :
21A, 2B, 7A, 13B, 4A, 4B, 13A (64 blocks)
Row 75 :
12A, 4B, 5A, 12B, 7A, 2B, 21A (63 blocks)
Row 76 :
21A, 2B, 7A, 12B, 5A, 2B, 13A (62 blocks)
Row 77 :
18A, 1B, 1A, 11B, 7A, 2B, 21A (61 blocks)
Row 78 :
21A, 2B, 6A, 11B, 1A, 2B, 17A (60 blocks)
Row 79 :
16A, 14B, 6A, 2B, 21A (59 blocks)
Row 80 :
21A, 2B, 6A, 13B, 16A (58 blocks)
Row 81 :
16A, 12B, 6A, 2B, 21A (57 blocks)
Row 82 :
21A, 1B, 6A, 13B, 15A (56 blocks)
Row 83 :
12A, 2B, 2A, 11B, 6A, 1B, 21A (55 blocks)
Row 84 :
21A, 1B, 6A, 11B, 2A, 3B, 10A (54 blocks)
Row 85 :
10A, 3B, 1A, 12B, 5A, 1B, 21A (53 blocks)
Row 86 :
20A, 1B, 6A, 16B, 9A (52 blocks)
Row 87 :
9A, 16B, 5A, 1B, 20A (51 blocks)
Row 88 :
20A, 1B, 5A, 15B, 9A (50 blocks)
Row 89 :
9A, 14B, 5A, 1B, 20A (49 blocks)
Row 90 :
24A, 16B, 8A (48 blocks)
Row 91 :
9A, 15B, 4A, 1B, 19A (47 blocks)
Row 92 :
24A, 14B, 8A (46 blocks)
Row 93 :
7A, 14B, 5A, 1B, 18A (45 blocks)
Row 94 :
12A, 1B, 4A, 1B, 4A, 15B, 7A (44 blocks)
Row 95 :
6A, 15B, 4A, 2B, 3A, 1B, 12A (43 blocks)
Row 96 :
12A, 1B, 2A, 2B, 6A, 13B, 6A (42 blocks)
Row 97 :
5A, 13B, 6A, 6B, 11A (41 blocks)
Row 98 :
11A, 5B, 5A, 14B, 5A (40 blocks)
Row 99 :
4A, 14B, 5A, 5B, 11A (39 blocks)
Row 100 :
12A, 1B, 1A, 1B, 7A, 13B, 3A (38 blocks)
Row 101 :
3A, 11B, 8A, 2B, 13A (37 blocks)
Row 102 :
23A, 8B, 1A, 1B, 3A (36 blocks)
Row 103 :
3A, 1B, 1A, 1B, 1A, 7B, 21A (35 blocks)
Row 104 :
21A, 2B, 1A, 3B, 1A, 2B, 14A (34 blocks)
Row 105 :
4A, 1B, 1A, 3B, 24A (33 blocks)
Row 106 :
22A, 4B, 1A, 1B, 4A (32 blocks)
Row 107 :
6A, 3B, 22A (31 blocks)
Rows 108-137 :
All color A to the end. Will be a perfect square after row 137
Info :
Cut yarn and tie in ends. This is the end of the graphgan square. Go through with a tapestry needle and extra yarn and touch up any edges you don't like. In corner to corners, catty-corner color changes often don't connect
— Part II: Sweater Assembly
Perimeter Border :
Dc along the entire perimeter of the square. Each block should have 2 dcs in it (it's easiest to count 4 stitches for every 2 blocks). For the corners: dc2 in the last block on that side, ch2, dc2 in the first block on the next side. When the square is entirely bordered in dcs, ch1, cut and tie off yarn
Folding and Sewing :
Fold the square in half such that the back side (wrong side) of the lion's head is touching the back side (wrong side) of the lion's feet. Sew together (mattress stitch recommended) both of the two shorter sides, starting from the where the corners meet to 9 inches before the fold. The 9 unsewed inches will become the arm holes. Cut and tie off yarn
— Sleeves
Row 1 :
Slst into the space just to the left of where your sewing ends. Ch3 (counts as 1 dc), dc into each dc around the arm hole. When you get back to your chain 3, count the dcs you just made. If you don't have an even number, add 1 dc in the space next to where your sewing ends. On the second sleeve, make sure you have the same number of dcs as the first sleeve. Slst into the ch3
Row 2-4 :
ch3, fpdc1, [bpdc1, fpdc1] to end. Slst into ch3
Finishing :
Ch1, cut yarn and tie off
— Collar
Row 1 :
Slst into the space just to the left of where your sewing ends. Ch3 (counts as 1 bpdc). Bpdc1, [fpdc2, bpdc2] until you get to the opposite end of the sweater where your other sewing is. Dc1 in each of the spaces around your sewing, then continue the [fpdc2, bpdc2] pattern as if these two dcs were part of it. When you come to the ch3, add any dcs needed to keep the [fpdc2, bpdc2] pattern even on the next row (you should end with 2 fpdcs before the ch3). Slst into the ch3
Row 2-6 :
Ch3, bpdc1, fpdc2, [bpdc2, fpdc2] to end, slst into ch3
Finishing :
Ch1, cut and tie off yarn. Sew in any lose ends
This Lion Graphgan Cocoon Cardigan pattern brilliantly combines the artistic beauty of graphgan design with practical wearable fashion. The majestic lion motif worked in rich claret and gold creates a stunning visual centerpiece, while the cocoon-style construction ensures comfortable, flattering fit for all body types. The modified C2C technique using half double crochet creates lighter fabric perfect for layering, and the ribbed finishing details on sleeves and collar add professional polish. Whether you're an experienced crocheter looking for a challenging colorwork project or someone ready to expand beyond blankets into garment construction, this pattern offers the perfect blend of artistic expression and functional design. 🦁🧶✨