About This Lady Liberty Amigurumi Pattern
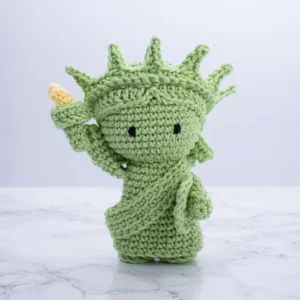
This little statue makes a wonderful centerpiece for holiday tables or a cute desktop companion for history lovers. It is a unique gift that stands out for its detail and charm.
Ideal for those with basic crocheting experience, featuring slightly more advanced stitches and techniques to expand your skills.
Takes 5-7 hours, making it an enjoyable project to finish over a couple of days.
Delightful animal designs with sweet details that capture the essence of your favorite woodland and farmyard friends.
This little statue makes a wonderful centerpiece for holiday tables or a cute desktop companion for history lovers. It is a unique gift that stands out for its detail and charm.
I absolutely love how the tiny book and crown details turn out on this project. There is a real sense of satisfaction in seeing such a grand monument transformed into something so small and huggable. Plus, using the back-post stitches gives her base a sturdy, architectural feel that I find really clever.


Working on this Lady Liberty project always feels a bit special to me. There is something about that specific shade of sea-foam green that just feels so classic and calming. When I was designing the sash, I wanted it to have just enough texture to stand out against the dress without being too bulky for her small frame.
One thing I love to do is experiment with the flame. While the pattern calls for yellow, you could totally use a variegated orange and red yarn to give it a bit more flicker and life! Also, if you find the crown a little fiddly, don't be afraid to use a slightly smaller hook just for that piece to keep those spikes nice and sharp.
I usually put on a good podcast or some folk music while I work on the hair and crown—those repetitive rounds are the perfect time to just zone out and enjoy the rhythm of the hook. She might be small, but she has so much personality once those tiny eyes are embroidered on. I hope she brings a little spark of joy to your home just like she does to mine!
Bring a touch of history to your craft corner with this adorable Lady Liberty. She is the perfect way to celebrate the spirit of freedom while practicing some fun new textures. You will love how the tiny details like her crown and torch come together to create a miniature icon that is as fun to display as it is to make. It is a wonderful project for anyone looking to add a patriotic flair to their handmade collection.
Start with pale green yarn. ch 26 and connect to the first ch to form a ring.
Work into the third loop of the ch: 26 sc (26)
26 sc (26)
26 sc (26)
26 sc (26)
26 sc (26)
26 sc (26)
5 sc, 1 dec, 12 sc, 1 dec, 5 sc (24)
24 sc (24)
24 sc (24)
24 sc (24)
24 sc (24)
24 sc (24)
Repeat (2 sc, 1 dec) 6 times (18)
sl st into the next stitch, cut the yarn and fasten off.
Using pale green, ch 35. Join to the first ch to form a circle.
10 sl st, 25 sc (35)
10 blsl, 25 blsc (35)
10 blsl, 25 blsc (35)
Join with a sl st, fasten off, and leave a yarn tail for sewing.
Start with pale green yarn for the first leg.
6 sc into a magic ring (6)
6 inc (12)
12 bpsc around (12)
12 sc (12)
12 sc (12)
Cut yarn and fasten off. Repeat steps for the second leg, but do not cut the yarn. Join the legs by inserting your hook into a stitch on the first leg.
24 sc total, working 12 sc around each leg (24)
24 sc (24)
24 sc (24)
24 sc (24)
24 sc (24)
Repeat (6 sc, 1 dec) 3 times (21)
21 sc (21)
21 sc (21)
21 sc (21)
Repeat (5 sc, 1 dec) 3 times (18)
18 sc (18)
Pause here to add stuffing. For the next round, slide the dress over the body and crochet through both the dress and the body stitches together.
18 sc through both layers (18)
18 blsl (18)
Work the next round only into the front loops left over from Round 17.
FL: Repeat (1 sc, 1 inc) 9 times (27)
Repeat (2 sc, 1 inc) 9 times (36)
Repeat (5 sc, 1 inc) 6 times (42)
42 sc (42)
42 sc (42)
42 sc (42)
42 sc (42)
42 sc (42)
42 sc (42)
42 sc (42)
42 sc (42)
Repeat (5 sc, 1 dec) 6 times (36)
Repeat (4 sc, 1 dec) 6 times (30)
Repeat (3 sc, 1 dec) 6 times (24)
Repeat (2 sc, 1 dec) 6 times (18)
Finish stuffing the head firmly.
Repeat (1 sc, 1 dec) 6 times (12)
Fasten off and weave in the end to close the head.
6 sc into a magic ring (6)
Repeat (2 sc, 1 inc) 2 times (8)
8 sc (8)
8 sc (8)
8 sc (8)
8 sc (8)
8 sc (8)
8 sc (8)
Flatten the opening and crochet 4 sc through both sides to close (4)
Fasten off, leaving a tail for sewing. Make two.
Using pale green, ch 28. Skip the first ch.
27 sc, ch 1, turn (27)
1 blsc, then repeat (ch 5, skip first ch, 1 sl st, 1 sc, 1 hdc, 1 dc, skip one foundation stitch, 3 blsc) 7 times, 1 blsc
Fasten off and leave a tail for sewing.
6 sc into a magic ring (6)
6 inc (12)
Repeat (1 sc, 1 inc) 6 times (18)
Repeat (2 sc, 1 inc) 6 times (24)
Repeat (3 sc, 1 inc) 6 times (30)
Repeat (4 sc, 1 inc) 6 times (36)
Repeat (5 sc, 1 inc) 6 times (42)
42 sc (42)
42 sc (42)
42 sc (42)
42 sc (42)
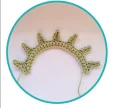
ch 2, 12 dc, ch 2, 1 sl st, ch 2, 12 dc, ch 2, 1 sc, then repeat (ch 7, skip first ch, 6 sc, join with sc) 16 times
Fasten off and leave a long tail for sewing.
4 sc into a magic ring (4)
4 sc (4)
Repeat (1 inc, 1 sc) 2 times (6)
6 sc (6)
6 FL inc (12)
12 bpsc (12)
12 sc (12)
sl st to join, fasten off, and leave a tail for sewing.
6 sc into a magic ring using yellow (6)
6 sc (6)
6 sc (6)
Repeat (2 sc, 1 inc) 2 times (8)
8 sc (8)
Fasten off and sew the flame inside the top of the torch.
Using pale green, ch 5. Skip the first ch.
4 sc, ch 1, turn (4)
4 sc, ch 1, turn (4)
4 sc, ch 1, turn (4)
4 sc, ch 1, turn (4)
Work a contour around the edge: 3 sc in the corner, 4 sc down the side, 3 sc in the next corner, 3 sc along the bottom, 3 sc in the corner, 4 sc up the side. Join with a sl st and fasten off.
I really hope you enjoy creating your very own little symbol of freedom! There is something so satisfying about finishing those tiny spikes on her crown and seeing her hold that little torch high. She is a wonderful project to work on during a quiet afternoon, and she always brings a smile to everyone who sees her. Don't forget to share your finished photos with the community—I cannot wait to see your version of Lady Liberty standing proud on your shelf! Happy crocheting! 🧶✨
Yes, you can use worsted weight yarn, but keep in mind that your finished Lady Liberty will be significantly larger than 5 inches, and you will need to adjust your hook size accordingly to keep the stitches tight.
The third loop is the bump on the back of the chain. When you look at the 'V' of the chain, flip it over, and you will see a single horizontal loop running down the center—that is where you should insert your hook.
The arm is naturally heavy with the torch. To fix this, use a small hidden stitch of green yarn to anchor the side of the arm to the side of the head near the ear area.
In this specific design, the dress is crocheted directly onto the body at Round 17, so it is permanently attached and not removable.
Count the stitches carefully from the center front. I recommend using pins to mark the eye positions on Round 24 first, then step back and look at the doll from a distance to ensure they are level before you start sewing.
