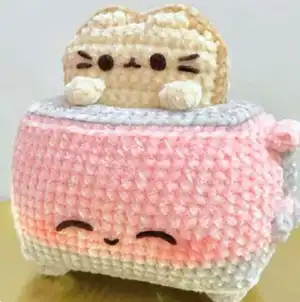
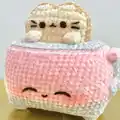
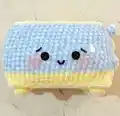
Create an adorable kitty bread popping out of a cozy toaster with this delightful crochet pattern! This intermediate-level project combines continuous rounds, color changes, and detailed assembly to bring this whimsical design to life. Perfect for cat lovers and those who enjoy playful home décor, this pattern results in a charming piece measuring approximately 6cm tall and 9cm wide. With options for both a regular and burnt version, you can customize your creation to match your style. The detailed instructions guide you through crafting the expressive kitty bread complete with ears and paws, plus a functional-looking toaster with legs, control knobs, and a carriage lever.
Progress Tracker
0% Complete
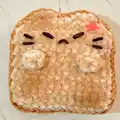
— Kitty Bread (Make 2) :
Info :
Work in ROWS. At the end of each row, turn your work, pull your hook slightly, and continue to the next row. DO NOT ch 1 at the end. Insert stitch markers on both sides if needed.
R1 :
Ch16, starting from the 2nd ch from the hook, 15sc (15)
R2-12 :
15sc, turn (15) - 11 rows
R13 :
sc2tog, 11sc, sc2tog, turn (13)
Info :
Making the ears now. DO NOT ch 1 before turning. Read through R14 completely before starting.
R14 :
sc2tog, 4sc, turn, sk 1, 3sc, turn, sk 1, 2sc, 2sc(the sides), 5sc, turn, sk 1, 3sc, turn, sk 1, 2sc, 2sc(the sides), sc2tog (12)
Bread Sides :
Change to Brown
R15 :
12sc, inc, 13sc, inc, 13sc, 2sc, 2sc(the sides), 5sc, 2sc(the sides), 5sc (58)
Info :
SL ST in the 1st st. Leave a short yarn and fasten off for the first piece. Make the second bread and leave a long yarn to sew.
Assembly :
Adjust the bread pieces and sew the sides BLO. Use stitch markers to indicate where to sew. Lightly stuff while sewing, DO NOT overstuff so the bread is still flat.
— Paws (Make 2) :
R1 :
In Beige, 6sc in MR (6)
Info :
DO NOT stuff. Leave a long tail to sew and fasten off. Fold the paw in half and sew it close. Sew between R8 & R9 of the bread, 2 sts away from the sides and 5 sts apart between the hands.
— Toaster Inner Part :
Info :
In Grey. Make a foundation chain and work around the chain. Ch 12, starting from the 2nd ch from the hook
R1 :
10sc, 3inc, on the other side of the chain, 10sc, 3inc (26)
R2 :
10sc, 3inc, sc, 3inc, 10sc, 3inc, sc, 3inc (34)
R3 :
11sc, 3inc, 3sc, 3inc, 12sc, 3inc, 3sc, 3inc, sc (42)
R4 :
12sc, 3inc, 5sc, 3inc, 14sc, 3inc, 5sc, 3inc, 2sc (50)
Info :
Work FLO in the next round. Crochet from the inside out, flip outwards if uncomfortable.
R5 FLO :
12sc, 3dec, 5sc, 3dec, 14sc, 3dec, 5sc, 3dec, 2sc (42)
R6 :
Both loops, 42sc (42)
R7-12 :
42sc (42) - 6 rounds
R13 BLO :
13sc, 3inc, 5sc, 3inc, 14sc, 3inc, 5sc, 3inc, sc (50)
Info :
Flip back your inner toaster if needed, the right side should be on the inside.
R14 :
Both loops, 50 sc (50)
R15 :
14sc, 3inc, 7sc, 3inc, 16sc, 3inc, 7sc, 3inc, 2sc (58)
Info :
SL ST, Leave a short tail and fasten off. Weave in the tail.
— Toaster Outer Part :
Info :
Starting with Grey. Make a foundation chain and work around the chain. Ch 12, starting from the 2nd ch from the hook
R1 :
10sc, 3inc, on the other side of the chain, 10sc, 3inc (26)
R2 :
10sc, 3inc, sc, 3inc, 10sc, 3inc, sc, 3inc (34)
R3 :
11sc, 3inc, 3sc, 3inc, 12sc, 3inc, 3sc, 3inc, sc (42)
R4 :
12sc, 3inc, 5sc, 3inc, 14sc, 3inc, 5sc, 3inc, 2sc (50)
R5 :
13sc, 3inc, 7sc, 3inc, 16sc, 3inc, 7sc, 3inc, 3sc (58)
R6 :
14sc, 3inc, 9sc, 3inc, 18sc, 3inc, 9sc, 3inc, 4sc (66)
R7 :
15sc, 3inc, 11sc, 3inc, 20sc, 3inc, 11sc, 3inc, 5sc (74)
R8 BLO :
15sc, 3dec, 11sc, 3dec, 20sc, 3dec, 11sc, 3dec, 5sc (66)
R9-10 :
66sc (66) - 2 rounds
Info :
Change color to Pink. Cut off the Grey yarn and hide the tail.
R11-12 :
66sc (66) - 2 rounds
— Legs (Make 4) :
Info :
Leave a long tail for sewing and fasten off. Lightly stuff if needed.
Assembly :
After R12 sew the 4 legs to the bottom of the outer part on each corner 1 st away from the edge (FLO line of R7). Cut cardboard slightly smaller than the bottom so it fits in, make sure FLO of R7 is visible on the side. Glue the cardboard to secure it. Cut another one for the inner part and glue it on the wrong side bottom of the inner toaster.
— Continuing Outer Part :
Info :
Stuff 1/3 of the outer toaster. Insert Kitty Bread into the inner part. Place the inner part into the outer part. The last rounds of both parts should touch. Secure the corners with stitch markers. Lightly stuff the sides (Do not overstuff, add more as you sew).
R13-15 :
66sc (66) - 3 rounds
R16 :
sc, (14sc, dec)x2, sc, (14sc, dec)x2 (62)
R17-20 :
62sc (62) - 4 rounds
R21 :
sc, (13sc, dec)x2, sc, (13sc, dec)x2 (58)
Info :
Leave a long tail to sew and fasten off.
Assembly Steps :
Sew the BLO of the outer part to the BLO of the inner part, then sew both loops of the outer part and BLO of the inner part. Add stuffing as you go, DO NOT overstuff but make sure it's stuffed nicely to the top.
— Toaster Control :
Info :
SL ST, stuff if needed, Leave a long tail for sewing and fasten off.
— Carriage Lever :
Info :
In Pink. Ch4, starting from the 2nd ch from the hook
R1 :
2sc, inc, on the other side of the chain 2sc, inc (8)
Info :
DO NOT stuff, Leave a long tail to sew and fasten off. Fold it in half and sew it close.
— Lever Base :
Info :
In Grey. Ch6, starting from the 2nd ch from the hook, 5sc
Info :
Leave a long tail to sew and fasten off.
— Button :
Info :
SL ST, DO NOT stuff. Leave a long tail to sew and fasten off.
— Final Assembly :
Toaster Control :
Sew the Toaster Control BLO on R10-14
Button :
Sew the Button BLO on R11-14
Lever Base :
Sew the Lever Base on R15-21
Carriage Lever :
Sew the Carriage Lever on R21
— Facial Assembly Version 1 (Normal) :
Kitty Bread Eyes :
Cut 2 eyes around 1-1.5 sts wide and place them on R10-R11, 4 sts apart
Kitty Bread Mouth :
Cut the mouth around 2 sts wide and glue it on R11
Kitty Bread Whiskers :
Cut the Whiskers around 1.5-2 sts wide and glue them on R11 & R12 on both sides, 1 st away from the eyes
Toaster Eyes :
Cut 2 eyes around 3-3.5 sts wide and place them on R13-R14, 4 sts apart
Toaster Mouth :
Cut the mouth around 1 st wide and glue it on R13
Toaster Blush :
Use pink eyeshadow as the blush on the side of the eyes
— Facial Assembly Version 2 (Burnt) :
Kitty Bread Eyes :
Cut 2 eyes around 2-2.5 sts wide and place them on R11-R12, 3 sts apart
Kitty Bread Mouth :
Cut the mouth around 1 st wide and glue it on R11
Kitty Bread Whiskers :
Cut the Whiskers around 1.5-2 sts wide and glue them on R11 & R12 on both sides, 1 st away from the eyes
Kitty Bread Veins :
Cut 3 curves for the cross-popping veins and glue them on R13-R14 using red felt
Kitty Bread Burnt Patches :
Use Dark Brown eyeshadow to make the burnt patches
Toaster Eyes :
Cut 2 eyes around 2 sts wide and place them on R14-R15, 5 sts apart
Toaster Mouth :
Cut the mouth around 1-1.5 sts wide and glue it on R13
Toaster Sweat Drop :
Cut a water drop for the sweat and glue it on R15-R17 using white felt
Toaster Blush :
Use pink eyeshadow as the blush on the side of the eyes
This delightful Kitty Toaster pattern combines kawaii charm with breakfast nostalgia to create an absolutely adorable home decoration! The pattern offers wonderful versatility with two expression options - a cheerful happy kitty or a hilariously grumpy burnt version complete with cross-popping veins. Each carefully crafted detail from the tiny paws to the functional-looking control knobs makes this project truly special. The combination of velvet yarn and felt features gives the finished piece a professional boutique quality that will impress everyone who sees it. Whether you display it on your desk, gift it to a cat-loving friend, or add it to your kawaii collection, this purrfect toast will bring smiles for years to come! 🐱🍞✨