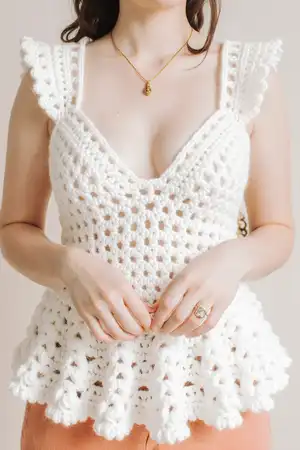
Create this beautiful empire-waist lacy top with a flattering silhouette that suits various body shapes. The Hyacinth Top features adjustable back ties that can be styled into an elegant bow, providing both coverage and charm. This quick beginner-friendly project combines basic stitches with a clever two-hook technique to achieve a gorgeous lace effect. Perfect for warm weather or layering, this made-to-measure design ensures a custom fit every time.
Progress Tracker
0% Complete
— PART I. CUPS :
Info :
Use small hook (3.0mm) for this part to ensure coverage
Step 1 :
Make a ch with length equal to measurement A then add ch2. Dc on 3rd ch from hook, dc until end of row
Step 2 :
Ch2, flip work. Dc on each st until end of row
Step 3 :
Repeat Step 2 until height equals measurement B
Step 4 :
Once you reach measurement B, add 2 more dc on last st (total 3 dc on last st). Continue adding dc to side of work, put 2 dc on each dc post until you reach last dc post
Step 5 :
Ch2, flip work. Dc on each st until end of row
Step 6 :
Repeat Step 5 until you reach Measurement C. Make sure last row ends on top of cup
Step 7 :
Mark 8th st from bottom of cup. Ch2, flip work, dc on each st until st marker. Remove marker. Hdc on next 3 sts, sc on last 5 sts
Step 8 :
Ch1, flip work. Sc on 1st 5 sts. Hdc on next 3 sts, dc on next st. 2dc on next st. Dc on each next st until end of row
Step 9 :
Repeat Steps 7-8 until you reach measurement D. Ch 1, cut yarn and fasten off
Info :
Repeat Steps 1-9 for other cup. Connect cups together by adding sc on wrong side (side that will be inside when worn)
— PART II. BACK TIES :
Step 1 :
Turn cups upside down. Work facing wrong side. Insert hook at bottom of dc post at 3rd row, sl st. Make ch with length equal to measurement E then add ch2. Dc on 3rd ch from hook, dc until end of row. Sl st into dc post of cup
Step 2 :
Sl st again into dc post on top. Flip work. Dc on each st until end of row
Step 3 :
Ch2, flip work. Dc on each st until end of row
Step 4 :
Now at bottom of cups, sc on each st of cups. Once you reach part with dc posts, add 2 sc per dc post. Continue until you reach sc post, add 1 sc on each sc post. Continue until end of other cup
Step 5 :
Make ch with same number as Step 1 including additional ch 2. Dc on 3rd ch from hook, dc until end of row. Sl st into dc post of cup
Step 6 :
Sl st again into dc post on top. Flip work. Dc on each st until end of row
Step 7 :
Ch2, flip work. Dc on each st until end of row. Sl st into dc post of cup. Ch1, cut yarn and fasten off
— PART III. BODY :
Infos :
Before starting, check fit by tying cups around body. Mark dc next to knot on both sides. Remove top and verify markers are symmetrical. Count sts from center to st marker on both sides should be equal. Total sts between markers must be multiple of 2. Check fit again with st markers on
Step 1 :
Insert yarn into st next to st marker. Ch2, dc on each st until you reach other st marker
Step 2 :
Ch 2. Flip work, dc on 1st st. *Ch1, skip 1 st, dc on next 2 sts*. Repeat ** until end of row
Info :
From this point, work with hook 5.0 (or bigger hook) for lace impression. All ch2 at beginning of rows count as dc
Step 3 :
Ch2, flip work. Make dc V-st on each ch1 sp by making dc-ch1-dc cluster on each ch1 sp until end of row. Dc on last st
Step 4 :
Ch2, flip work. Make Iris st on each ch1 sp by making dc-dc-ch1-dc-dc cluster on each ch1 sp until end of row. Dc on last st
Step 5 :
Repeat Step 4 until you reach desired length. Ch1, cut yarn and fasten off
— PART IV. STRAPS :
Info :
Before starting, mark part of back ties 1 inch away from 1st and last dc of body. Fit top and check strap length needed to connect tip of cups to marked st (measurement Z). Consider yarn stretch when measuring
Step 1 :
Insert yarn into topmost st of cup. Make ch with length equal to measurement Z in multiples of 3 + 1. Sl st into st next to marker. Make sure ch is not twisted. Work strap away from 1-inch gap
Step 2 :
Sl st into next 2 sts. Flip work. Dc on each st until you reach cups. 2dc on each dc post until end of cup. Sl st into ch that matches height of dc. Check fit of straps at this point
Step 3 :
Sl st into next 2 sts. Flip work, dc on 1st st. *Ch1, skip 1 st, dc on next 2 sts*. Repeat ** until end of row. Sl st into ch that matches height of dc
Info :
From this point, work with hook 5.0 (or bigger hook) for lace impression. Before continuing, mark 3rd ch1 sp from tip of cup
Step 4 :
Sl st into next 2 sts. Flip work. Dc on 1st st. Make dc V-st on each ch1 sp by making dc-ch1-dc cluster on each ch1 sp until second to last ch1 sp before marker. For second to last ch1 sp, make hdc-ch1-hdc cluster then sl st on last ch1 sp
Step 5 :
Ch1. Flip work. Sc on next ch1 sp. Make Iris st on each ch1 sp by making dc-dc-ch1-dc-dc cluster on each ch1 sp until end of row. Dc on last st. Sl st into ch that matches height of dc
Step 6 :
Sl st into next 2 sts. Flip work. Dc on 1st st. Make Iris st on each ch1 sp by making dc-dc-ch1-dc-dc cluster on each ch1 sp until last ch1 sp. For last ch1 sp, sl st. Ch1, cut yarn and fasten off
Info :
Repeat Steps 1-6 for other strap
The Hyacinth Top pattern brings together elegance and comfort in a design that truly celebrates your unique shape. With its flattering empire waist, romantic lace detailing, and adjustable tie-back closure, this versatile piece works beautifully for warm summer days or layered over your favorite camisole. The made-to-measure approach ensures you'll create something that fits like a dream, while the simple techniques keep the process enjoyable from start to finish. Happy crocheting! 🧶✨