🧶 Beautiful ✨ Detailed 💝 Adorable

Mini Sunflower Turtle Amigurumi Pattern

Mini Sunflower Turtle Amigurumi Pattern
4.4★ Rating
2-3 Hours Time Needed
1.4K Made This
✂️

Beginner Friendly Level

Perfect for those just starting their sewing journey, with clear instructions and simple techniques

⏱️

Bite-Sized Project

Complete in under 2 hours—quick, fun, and perfect for a little creative escape.

🧸

Cute Companion

An adorable friend to cherish, handcrafted with love to bring comfort and joy for years to come.

About This Mini Sunflower Turtle Amigurumi Pattern

This Mini Sunflower Turtle pattern is designed to bring sunshine into your crafting world with its unique dimensional shell. The pattern features a distinctive sunflower design created using front loop only stitching and triple crochet petals that create beautiful texture. Working with bulky chenille yarn gives this little turtle a soft, velvety feel that's perfect for cuddling. The construction method involves crocheting the legs and tail directly into the body, making assembly incredibly simple and secure for a finished project that's both sturdy and adorable.

Mini Sunflower Turtle Amigurumi Pattern crochet pattern - detailed view of completed project

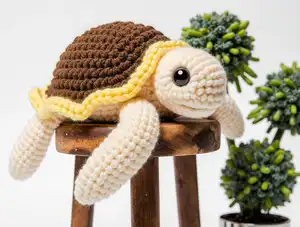
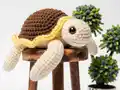
The finished turtle measures approximately 6 inches long and wide with a 2-inch profile, making it the perfect desk companion or shelf decoration. The combination of ivory, yellow, and cocoa colors creates a warm, natural aesthetic that complements any décor style.

Why You'll Love This Mini Sunflower Turtle Amigurumi Pattern

I absolutely love this pattern because it's one of those rare designs that looks impressive but comes together so quickly! The sunflower shell is created with a clever technique that makes those petals pop without any complicated stitching. I'm always amazed at how the front loop only method creates such beautiful dimension—it's like magic watching those petals take shape. What really makes this special is how the legs attach directly into the body during construction, eliminating all that tedious sewing at the end. The bulky chenille yarn works up fast and feels incredibly soft, making this project satisfying from start to finish. Plus, who can resist a tiny turtle wearing a sunflower as a shell? It's pure joy in crochet form!

Mini Sunflower Turtle Amigurumi Pattern step 1 - construction progress Mini Sunflower Turtle Amigurumi Pattern step 2 - assembly progress Mini Sunflower Turtle Amigurumi Pattern step 3 - details and accessories Mini Sunflower Turtle Amigurumi Pattern step 4 - final assembly and finishing

Switch Things Up

I love experimenting with different color combinations for this sunflower turtle! While the classic yellow and ivory combo is absolutely charming, I've had so much fun creating variations. Try a pink sunflower shell with cream body for a romantic spring look, or go bold with a red poppy-inspired shell. For autumn displays, I've used orange and burgundy for the petals with a tan body—absolutely stunning!

You can also adjust the size by changing your yarn weight. I've made micro versions using sport weight yarn and a 2mm hook that are perfect as keychains or ornaments. On the flip side, using super bulky yarn with a 6mm hook creates an impressive statement piece that kids adore as a pillow pal.

Want to add more personality? Embroider a little smile on the face or add tiny felt flowers between the sunflower petals. I've even seen crafters add small wire armature to the legs for poseable versions. Some makers skip the safety eyes entirely and embroider closed, sleepy eyes for a dreaming turtle aesthetic—so precious! The possibilities for customization are endless while keeping the core construction method simple and satisfying.

Common Mistakes & How to Fix Them

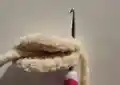
✗ Not using stitch markers with fluffy yarn, making it difficult to identify stitches and rows—place markers liberally until you're comfortable with the yarn texture ✗ Pulling stitches too tight when working with chenille yarn, which can cause the yarn to split and lose its fluffy texture—maintain a relaxed tension throughout ✗ Forgetting to mark the back loops in Round 6 before working Round 7 in front loops only, making it nearly impossible to find them later for Round 8 
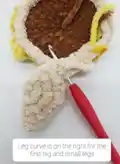
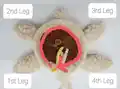
✗ Attaching the legs with curves facing the wrong direction, creating an awkward stance—always check photo references and ensure curves face right on front legs, left on back legs ✗ Under-stuffing the body before closing, resulting in a flat turtle—stuff firmly to maintain the rounded shell shape and dimensional appearance of the sunflower

Mini Sunflower Turtle Amigurumi Pattern

Create an adorable mini sunflower turtle with this charming crochet pattern! This delightful design combines a cozy ivory turtle body with a stunning yellow sunflower shell featuring dimensional petals. Perfect for spring décor, gift-giving, or adding a touch of sunshine to any space. At approximately 6 inches in size, this cheerful companion works up quickly using bulky yarn and measures just right for display or cuddles. The pattern includes detailed instructions for creating the distinctive sunflower shell with triple crochet petals and sturdy legs that give your turtle personality and stability.

Beginner Friendly 2-3 Hours

Materials Needed for Mini Sunflower Turtle Amigurumi Pattern

— Main Fabric

  • 01
    Size 5 Bulky yarn in Ivory (Yarn Bee Velvety Smooth recommended)
  • 02
    Size 6 Bulky yarn in Yellow (Premier Just Chenille recommended)
  • 03
    Size 6 Bulky yarn in Cocoa/Brown (Premier Just Chenille recommended)

— Tools Required

  • 01
    3.5mm crochet hook (E-5)
  • 02
    Tapestry needle
  • 03
    Scissors
  • 04
    12mm safety eyes
  • 05
    Poly-Fil stuffing
  • 06
    Stitch markers (recommended for fluffy yarn)

Progress Tracker

0% Complete

— Front Legs :

Info :

Using Ivory Yarn (Make 2)

R1 :

6SC in MR

R2 :

Inc (12)

R3 :

SC, Inc (18)

R4 :

2SC, Inc (24)

Info :

SlSt into next St. Fold your circle in half to make a half circle, SC around the half circle through both stitches. SlSt into the last stitch, BO, weave in the yarn tail. You do not need to leave a tail for sewing.

— Back Legs :

Info :

Using Ivory Yarn (Make 2)

R1 :

6SC in MR

R2 :

Inc (12)

R3 :

SC, Inc (18)

Info :

SlSt into next St. Fold your circle in half to make a half circle, SC around the half circle through both stitches. SlSt into the last stitch, BO, weave in the yarn tail.

— Tail :

Info :

Using Ivory Yarn

R1 :

3SC in MR

R2 :

Inc (6)

R3-4 :

SC (6)

Info :

SlSt into the last stitch, BO, weave in the yarn tail.

— Head :

Info :

Using Ivory Yarn

R1 :

8SC in MR

R2 :

Inc (16)

R3 :

SC, Inc (24)

R4 :

3SC, Inc (30)

R5-6 :

SC (30)

R7 :

3SC, Dec (24)

R8 :

SC, Dec (16)

R9 :

SC (16)

Info :

SlSt and leave a long tail for sewing (about a foot of yarn). Add safety eyes between row 4 and 5, about 8 stitches apart. Add stuffing.

— Body :

Info :

Using Brown Yarn

R1 :

8SC into MR

R2 :

Inc (16)

R3 :

SC, Inc (24)

R4 :

3SC, Inc (30)

R5 :

4SC, Inc (36)

R6 :

3SC, Inc (45)

Info :

Color change to Yellow yarn

R7 :

Working in FLO: 5SC, [(SC, TC, TC2, TC, SC) x 7], 5SC (52). Note: TC2 means triple crochet two times in one stitch. You may want to put stitch markers in the back loops for the next round.

Info :

Color change to Ivory yarn

R8 :

SC into BLO of R6 where you placed your stitch markers (45)

R9 :

This is the row you will crochet the legs and tail into. When attaching, push your hook through the stitch(s) of the leg or tail first, then through the stitch of the body and complete your single crochet. Work as follows: 5SC, attach first big leg using 3SC (curve on right), 5SC, attach first small leg using 2SC (curve on right), 6SC, attach tail using 3SC, 6SC, attach second small leg using 2SC (curve on left), 5SC, attach second big leg using 3SC (curve on left), 5SC (45)

R10 :

3SC, Dec (36)

R11 :

2SC, Dec (27)

Info :

Stuff the body to your desired firmness

R12 :

SC, Dec (18)

R13 :

Dec (9)

Info :

Add stuffing again if necessary. SlSt, cut yarn leaving a short tail to sew the hole closed. Weave the yarn tail back and forth into the stitches around then pull tight to close. Tie to secure and weave the rest into the body.

Assembly Instructions

  • Sew the head to the body, placing it between the two front legs for proper positioning and stability
  • Position the head over 3-4 rows of the sunflower shell and 1-2 rows of the bottom body for secure attachment
  • Use long sewing pins to pin the head in place before sewing to ensure even placement and prevent shifting
  • Weave in all remaining yarn tails securely into the body to prevent unraveling over time

Important Notes

  • 💡When working with fluffy chenille yarn, use stitch markers liberally until you can feel for stitches confidently
  • 💡The Premier Just Chenille yarn recommended is similar in size to Yarn Bee brand, not super bulky despite being size 6
  • 💡Place stitch markers in the back loops of Round 6 before working Round 7 in front loops only to easily locate them for Round 8
  • 💡Pay careful attention to leg curve direction when attaching in Round 9—front legs curve right, back legs curve left
  • 💡Leave approximately one foot of yarn when finishing the head to ensure you have enough tail for secure sewing
  • 💡Stuff the body firmly before closing to maintain the dimensional sunflower shell appearance and rounded shape

This adorable Mini Sunflower Turtle pattern brings together nature's cheerfulness in a cuddly companion that's perfect for spring celebrations or year-round sunshine! The dimensional sunflower shell created with clever front loop only stitching makes this little turtle truly special and eye-catching. Whether you're creating a gift for a friend, adding to your own collection, or making decorations for seasonal displays, this quick-working pattern delivers maximum cuteness with minimal time investment. The bulky yarn choice ensures speedy stitching while creating that irresistibly soft, huggable texture everyone loves. 🌻🐢 Happy crocheting! 🧶✨

You ask,

we answer.

FAQs

Can I use regular worsted weight yarn instead of bulky yarn?

Yes, you can use worsted weight yarn with a smaller hook (2.5-3mm), but your finished turtle will be significantly smaller than the 6-inch size. Adjust your safety eye size accordingly to 8-9mm for proper proportion.

How do I work the sunflower petals in Round 7?

Work in front loops only, creating each petal with the sequence: SC, TC, TC2 (two triple crochets in one stitch), TC, SC. Repeat this petal sequence 7 times between the 5SC at the beginning and end of the round.

Why is it important to mark the back loops in Round 6?

The back loops from Round 6 are where you'll work Round 8 after creating the sunflower petals in Round 7. With fluffy yarn, these loops can be nearly impossible to find if not marked beforehand.

Can I make the legs separately and sew them on instead?

While you could sew them on, crocheting them directly into the body in Round 9 creates a much stronger attachment that won't come loose with handling, making it ideal especially if gifting to children.

What if my chenille yarn keeps splitting while I crochet?

Keep your tension relaxed and work slowly. If the yarn continues to split, try using a hook one size larger (4mm) or switch to a hook with a smoother finish to reduce friction on the delicate chenille fibers.