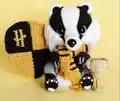
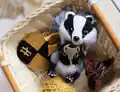
Create your own magical companion with this enchanting Hufflepuff badger amigurumi! This adorable pattern brings the beloved house mascot to life with fluffy cheeks, striped details, and charming accessories including a house crest, scarf, and sacred cup. Perfect for Harry Potter fans and crochet enthusiasts alike, this project combines traditional amigurumi techniques with special jacquard colorwork to achieve those distinctive badger markings. The finished toy stands approximately 11cm tall in sitting position and features moveable head with cotter pin assembly for extra character.
Progress Tracker
0% Complete
— HEAD :
Yarn A Round 1 :
6 loops, turning, 5sc (starting from 2nd loop from hook), 5sc (from back of chain) (10l)
Round 2 :
[4sc, inc]x2 (12l)
Info :
Begin jacquard technique alternating Yarn A and Yarn B without cutting threads for fluffy cheeks
Round 6 :
inc (Yarn A); inc (Yarn B); [inc]x3 (Yarn A); inc (Yarn B), 6sc (Yarn A) (18l)
Round 7 :
2sc (Yarn A); 2sc (Yarn B); 6sc (Yarn A); 2sc (Yarn B), 6sc (Yarn A) (18l)
Round 8 :
sc, inc (Yarn A); sc, inc (Yarn B); [sc, inc]x3 (Yarn A); sc, inc (Yarn B), 6sc (Yarn A) (24l)
Round 9 :
3sc (Yarn A); 3sc (Yarn B); 9sc (Yarn A); 3sc (Yarn B), 6sc (Yarn A) (24l)
Round 10 :
2sc, inc (Yarn A); 2sc, inc (Yarn B); [2sc, inc]x3 (Yarn A); 2sc, inc (Yarn B), 6sc (Yarn A) (30l)
Round 11 :
4sc (Yarn A); 4sc (Yarn B); 12sc (Yarn A); 4sc (Yarn B), 6sc (Yarn A) (30l)
Round 12 :
3sc, inc (Yarn A); 3sc, inc (Yarn B); [3sc, inc]x3 (Yarn A); 3sc, inc (Yarn B), 6sc (Yarn A) (36l)
Round 13 :
5sc (Yarn A); 5sc (Yarn B); 15sc (Yarn A); 5sc (Yarn B), 6sc (Yarn A) (36l)
Round 14 :
4sc, inc (Yarn A); 4sc, inc (Yarn B); [4sc, inc]x3 (Yarn A); 4sc, inc (Yarn B), 6sc (Yarn A) (42l)
Round 15 :
5sc, inc (Yarn A); 5sc, inc (Yarn B); [5sc, inc]x3 (Yarn A); 5sc, inc (Yarn B), 6sc (Yarn A) (48l)
Round 16 :
6sc, inc (Yarn A); 6sc, inc (Yarn B); [6sc, inc]x3 (Yarn A); 6sc, inc (Yarn B), 6sc (Yarn A) (54l)
Round 17-19 :
8sc (Yarn A); 8sc (Yarn B); 24sc (Yarn A); 8sc (Yarn B), 6sc (Yarn A) (54l)
Round 20 :
6sc, dec (Yarn A); 6sc, dec (Yarn B); [6sc, dec]x3 (Yarn A); 6sc, dec (Yarn B), 6sc (Yarn A) (48l)
Info :
Comb cheeks with rug brush, insert and fix nose, cut black felt spots and attach around eyes, place safety eyes between rounds 9-10 with 10 stitches apart, embroider white loose stitch around eyes
Round 21 :
Cut Yarn B, continue with Yarn A only - [6sc, dec]x6 (42l)
Round 22 :
[5sc, dec]x6 (36l)
Info :
Start stuffing head with synthepus
Round 23 :
[4sc, dec]x6 (30l)
Info :
Insert cotter pin into shim, place between rounds 20-21 at bottom of head
Round 24 :
[3sc, dec]x6 (24l)
Round 25 :
[2sc, dec]x6 (18l)
Round 26 :
[sc, dec]x6 (12l)
Info :
Completely fill head, insert white felt circle before closing
Round 27 :
[dec]x6 (6l), pass thread through all loops, tighten and secure
— EARS (Make 2) :
Yarn C Round 1 :
2 loops, 6sc in 2nd loop from hook (6l)
Round 3 :
[sc, inc]x6 (18l)
Round 4 :
Change to Yarn A - 18sc (Yarn C + Yarn A for color transition) (18l)
Round 5 :
Cut Yarn C leaving long end - fold 18 loops in half, 1 loop turning, 9 sl st (9l)
Info :
Cut and fix thread, sew ears to head using needles for placement symmetry
— BODY :
Yarn D Round 1 :
2 loops, 8sc in 2nd loop from hook (8l)
Round 3 :
[3sc, inc]x4 (20l)
Round 4 :
Change to Yarn C - 4sc, inc, 2sc (Yarn D + Yarn C), 2sc, inc, [4sc, inc]x2 (Yarn D) (24l)
Info :
Begin jacquard with Yarn D and C, crochet front with both colors, back with Yarn D only
Round 5 :
Through back loops only - 8sc (Yarn C), 16sc (Yarn D) (24l)
Round 6 :
[3sc, inc]x2 (Yarn C); [3sc, inc]x4 (Yarn D) (30l)
Info :
Insert cotter pin in middle of body, place disk on pin and wrap ends with pliers
Round 7 :
[4sc, inc]x2 (Yarn C); [4sc, inc]x4 (Yarn D) (36l)
Round 8 :
12sc (Yarn C), 24sc (Yarn D) (36l)
Round 9 :
[5sc, inc]x2 (Yarn C); [5sc, inc]x4 (Yarn D) (42l)
Round 10 :
14sc (Yarn C), 28sc (Yarn D) (42l)
Round 11 :
[6sc, inc]x2 (Yarn C); [6sc, inc]x4 (Yarn D) (48l)
Round 12-15 :
16sc (Yarn C), 32sc (Yarn D) (48l)
Round 16 :
Change to Yarn B for fluffy tummy, cut Yarn C - 16sc (Yarn B), 32sc (Yarn D) (48l)
Round 17 :
6sc, [dec]x2, 6sc (Yarn B); [6sc, dec]x4 (Yarn D) (42l)
Round 18 :
5sc, [dec]x2, 5sc (Yarn B); [5sc, dec]x4 (Yarn D) (36l)
Round 19 :
4sc, [dec]x2, 4sc (Yarn B); [4sc, dec]x4 (Yarn D) (30l)
Info :
Start stuffing body
Round 20 :
3sc, [dec]x2, 3sc (Yarn B); [3sc, dec]x4 (Yarn D) (24l)
Round 21 :
Cut Yarn B, continue with Yarn D only - [2sc, dec]x6 (18l)
Round 22 :
[sc, dec]x6 (12l)
Info :
Completely fill body, insert white felt circle before closing
Round 23 :
[dec]x6 (6l), pass thread through loops, tighten and secure
Info :
Embroider line with Yarn B and fix with white thread to hide transition, comb tummy with rug brush
— HANDS (Make 2) :
Yarn D Round 1 :
2 loops, 6sc in 2nd loop from hook (6l)
Round 2 :
[2sc, inc]x2 (8l)
Round 3 :
[3sc, inc]x2 (10l)
Round 6 :
Change to Yarn C - 10sc (Yarn D + Yarn C) (10l)
Round 7-8 :
Cut Yarn D, start stuffing - 3sc, 5 sl st, 2sc (10l)
Round 9 :
sc, dec, sc, [inc]x3, sc, dec (11l)
Round 12 :
2 sl st, 2sc, dec, 2sc, sl st (8l)
Round 13 :
2 sl st, 5sc, sl st (8l)
Round 14 :
[inc]x2, sc, [dec]x2, sc (8l)
Round 15 :
Completely fill - 4sc, [dec]x2 (6l), pass thread through loops, tighten
Info :
Embroider claws with white floss divided in half
— LEGS (Make 2) :
Yarn D Round 1 :
2 loops, 6sc in 2nd loop from hook (6l)
Round 2 :
[2sc, inc]x2 (8l)
Round 3 :
[sc, inc]x4 (12l)
Round 4 :
[5sc, inc]x2 (14l)
Round 7 :
[dec]x2, 10sc (12l)
Round 8 :
Change to Yarn C - 12sc (Yarn D + Yarn C) (12l)
Round 9 :
Cut Yarn D, start stuffing - dec, 8sc, dec (10l)
Round 12 :
3sc, 5 sl st, 2sc (10l)
Round 13 :
sc, dec, sc, [inc]x3, sc, dec (11l)
Round 14 :
4sc, [inc]x3, 4sc (14l)
Round 15 :
6sc, [inc]x2, 6sc (16l)
Round 18 :
Completely fill - [2sc, dec]x2 (6l), pass thread through loops, tighten
— SPOT (White floss with 1.5mm hook) :
Round 1 :
4 loops, turning, 3sc (from 2nd loop), 3sc (from back of chain) (6l)
Info :
Leave long end, sew spot to foot, make 4 French knots diagonally upward, embroider claws with divided floss
— TAIL :
Yarn D Round 1 :
2 loops, 6sc in 2nd loop from hook (6l)
Info :
Use jacquard with Yarn D and Yarn B without cutting
Round 2 :
3sc (Yarn B), 3sc (Yarn D) (6l)
Round 3 :
2sc, inc (Yarn B), 2sc, inc (Yarn D) (8l)
Round 4 :
[sc, inc]x2 (Yarn B), [sc, inc]x2 (Yarn D) (12l)
Round 5-8 :
6sc (Yarn B), 6sc (Yarn D) (12l)
Info :
Start stuffing tail
Round 9 :
[sc, dec]x2 (Yarn B), [sc, dec]x2 (Yarn D) (8l)
Round 10 :
Completely fill - 2sc, dec (Yarn B), 2sc, dec (Yarn D) (6l), pass thread through loops, tighten
Info :
Comb tail with rug brush
— CUP (1.5mm hook with golden metallic floss) :
Detail 1 Round 1 :
2 loops, 6sc in 2nd loop from hook (6l)
Round 2 :
[2sc, inc]x2 (8l)
Round 3 :
[3sc, inc]x2 (10l)
Round 4 :
Through back loops only - [4sc, inc]x2 (12l)
Round 5 :
[2sc, inc]x4 (16l)
Round 6 :
[3sc, inc]x4 (20l)
Round 11 :
10 sl st, 8 loops, sl st in stitch 4 rounds down, 1 loop turning, 7 sl st, sl st in same loop; 10 sl st, 8 loops, sl st in stitch 4 rounds down, 1 loop turning, 7 sl st, sl st in same loop
Info :
Cut 10cm wire, fold in half, insert into cup
Detail 2 Round 1 :
2 loops, 6sc in 2nd loop from hook (6l)
Info :
Insert wire into detail 2, bend ends and trim excess, wrap wire with thread using super glue
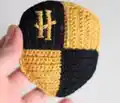
— HOUSE CREST (1.75mm hook in rows) :
Yarn E Row 1 :
10 loops, turning, 9sc (9l)
Row 2 :
1 loop, turning, 9sc (9l)
Row 3 :
1 loop, turning, 8sc, inc (10l)
Row 4 :
1 loop, turning, 10sc (10l)
Row 5 :
1 loop, turning, 9sc, inc (11l)
Row 6 :
1 loop, turning, 11sc (11l)
Row 7 :
1 loop, turning, 10sc, inc (12l)
Row 8-9 :
1 loop, turning, 12sc (12l)
Row 10 :
Change to Yarn C - 1 loop, turning, 12sc (Yarn E + Yarn C) (12l)
Yarn C Row 11-14 :
Don't cut Yarn E - 1 loop, turning, 12sc (12l)
Row 15 :
1 loop, turning, 10sc, dec (11l)
Row 16 :
1 loop, turning, 11sc (11l)
Row 17 :
1 loop, turning, 9sc, dec (10l)
Row 18 :
1 loop, turning, 10sc (10l)
Row 19 :
1 loop, turning, 8sc, dec (9l)
Row 20 :
1 loop, turning, 9 sl st (9l)
Row 21 :
Take other end of Yarn E, change direction - 10sc (Yarn C + Yarn E), 10sc (Yarn E + Yarn C) (20l), cut Yarn E
Row 22 :
1 loop, turning, 10sc (Yarn C), 10sc (Yarn E) (20l)
Row 23 :
1 loop, turning, 10sc (Yarn E), 10sc (Yarn C) (20l)
Row 24 :
1 loop, turning, 10sc (Yarn C), 10sc (Yarn E) (20l)
Row 25 :
1 loop, turning, 10sc (Yarn E), 10sc (Yarn C) (20l)
Row 26 :
1 loop, turning, 10sc (Yarn C), 10sc (Yarn E) (20l)
Row 27 :
1 loop, turning, 10sc (Yarn E), 10sc (Yarn C) (20l)
Row 28 :
1 loop, turning, dec, 8sc (Yarn C), 8sc, dec (Yarn E) (18l)
Row 29 :
1 loop, turning, dec, 7sc (Yarn E), 7sc, dec (Yarn C) (16l)
Row 30 :
1 loop, turning, dec, 6sc (Yarn C), 6sc, dec (Yarn E) (14l)
Row 31 :
1 loop, turning, dec, 5sc (Yarn E), 5sc, dec (Yarn C) (12l)
Row 32 :
1 loop, turning, dec, 4sc (Yarn C), 4sc, dec (Yarn E) (10l)
Row 33 :
1 loop, turning, dec, 3sc (Yarn E), 3sc, dec (Yarn C) (8l)
Row 34 :
1 loop, turning, dec, 2sc (Yarn C), 2sc, dec (Yarn E) (6l)
Row 35 :
1 loop, turning, dec, sc (Yarn E), sc, dec (Yarn C) (4l)
Row 36 :
1 loop, turning, dec (Yarn C), dec (Yarn E) (2l)
Row 37 :
1 loop, turning, dec. Crochet around perimeter counter-clockwise using jacquard - 16sc (Yarn C), 19sc (Yarn E), 19sc (Yarn C), 16sc, sl st in 1st dec (Yarn E) (71l)
Info :
Embroider lines with Yarn C to hide stages, trace letter H on water soluble canvas, fix to upper left, embroider with divided Yarn E using backstitch and fill stitches, rinse and remove canvas, steam with iron, attach 20cm Yarn E to both sides with hook
— SCARF (1.75mm hook with Yarn E in rows) :
Row 1 :
5 loops, turning, 4sc (4l)
Row 2-70 :
1 loop, turning, 4sc (4l)
Info :
Cut 8 strands of Yarn E 6cm long for fringe, attach at both edges and trim evenly
— STRIPES (Two options) :
Option 1 :
Cut 16 strands of Yarn C 10cm long, arrange after 6 rows then after 2 rows repeat 8 times, fasten threads with 2 knots on wrong side, trim excess, fix with superglue, steam
Option 2 :
Mark stripe locations with pins (fold scarf 2-3-4 times for equal spacing), thread Yarn C through needle with knot, insert from center on wrong side, make 2 wraps around scarf, step back 2 rows and repeat near each pin, fasten and cut
This enchanting Hufflepuff Badger pattern celebrates the most underestimated yet fiercely loyal house at Hogwarts! With its fluffy cheeks, distinctive striped markings, and complete set of house accessories, Puffy brings magical charm to any Harry Potter collection. The advanced techniques including jacquard colorwork, threadbare jointing, and working with fuzzy yarn will expand your amigurumi skills while creating something truly special. Whether displayed on a shelf or gifted to a fellow Potterhead, this adorable badger embodies the warmth, dedication, and hard work that defines Hufflepuff house. 🦡✨ Happy crocheting!