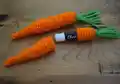
Create this adorable carrot lip balm holder that's both practical and fun! This clever design fits standard lip balm sticks perfectly and can also double as a money gift holder by simply rolling bills inside. With its vibrant orange body and playful green strands on top, this carrot holder makes a delightful handmade gift or a charming accessory to keep your lip balm safe and easy to find in your bag. The two-piece design allows the top to pop on and off easily, making it super functional while looking absolutely adorable!
Progress Tracker
0% Complete
— Bottom of Carrot (Large Pointed Section) :
Info :
The carrot is made in continuous rounds. Do not join rounds with a slip stitch. Simply make the first stitch of a round in the first stitch of the previous round.
Info :
Make sure to pull the magic ring closed and weave in/secure end at closure at the beginning.
Info :
Use your orange worsted weight yarn.
Round 1 :
Make a magic ring, ch 1, work 4 sc in magic ring, pull ring closed. (4 sc)
Info :
Using your tapestry needle weave in the end to close the magic circle
Round 2 :
Sc in each st around. (4 sc)
Round 3 :
Sc in each st around. (4 sc)
Round 4 :
2 sc in first st, sc in next st, 2 sc in next st, sc in next st. (6 sc)
Round 5 :
Sc in each st around. (6 sc)
Round 6 :
Sc in each st around. (6 sc)
Round 7 :
2 sc in first st, sc in next 2 sts, 2 sc in next st, sc in next 2 sts. (8 sc)
Round 8 :
Sc in each st around. (8 sc)
Round 9 :
Sc in each st around. (8 sc)
Round 10 :
2 sc in first st, sc in next 3 sts, 2 sc in next st, sc in next 3 sts. (10 sc)
Round 11 :
Sc in each st around. (10 sc)
Round 12 :
Sc in each st around. (10 sc)
Round 13 :
2 sc in first st, sc in next 4 sts, 2 sc in next st, sc in next 4 sts. (12 sc)
Round 14 :
Sc in each st around. (12 sc)
Round 15 :
Sc in each st around. (12 sc)
Round 16 :
Sc in each st around. (12 sc)
Round 17 :
Sc in each st around. (12 sc)
Round 18 :
Sc in each st around. (12 sc)
Round 19 :
Sc in each st around. (12 sc)
Round 20 :
Sc in each st around, slst to first st of round, fasten off, weave in end. (12 sc)
— Top/Lid of Carrot :
Info :
The carrot top is also made in continuous rounds. Do not join rounds with a slip stitch. Simply make the first stitch of a round in the first stitch of the previous round.
Info :
Make sure to pull the magic ring closed and weave in/secure end at closure at the beginning.
Info :
Use your orange worsted weight yarn.
Round 1 :
Make a magic ring, ch 1, work 6 sc in magic ring, pull ring closed. (6 sc)
Round 2 :
2 sc in each st around. (12 sc)
Info :
Using your tapestry needle weave in the end to close the magic circle
Round 3 :
Sc in each st around. (12 sc)
Round 4 :
Sc in each st around. (12 sc)
Round 5 :
Sc in each st around. (12 sc)
Round 6 :
Sc in each st around. (12 sc)
Round 7 :
Sc in each st around. (12 sc)
Round 8 :
Sc in each st around, slst to first st of round, fasten off, weave in end. (12 sc)
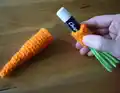
— Attaching Green Strands to Carrot Top :
Step 1 :
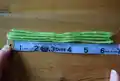
Cut 4 strands of green yarn that are each 6 inches long.
Step 2 :
Holding the green strands together, fold them in half.
Step 3 :
Insert your hook under the closed magic ring (first round) of the carrot top and pull through a loop (the fold of the green strands). Bring the ends of the green strands through the loop and pull tightly against the top of the carrot. The green strands should now be attached to the carrot top.
Step 4 :
Trim the green strands so they are even.
This charming carrot lip balm holder pattern brings together practicality and whimsy in the cutest way possible! It's a perfect beginner-friendly project that works up quickly and makes thoughtful handmade gifts for friends, teachers, or anyone who loves adorable accessories. The simple construction using basic single crochet stitches means you'll be finishing carrots left and right in no time. Plus, the dual-purpose design means it works beautifully as both a lip balm holder and a creative money gift holder! 🥕🧶✨