🧢 Beautiful ✨ Detailed πŸ’ Adorable

Hot Air Balloon Boy Amigurumi Pattern

Hot Air Balloon Boy Amigurumi Pattern
4.3β˜… Rating
10-12 Hours Time Needed
2.0K Made This
βœ‚οΈ

Advanced Level

Designed for experienced knitters, these patterns involve intricate designs and complex techniques to challenge and inspire.

⏱️

Slow & Steady

A 10-12 hour projectβ€”great for savoring the process over several sessions.

🎁

Tiny Treasure

Small, sweet, and gift-worthy creations that fit perfectly in the palm of your hand with detailed charm.

About This Hot Air Balloon Boy Amigurumi Pattern

This enchanting Hot Air Balloon Boy pattern combines classic amigurumi techniques with clever construction methods to create a truly special character. The boy features beautifully textured yellow hair with decorative scalloped edges, a unique propeller-style hat made from two sewn-together pieces in brown and pink, and an impressive ruffled collar that cascades elegantly around the neck. The pattern uses strategic color changes to create striped pants that flow seamlessly into a two-toned body, and includes detailed instructions for creating perfectly shaped legs with decorative edging. Every element works together to create a vintage-inspired character full of personality and charm.

Hot Air Balloon Boy Amigurumi Pattern crochet pattern - detailed view of completed project

With comprehensive round-by-round instructions and detailed assembly guidance including photo references, this pattern walks you through advanced techniques like working on remaining loops and creating the unique hat propeller effect. The finished boy sits beautifully and makes a wonderful heirloom-quality piece.

Why You'll Love This Hot Air Balloon Boy Amigurumi Pattern

I'm absolutely smitten with this pattern because it teaches you such clever construction techniques that you'll use in future projects! The way the hat comes together by sewing two pieces and then continuing to crochet is pure genius, and I love how it creates that adorable propeller effect. The ruffled collar is my favorite part - watching it bloom as you increase rounds is so satisfying, and it gives the finished piece such an elegant, vintage feel. What really makes my heart sing is the attention to detail in every element, from the textured hair with its sweet scalloped edges to the carefully planned color transitions in the body. It's one of those patterns where you learn something new with each piece you create, and the end result is a character so full of personality that you can't help but smile every time you look at it!

Hot Air Balloon Boy Amigurumi Pattern step 1 - construction progress Hot Air Balloon Boy Amigurumi Pattern step 2 - assembly progress Hot Air Balloon Boy Amigurumi Pattern step 3 - details and accessories Hot Air Balloon Boy Amigurumi Pattern step 4 - final assembly and finishing

Switch Things Up

I'm always excited to experiment with this pattern because there are so many creative directions you can take! For a girl version, swap the brown and pink placement - use pink for the body stripes and brown for one hat piece, add a little bow to the hair, and maybe use pastel yellow or blonde yarn for softer locks. You could even add a tiny crocheted flower to the hat instead of balls for a more feminine touch.

The hair offers wonderful customization opportunities - try making it in curly mohair yarn for a fluffy cloud effect, or use gradient yarn that shifts from light to dark for dimensional color. I've thought about creating seasonal versions: autumn colors with orange and brown, winter whites and silvers with a sparkly yarn, or spring pastels with mint green and lavender.

For the collar, you could work it in a contrasting color or even use variegated yarn to create a rainbow ruffle effect. If you want something less dramatic, stop at round 2 of the collar for a simpler gathered neckline, or skip it entirely for a more casual look and instead add a little bow tie.

The propeller hat is perfect for theme variations - make both pieces in blue and white for a nautical sailor look, use red and white for a candy cane effect, or try metallic yarns for a steampunk aviator vibe. You could also add tiny crocheted goggles positioned on the hat or forehead for extra adventure appeal!

Common Mistakes & How to Fix Them

βœ— Not marking the stitches correctly when sewing the two hat pieces together, which can result in uneven propeller shape and misaligned sections βœ— Forgetting to work on remaining loops for the hat detail in round 11, missing the dimensional propeller effect entirely βœ— Stuffing the collar too firmly instead of leaving it soft and ruffled, which destroys the delicate cascading effect βœ— Not changing colors cleanly when alternating between brown and pink yarns in the body, creating messy color transitions throughout the striped sections βœ— Skipping the back loop only instruction in round 9 of the hat, which eliminates the ridge needed for the dimensional detail

Hot Air Balloon Boy Amigurumi Pattern

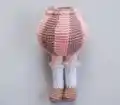
Take flight with this absolutely adorable Hot Air Balloon Boy amigurumi pattern! This whimsical design features a charming little character with textured yellow hair, a unique two-toned propeller hat, and the most delightful ruffled collar that adds a touch of vintage charm. Perfect for crochet lovers who enjoy creating detailed characters, this pattern includes special techniques like working with remaining loops to create dimensional hat details and crafting beautifully striped legs that transition into a colorful body. Whether you're making this sweet boy as a nursery decoration or a treasured keepsake gift, he'll capture hearts with his innocent charm and playful spirit!

Advanced 10-12 Hours

Materials Needed for Hot Air Balloon Boy Amigurumi Pattern

β€” Main Fabric

  • 01
    YarnArt Jeans 73 skin color (50g, 160m) - Color A
  • 02
    YarnArt Jeans 71 brown (50g, 160m) - Color B
  • 03
    YarnArt Jeans 36 pink (50g, 160m) - Color C
  • 04
    YarnArt Jeans 62 white (50g, 160m) - Color D
  • 05
    YarnArt Jeans 88 yellow (50g, 160m) - Color E

β€” Tools Required

  • 01
    Crochet hook size 2.5mm
  • 02
    Tapestry needles
  • 03
    Brown thread for embroidery
  • 04
    Pink blush for cheeks
  • 05
    Pins
  • 06
    Stitch markers
  • 07
    Scissors
  • 08
    Polyester fiberfill

Progress Tracker

0% Complete

β€” Head (yarn A):

Round 1:

sc 6 into a magic loop (6)

Round 2:

inc 6 (12)

Round 3:

[sc 1, inc 1] 6x (18)

Round 4:

sc 1, inc 1, [sc 2, inc 1] 5x, sc 1 (24)

Round 5:

[sc 3, inc 1] 6x (30)

Round 6:

sc 2, inc 1, [sc 4, inc 1] 5x, sc 2 (36)

Round 7:

[sc 5, inc 1] 6x (42)

Round 8:

sc 3, inc 1, [sc 6, inc 1] 5x, sc 3 (48)

Round 9:

[sc 7, inc 1] 6x (54)

Round 10:

sc 4, inc 1, [sc 8, inc 1] 5x, sc 4 (60)

Round 11-23:

sc 60 (13 rnds) (60)

Round 24:

[sc 8, dec 1] 6x (54)

Round 25:

[sc 7, dec 1] 6x (48)

Round 26:

[sc 6, dec 1] 6x (42)

Round 27:

[sc 5, dec 1] 6x (36)

Round 28:

[sc 4, dec 1] 6x (30)

Round 29:

[sc 3, dec 1] 6x (24)

Info:

Break the yarn with a long rest. Stuff firmly.

β€” Hair (yarn E):

Round 1-10:

crochet rnd 1-10 of the Head (60)

Round 11-22:

sc 60 (12 rnds) (60)

Round 23:

sc 15, *skip 2 sts, (dc 2, tr 2, dc 2), skip 2 sts, slst*, repeat ** 5 times, sc 15 (66)

Info:

Break the yarn with a long rest.

β€” Ears (yarn A, make 2):

Round 1:

sc 6 in a magic loop (6)

Round 2:

inc 6 (12)

Round 3-4:

sc 12 (2 rnds) (12)

Info:

Break the yarn with a long rest, use the tapestry needle to sew 2 edges together.

β€” Hat (make 1 with yarn B, 1 with yarn C):

Round 1:

sc 3 in a magic loop (3)

Round 2:

inc 3 (6)

Round 3:

sc 6 (6)

Round 4:

[sc 1, inc 1] 3x (9)

Round 5:

sc 9 (9)

Round 6:

[sc 2, inc 1] 3x (12)

Round 7:

sc 12 (12)

Round 8:

[sc 3, inc 1] 3x (15)

Round 9:

sc 5 BLO (only BLO for 5 sts, then back to crochet on both loops for the remaining sts), sc 10 (15)

Round 10:

[sc 2, inc 1, sc 2] 3x (18)

Round 11:

sc 5 on the 5 remaining loops on rnd 9, skip 5 first sts of this rnd, then back to crochet on this rnd, sc 13 (see Assembling part for more details) (18)

Round 12:

[sc 5, inc 1] 3x (21)

Round 13:

sc 21 (21)

Round 14:

[sc 6, inc 1] 3x (24)

Round 15:

sc 24 (24)

Round 16:

[sc 5, inc 1] 4x (28)

Round 17:

[sc 6, inc 1] 4x (32)

Round 18:

[sc 7, inc 1] 4x (36)

Round 19:

[sc 8, inc 1] 4x (40)

Round 20:

[sc 9, inc 1] 4x (44)

Round 21:

[sc 10, inc 1] 4x (48)

Round 22:

[sc 11, inc 1] 4x (52)

Round 23:

sc 52 (52)

Info:

Break yarn B, crochet the 2nd piece with yarn C, but do not break the yarn this time. Mark 2 sts (on each piece): the 26th st & 37th st of the last rnd. The distance between 2 marked sts is 12 sts. Use the tapestry needle to sew these 12 sts from each piece together, only sew on back loop (see Assembling part).

Info:

After finishing sewing, there are: (52-12) + (52-12) = 80 sts. If you count more or less 80 sts, just dec or inc to reach this number. Connect yarn B/C (depending on which color is the ending color, just choose the matching color), the next st will be the 1st st for next rnds:

Round 1:

sc 40, sc 40 (80)

Round 2:

[sc 9, dec 1, sc 9] 2x, [sc 9, dec 1, sc 9] 2x (76)

Round 3:

[sc 8, dec 1, sc 9] 2x, [sc 8, dec 1, sc 9] 2x (72)

Round 4-7:

sc 36, sc 36 (4 rnds) (72)

Info:

Break the yarn with a long rest.

β€” Legs (yarn B, make 2):

Round 1:

ch 6, start on the 2nd stitch from the hook, sc 4, (sc 3), continue to crochet on the other side of the foundation chain, sc 3, inc 1 (12)

Round 2:

inc 1, sc 3, inc 3, sc 3, inc 2 (18)

Round 3-4:

sc 18 (2 rnds) (18)

Round 5:

sc 5, dec 4, sc 5 (14)

Round 6:

sc 14 (14)

Round 7:

sc 3, dec 4, sc 3, change to yarn D (10)

Round 8-17:

sc 10 (10 rnds) (10)

Round 18:

(FLO) *ch 3, slst 1 on the next st*, repeat ** till the end, break yarn D, change to yarn A, crochet on the remaining loops (10)

Round 19-22:

sc 10 (4 rnds) (10)

Info:

Break the yarn, crochet the 2nd leg the same way but do not break the yarn, continue to crochet sc 5, join with the last st of the 1st leg with slst 1, and continue to crochet the body (yarn B: black letter, yarn C: red letter)

β€” Body:

Round 23:

[sc 2, sc 2] 5x (20)

Round 24:

[inc 2, inc 2] 5x (40)

Round 25:

[sc 4, sc 4] 5x (40)

Round 26:

[sc 3, inc 1, sc 3, inc 1] 5x (50)

Round 27:

[sc 4, inc 1, sc 4, inc 1] 5x (60)

Round 28-36:

[sc 6, sc 6] 5x (9 rnds) (60)

Round 37:

sc 6, sc 2, dec 1, sc 2, sc 6, dec 1, sc 4, sc 4, dec 1, sc 6, sc 2, dec 1, sc 2, sc 6, dec 1, sc 4, sc 4, dec 1 (54)

Round 38:

[sc 6, sc 5] 2x, [sc 5, sc 6] 2x, sc 5, sc 5 (54)

Round 39:

sc 2, dec 1, sc 2, sc 5, dec 1, sc 4, sc 3, dec 1, sc 5, sc 2, dec 1, sc 2, sc 5, dec 1, sc 4, sc 3, dec 1, sc 5 (48)

Round 40:

sc 5, sc 5, sc 5, sc 4, sc 5, sc 5, sc 5, sc 5, sc 4, sc 5 (48)

Round 41:

sc 3, dec 1, sc 5, sc 1, dec 1, sc 2, sc 4, dec 1, sc 3, sc 3, dec 1, sc 5, sc 1, dec 1, sc 2, sc 4, dec 1, sc 3 (42)

Round 42:

sc 4, sc 5, [sc 4, sc 4] 2x, sc 5, sc 4, sc 4, sc 4, start stuffing (42)

Round 43:

sc 4, dec 1, sc 3, sc 2, dec 1, sc 4, sc 1, dec 1, sc 1, sc 4, dec 1, sc 3, sc 2, dec 1, sc 4, sc 1, dec 1, sc 1 (36)

Round 44:

sc 4, [sc 4, sc 3] 2x, sc 4, sc 4, sc 3, sc 4, sc 3 (36)

Round 45:

dec 1, sc 2, sc 2, dec 1, sc 3, sc 1, dec 1, sc 1, sc 3, dec 1, sc 2, sc 2, dec 1, sc 3, sc 1, dec 1, sc 1, sc 3 (30)

Round 46:

(BLO) [sc 3, sc 3] 5x, break yarn C (30)

Round 47:

[sc 3, dec 1] 6x (24)

Info:

Break the yarn with a long rest. Turn the body upside down, join yarn D on rnd 46, crochet on the remaining loops to make the collar:

β€” Collar:

Round 1:

inc 30 (60)

Round 2:

inc 60 (120)

Round 3:

inc 120 (240)

Info:

Break the yarn, hide the remaining yarn.

β€” Arms (yarn D, make 2):

Round 1:

sc 6 in a magic loop (6)

Round 2:

[sc 1, inc 1] 3x (9)

Round 3:

sc 4, Bobble 1, sc 4 (9)

Round 4:

sc 9, change to yarn B (9)

Round 5-20:

sc 9 (16 rnds) (9)

Info:

Break the yarn with a long rest, use the tapestry needle to sew 2 edges together.

β€” Hat's Balls (make 1 with yarn B, 1 with yarn C):

Round 1:

sc 6 into a magic loop (6)

Round 2:

inc 6 (12)

Round 3:

[sc 2, inc 1] 4x (16)

Round 4-5:

sc 16 (2 rnds) (16)

Round 6:

[sc 2, dec 1] 4x, stuffing (12)

Round 7:

dec 6 (6)

Info:

Break the yarn with a long rest, weave in the last 6 sts.

Assembly Instructions

  • Put the hair piece on the head and use the tapestry needle to sew it securely in place.
  • Mark the 26th and 37th stitches on the last round of each hat piece (12 stitches apart), then sew these 12 stitches from each piece together using back loops only.
  • After sewing the hat pieces together, connect the matching color yarn and continue crocheting as instructed to complete the hat.
  • Attach one hat ball on each side of the completed hat for the propeller effect.
  • Use brown thread to embroider the eyes at round 18, positioning them 5 stitches apart.
  • Apply pink blush to create rosy cheeks on the face.
  • Attach the ears 5 stitches apart from the end of the eyes.
  • Attach the completed hat on top of the hair and sew it securely in place.
  • Attach the body to the head, ensuring proper alignment and secure attachment.
  • Attach the arms to the sides of the body at the appropriate position.

Important Notes

  • πŸ’‘Pay careful attention to the hat construction in rounds 9 and 11, where you work on remaining loops to create the dimensional propeller detail.
  • πŸ’‘Mark the stitches accurately before sewing the two hat pieces together to ensure even alignment and proper propeller shape.
  • πŸ’‘The collar should not be stuffed - leave it soft and flowing for the best ruffled effect.
  • πŸ’‘Use stitch markers to track color changes in the striped body sections, as the pattern alternates between yarn B and yarn C.
  • πŸ’‘When joining the legs to form the body, make sure to follow the color coding carefully (black letters for yarn B, red letters for yarn C).
  • πŸ’‘Stuff the body progressively as instructed in round 42 to maintain proper shaping throughout decreases.
  • πŸ’‘Pin all pieces in place before final sewing to ensure the character sits properly and has good proportions.

This enchanting Hot Air Balloon Boy pattern was designed to capture the wonder of vintage adventure and childhood dreams! With its cleverly constructed propeller hat, flowing ruffled collar, and beautifully detailed features, this amigurumi combines advanced techniques with charming design. The pattern guides you through creating dimensional details and color-work that result in a truly special keepsake piece. Perfect for display or as a treasured gift, this little aviator will bring joy and whimsy to any space! ✨🎈🧢

You ask,

we answer.

FAQs

How do I work the hat construction with the remaining loops in round 11?

In round 9, you work back loop only for 5 stitches, leaving front loops unused. In round 11, you first crochet into those 5 remaining front loops from round 9, then skip the first 5 stitches of round 11 and continue on the remaining stitches. The pattern includes detailed assembly photos showing this technique.

Why do I need to make two separate hat pieces?

The two-toned propeller effect is created by making one piece in brown and one in pink, then sewing them together at specific marked stitches. This creates the distinctive spinning propeller look that makes the hat so special.

How do I prevent the collar from looking too stiff?

Do not stuff the collar at all! The dramatic increase rounds create a natural ruffle that should cascade softly. Stuffing would destroy this delicate effect and make it look bulky instead of elegant.

What does the color coding in the body instructions mean?

Throughout the body instructions, black text indicates yarn B (brown) and red text indicates yarn C (pink). This helps you track which color to use for each section as you create the striped pattern.

Can I make this character in different colors?

Absolutely! While the pattern uses specific colors, you can customize the hair, hat, and outfit colors to create your own unique character. Just maintain the same color-change structure for best results.