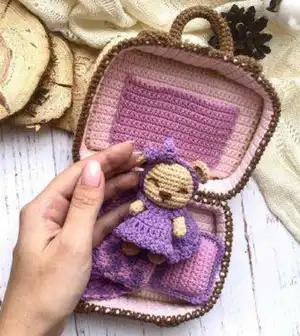
Create an absolutely adorable teddy bear nestled inside its own charming suitcase with this delightful crochet pattern! This unique design combines two projects in one – a sweet 11cm teddy bear complete with a purple dress and headband, plus a fully functional 14cm suitcase with opening lid, handle, and decorative details. The bear includes carefully crafted features like embroidered facial details, jointed limbs, and cozy accessories including a pillow and blanket. Perfect for gift-giving or as a special keepsake, this pattern brings together amigurumi techniques with practical construction methods to create something truly memorable.
Progress Tracker
0% Complete
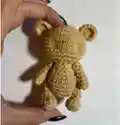
— TEDDY BEAR
— Arms (make 2) :
Info :
Place row marker here
Round 2-6 :
6sc (5 rounds)
Info :
Stuff the arms with fiberfill. Fasten off, cut the yarn, weave in the yarn ends
— Legs (make 2) :
Info :
Place row marker here
Round 3 :
3sc, 3dec, 3sc (9)
Round 4 :
(1sc, dec) *3 (6)
Round 5-9 :
6sc (5 rounds)
Info :
Stuff the legs with fiberfill. Fasten off, cut the yarn, weave in the yarn ends
— Ears (make 2) :
Info :
Place row marker here
Info :
Leave long tail for sewing
— Tail :
Info :
Place row marker here
Info :
Stuff the tail with fiberfill. Leave long tail for sewing
— Body - Head :
Info :
Place row marker here
Round 3 :
(1sc, inc) *6 (18)
Round 4 :
(2sc, inc) *6 (24)
Round 5-8 :
24sc (4 rounds)
Round 9 :
(2sc, dec) *6 (18)
Round 11 :
(1sc, dec) *6 (12)
Info :
Stuff the body with fiberfill
Round 14 :
(3sc, inc) *6 (30)
Round 15-21 :
30sc (7 rounds)
Round 22 :
(3sc, dec) *6 (24)
Info :
Stuff the head with fiberfill
Round 23 :
(2sc, dec) *6 (18)
Round 24 :
(1sc, dec) *6 (12)
Info :
Fasten off, cut the yarn, weave in the ends
— Assembly :
Info :
Fasten the legs and arms with a thread mount. Attach the legs and arms using long needle and thread. Tighten cheeks. Sew the ears to the head. Sew the tail to the body. Embroider the eyes, nose and eyebrows with brown yarn
— Headband :
Instructions :
Chain 45. Start in the second chain from the hook: 1sl st, 1sc, 3dc, 1sc, 32sl st, 1sc, 3dc, 1sc, 1sl st. Cut the yarn and fasten off. Tie the headband on the head
— Dress :
Info :
With purple yarn. Work in rows
Row 1 :
Chain 19. From the second chain on the hook: 18sc, turn (18)
Row 2 :
ch1, 3sc, ch4, (skip 4 sc, start from the next stitch), 4sc, ch4, (skip 4 sc, start from the next stitch), 3sc, turn (18)
Row 3 :
ch2, 18dcinc, turn (36)
Row 4 :
ch2, 36dc, turn (36)
Row 5 :
ch2, (dcinc, sc) *18
Info :
Cut the yarn. Make a fastener on the dress (sew a button on one side, make a button loop on the other). Put on a dress on the bear
— Pillow :
Info :
Crochet 2 pieces in pink color
Row 1 :
Chain 15. Start in the second chain from the hook: 14sc, turn (14)
Row 2-11 :
Ch1, 14sc, turn (10 rows)
Assembly :
Apply the pink part and crochet with purple yarn: 14sc, inc in the corner, 11sc, inc in the corner, 14sc, inc in the corner, 11sc, inc in the corner. Fasten off, cut the yarn, weave in the yarn ends
— Blanket :
Info :
With pink yarn. Work in rows
Row 1 :
Ch 31. Start in the second chain from the hook: 30sc, turn (30)
Row 2 :
Attention! Crochet in jacquard technique from Row 2 to 11. Add purple yarn (these stitches are highlighted in red)
Row 3 :
ch2, (3dc, 3dc) *5, turn (30)
Row 4 :
ch2, (3dc, 3dc) *5, turn (30)
Row 5 :
ch2, (3dc, 3dc) *5, turn (30)
Row 6 :
ch2, (3dc, 3dc) *5, turn (30)
Row 7 :
ch2, (3dc, 3dc) *5, turn (30)
Row 8 :
ch2, (3dc, 3dc) *5, turn (30)
Row 9 :
ch2, (3dc, 3dc) *5, turn (30)
Row 10 :
ch2, (3dc, 3dc) *5, turn (30)
Row 11 :
ch2, (3dc, 3dc) *5, turn (30)
Row 12 :
With pink yarn. Ch1, 30sc. Fasten off, cut the yarn, weave in the yarn ends
— SUITCASE
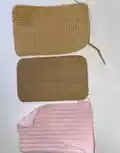
— Side parts (make 2) :
Info :
Crochet 2 pieces in light pink and 2 pieces in beige color. Work in rows
Row 1 :
Chain 7. From the second chain on the hook: 6sc, turn (6)
Row 2-107 :
Ch1, 6sc, turn (106 rows)
Info :
Fold in half and make 6sl st through both sides. Cut the yarn
— Connect the pieces (make 2) :
Info :
Put the light pink detail inside the beige one
Instructions :
Apply the beige part and crochet with beige yarn: 108sc. Cut the yarn. Connect on the other side of the side with brown yarn: 108 reserve sc. Cut the yarn
— Bottom cover :
Info :
Crochet 1 pieces in light pink and 1 pieces in beige color. Work in rows
Row 1 :
Chain 33. Start from the second chain on the hook: inc, 30sc, inc, turn (34)
Row 2-22 :
Ch1, 34sc, turn (21 rows) (34)
Row 23 :
ch1, dec, 30sc, dec (32)
Info :
Continue crocheting from one beige piece
Instructions :
Cut a rectangle from the cardboard and put it between the parts. Apply the beige part and crochet with beige yarn: 108sc. Fasten off, cut the yarn, weave in the ends
Assembly :
Attach the pieces to the bottom cover in a circle. Attach the bottom cover to the side part with brown yarn by crocheting 108 reserve sc. Fasten off, cut the yarn, weave in the ends
— Upper cover :
Info :
Crochet 1 pieces in light pink and 1 pieces in beige color. Work in rows
Row 1 :
Chain 33. Start from the second chain on the hook: inc, 30sc, inc, turn (34)
Row 2-22 :
Ch1, 34sc, turn (21 rows) (34)
Row 23 :
ch1, dec, 30sc, dec (32)
Info :
Fasten off, cut the yarn, weave in the yarn ends
— Pocket :
Info :
With pink yarn. Work in rows
Row 1 :
Chain 26. Start from the second chain on the hook: 25sc, turn (25)
Row 2-16 :
Ch1, 25sc, turn (15 rows)
Info :
Leave long tail for sewing. Sew the pocket to the light pink part
Assembly :
Cut a rectangle from the cardboard and put it between the parts. Apply the beige part and crochet with beige yarn: 108sc. Fasten off, cut the yarn, weave in the ends
Instructions :
Attach the pieces to the upper cover in a circle. Attach the upper cover to the side part with brown yarn by crocheting 108 reserve sc. Fasten off, cut the yarn, weave in the ends. Fold together the upper with the bottom. On the long side, make a seam with a brown thread connecting the parts
— Decoration (make 2) :
Row 1 :
Chain 82. Start in the third chain from the hook: 80dc, turn (80)
Info :
Leave long tail for sewing. Sew the decoration to the suitcase
— Handle :
Info :
Place row marker here
Round 2-24 :
6sc (23 rounds)
Info :
Leave long tail for sewing. Sew the handle to the suitcase. Make a fastener on the suitcase (sew a button on one side, make a button loop on the other). Fasten
This enchanting Teddy Bear in Suitcase pattern creates a complete story in miniature form - a perfectly portable companion ready for adventure! The pattern walks you through creating both an articulated bear with removable accessories and a structured suitcase with authentic details like a working handle and button closure. The combination of amigurumi techniques for the bear and construction methods for the suitcase makes this an engaging project that builds multiple skills. Whether you're making it as a special gift or a keepsake for yourself, this pattern delivers that magical moment when you tuck the little bear into its cozy suitcase home. Happy crocheting! 🧶✨