๐Ÿงถ Beautiful โœจ Detailed ๐Ÿ’ Adorable

Hippo Lovey Amigurumi Pattern

Hippo Lovey Amigurumi Pattern
4.4โ˜… Rating
4-5 Hours Time Needed
3.6K Made This
โœ‚๏ธ

Intermediate Level

Ideal for those with basic knitting experience, featuring slightly more advanced stitches and techniques to expand your skills.

โฑ๏ธ

Weekend Treat

Takes 5-7 hours, making it an enjoyable project to finish over a couple of days.

๐Ÿงธ

Cute Companion

An adorable friend to cherish, handcrafted with love to bring comfort and joy for years to come.

About This Hippo Lovey Amigurumi Pattern

This hippo lovey pattern creates a charming security blanket companion that babies and toddlers will adore. The pattern features a structured hippo head with sweet embroidered details including nostrils and eyebrows, attached to a unique lovey body that incorporates arms and legs into a snuggable blanket-like design. Using soft micropolyester yarn, this pattern combines amigurumi techniques with practical construction methods to create a cuddly friend that's perfect for comfort and play.

Hippo Lovey Amigurumi Pattern crochet pattern - detailed view of completed project

The finished lovey measures 45 cm with recommended materials and features color-blocked sections in gray and dark gray for visual interest. The pattern includes detailed assembly instructions with helpful photos showing proper placement of all components for a professional finish.

Why You'll Love This Hippo Lovey Amigurumi Pattern

I absolutely love how this pattern transforms simple crochet techniques into an heirloom-quality lovey that becomes a child's treasured companion. The combination of a sturdy hippo head with the innovative lovey body design creates something truly special that's both practical and adorable. I'm particularly fond of the thoughtful details like the sunken safety eyes and embroidered facial features that give this hippo so much personality. What makes this pattern even more enjoyable is how the continuous spiral construction keeps your momentum going, and watching the pieces come together during assembly feels incredibly rewarding. The use of plush Dolphin Baby yarn means every stitch creates something luxuriously soft that you'll want to cuddle yourself!

Hippo Lovey Amigurumi Pattern step 1 - construction progress Hippo Lovey Amigurumi Pattern step 2 - assembly progress Hippo Lovey Amigurumi Pattern step 3 - details and accessories Hippo Lovey Amigurumi Pattern step 4 - final assembly and finishing

Switch Things Up

I love experimenting with different color combinations to give each hippo lovey its own unique personality and charm. Instead of the classic gray shades, you could create a pastel pink hippo with white accents for a sweet baby girl gift, or try a cheerful blue and turquoise combination for something bright and playful. For a more modern aesthetic, consider neutral tones like cream and taupe, or even go bold with lavender and mint green for a whimsical twist that stands out.

Another fun modification I enjoy making is changing up the facial details to create different expressions and characters. You could embroider a sweet sleeping face with closed eyes instead of using safety eyes, or add rosy cheeks with pink embroidery thread for extra cuteness. Some makers even add a little bow between the ears or a heart applique on the body to personalize each lovey for the special little one who'll receive it.

I've also found that adjusting the size is easier than you might think with this pattern. Using a thinner sport weight yarn with a smaller hook creates an adorable mini version that's perfect for tiny newborn hands, while upgrading to a bulkier yarn makes an extra cuddly oversized lovey for toddlers. The pattern structure scales beautifully, so don't be afraid to experiment with your yarn stash and see what delightful variations you can create while maintaining those signature hippo features we all love!

Common Mistakes & How to Fix Them

โœ— Forgetting to stuff the head firmly enough before closing, which can result in a floppy appearance instead of the proper rounded shape โœ— Not pressing the safety eyes into the head to create the sunken effect mentioned in the pattern, missing this signature detail โœ— Placing the ears too far apart or too close together, which affects the hippo's overall proportions and cute factor significantly โœ— Skipping the step to gently knot each leg as instructed, which helps define the lovey's shape and creates better visual separation โœ— Overstuffing the head too firmly when the pattern specifically says not to, making it difficult to achieve the right cuddly softness

Hippo Lovey Amigurumi Pattern

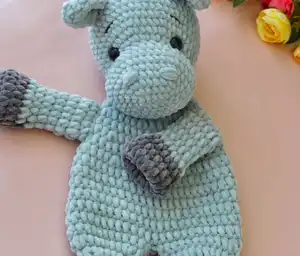
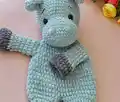
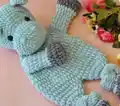
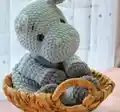
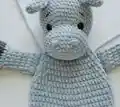
Create an adorable hippo lovey that combines the comfort of a soft snuggle blanket with the charm of a cuddly amigurumi friend. This delightful pattern features a sweet hippo head with safety eyes and embroidered details, complete with tiny arms attached to a cozy body that doubles as a security blanket. Perfect for babies and toddlers, this lovey measures approximately 45 cm and uses ultra-soft Himalaya Dolphin Baby yarn in gray and dark gray shades. Whether you're crafting a thoughtful baby shower gift or making a special companion for naptime, this hippo lovey pattern offers clear instructions with helpful photos to guide you through every step of creating this heartwarming keepsake.

Intermediate 4-5 Hours

Materials Needed for Hippo Lovey Amigurumi Pattern

โ€” Main Fabric

  • 01
    Himalaya Dolphin Baby 100g/120m (100% micropolyester) in color code #80325 (Gray)
  • 02
    Himalaya Dolphin Baby 100g/120m (100% micropolyester) in color code #80320 (Dark gray)

โ€” Tools Required

  • 01
    Crochet hook size 5 mm
  • 02
    Black safety eyes size 16 mm
  • 03
    Fiberfill for stuffing
  • 04
    Black embroidery thread
  • 05
    Sewing pins
  • 06
    Scissors
  • 07
    Darning needle

Progress Tracker

0% Complete

โ€” Head :

Start :

Using 5 mm crochet hook and Himalaya Dolphin Baby #80325 (Gray), Ch 6

Rnd 1 :

Start in second chain from the hook: sc in next 4 st, 3 sc into the last chain, (turn the crocheting and on the other side of foundation chain work) sc in next 3 st, 2 sc into the last loop [12]

Info :

Crochet in continuous spirals

Rnd 2 :

inc in next st, sc in next 3 st, inc in next 3 st, sc in next 3 st, inc in next 2 st [18]

Rnd 3 :

1 sc, inc, 3 sc, (1 sc, inc) repeat 3 times, 3 sc, (1 sc, inc) repeat 2 times [24]

Rnd 4 :

2 sc, inc, 3 sc, (2 sc, inc) repeat 3 times, 3 sc, (2 sc, inc) repeat 2 times [30]

Rnd 5 :

3 sc, inc, 3 sc, (3 sc, inc) repeat 3 times, 3 sc, (3 sc, inc) repeat 2 times [36]

Rnd 6-7 :

36 sc [36] - 2 rounds

Rnd 8 :

3 sc, dec, 3 sc, (3 sc, dec) repeat 3 times, 3 sc, (3 sc, dec) repeat 2 times [30]

Rnd 9 :

30 sc [30] - 1 round

Rnd 10 :

5 sc, inc in next 5 st, 20 sc [35]

Rnd 11 :

inc, 3 sc, inc, 2 sc, inc, 4 sc, inc, 2 sc, inc, 3 sc, inc, 15 sc [41]

Rnd 12 :

7 sc, inc, 2 sc, inc, 4 sc, inc, 2 sc, inc, 22 sc [45]

Rnd 13-18 :

45 sc [45] - 6 rounds

Info :

Install safety eyes between rounds 10 and 11, with the distance 12 stitches between them

Info :

Stuff the head not firmly with filler! Insert small amounts at a time until you get the right shape

Rnd 19 :

(13 sc, dec) repeat 3 times [42]

Rnd 20 :

42 sc [42] - 1 round

Rnd 21 :

(5 sc, dec) repeat 6 times [36]

Rnd 22 :

(4 sc, dec) repeat 6 times [30]

Rnd 23 :

(3 sc, dec) repeat 6 times [24]

Rnd 24 :

(2 sc, dec) repeat 6 times [18]

Rnd 25 :

(1 sc, dec) repeat 6 times [12]

Rnd 26 :

(dec) repeat 6 times [6]

Info :

Cut yarn leaving a few inches, use darning needle to thread through outside loops of remaining 6 stitches, pull tight to close

Info :

With the fingers of your hand, press your eyes into the hippo's head so that they are slightly sunken

โ€” Ears (make 2) :

Info :

Using 5 mm crochet hook and Himalaya Dolphin Baby #80325 (Gray)

Rnd 1 :

5 sc in magic ring [5]

Rnd 2 :

(inc) repeat 5 times [10]

Rnd 3 :

(1 sc, inc) repeat 5 times [15]

Rnd 4-5 :

15 sc [15] - 2 rounds

Info :

Fold the ear in half and crochet through two layers 7 sc. Fasten off and leave long thread for sewing

โ€” Arms (make 2) :

Info :

Using 5 mm crochet hook and Himalaya Dolphin Baby #80320 (Dark gray)

Rnd 1 :

6 hdc in magic ring [6]

Rnd 2 :

(inc) repeat 6 times [12]

Rnd 3 :

(1 hdc, inc) repeat 6 times [18]

Rnd 4-5 :

18 hdc in each stitch around [18] - 2 rounds

Info :

Change yarn into Himalaya Dolphin Baby #80325 (Gray)

Rnd 6 :

(1 hdc, dec) repeat 6 times [12]

Rnd 7-11 :

12 hdc in each stitch around [12] - 5 rounds

Info :

The arms don't get filled. Fold the arm in half and crochet through two layers 6 sc. Fasten off and leave long thread for sewing

โ€” Legs - Body :

Info :

Using 5 mm crochet hook and Himalaya Dolphin Baby #80320 (Dark gray)

Rnd 1 :

6 hdc in magic ring [6]

Rnd 2 :

(inc) repeat 6 times [12]

Rnd 3 :

(1 hdc, inc) repeat 6 times [18]

Rnd 4-5 :

18 hdc in each stitch around [18] - 2 rounds

Info :

Change yarn into Himalaya Dolphin Baby #80325 (Gray)

Rnd 6 :

(1 hdc, dec) repeat 6 times [12]

Rnd 7 :

(2 hdc, dec) repeat 3 times [9]

Rnd 8-19 :

9 hdc in each stitch around [9] - 12 rounds

Rnd 20 :

(2 hdc, inc) repeat 3 times [12]

Rnd 21 :

(1 hdc, inc) repeat 6 times [18]

Rnd 22 :

(2 hdc, inc) repeat 6 times [24]

Info :

We are now done with the first leg, fasten off and cut the yarn. The legs don't get filled. Crochet the second leg by repeating rounds 1-22

Rnd 23 :

Connecting the legs with a 1 hdc, go on with 23 hdc around the first leg and 24 hdc around the second leg [48]

Rnd 24-25 :

48 hdc in each stitch around [48] - 2 rounds

Info :

There may be a hole between the legs. This can simply be closed at the end by sewing

Info :

The gently knot each leg

Rnd 26-29 :

48 hdc in each stitch around [48] - 4 rounds

Rnd 30 :

(6 hdc, dec) repeat 6 times [42]

Rnd 31 :

42 hdc in each stitch around [42] - 1 round

Rnd 32 :

(5 hdc, dec) repeat 6 times [36]

Rnd 33 :

36 hdc in each stitch around [36] - 1 round

Rnd 34 :

(4 hdc, dec) repeat 6 times [30]

Rnd 35 :

30 hdc in each stitch around [30] - 1 round

Rnd 36 :

(3 hdc, dec) repeat 6 times [24]

Rnd 37 :

(2 hdc, dec) repeat 6 times [18]

Info :

If you need work additional stitches to be at the side of work. Fold the detail in half and crochet 9 sc through two layers! Fasten off and leave long thread for sewing

Assembly Instructions

  • Attach the ears between rounds 16 and 17 of the head, ensuring the distance between them is 8 stitches, then secure with pins and sew firmly
  • Embroider the nostrils on the nose between rounds 4 and 5, with 3 stitches distance between them, making 3-4 stitches with black thread
  • Using black embroidery thread, embroider the eyebrows between rounds 13 and 14 with 8 stitches distance between them as shown in photos
  • Attach the hippo head to the lovey body between rounds 13 and 14, making sure the eyes are looking straight ahead and the right side of the lovey is facing you
  • Sew the arms between rounds 31 and 35 of the body, securing them with pins first to ensure proper placement across from each other
  • Close any hole that may appear between the legs by sewing it together with matching yarn using a darning needle
  • Weave in all yarn ends securely throughout the project to ensure durability and a professional finish

Important Notes

  • ๐Ÿ’กThe toy is crocheted in continuous spirals without joining the rounds - do not turn or slip stitch unless otherwise stated in the pattern
  • ๐Ÿ’กUse any materials and tools you like, but the final size of your lovey may differ from the 45 cm stated with recommended materials
  • ๐Ÿ’กStuff the head not firmly with filler, inserting small amounts at a time to achieve the right shape and maintain softness for babies
  • ๐Ÿ’กThe arms and legs don't get filled with stuffing - they should remain flat for the proper lovey blanket design and feel
  • ๐Ÿ’กPress the safety eyes slightly into the head with your fingers to create a sunken effect that gives the hippo its characteristic expression
  • ๐Ÿ’กTake your time with the assembly steps and use pins to position all pieces before sewing for the most professional and proportionate results
  • ๐Ÿ’กConsider the skill level of beginner to intermediate when starting this project and review all abbreviations before beginning to crochet

This adorable Hippo Lovey pattern combines the snuggly comfort of a security blanket with the irresistible charm of an amigurumi companion that babies will treasure for years. The thoughtful design features a sweet hippo head with personality-filled details attached to an innovative body structure that provides the perfect size and shape for tiny hands to hold. Using luxuriously soft Himalaya Dolphin Baby yarn, this pattern creates a cuddly friend that's both practical and beautiful. Every stitch contributes to making a heartfelt gift that becomes a cherished part of childhood memories. Happy crocheting and enjoy creating this special lovey! ๐Ÿฆ›๐Ÿ’™

You ask,

we answer.

FAQs

Can I use a different yarn than Himalaya Dolphin Baby for this hippo lovey pattern?

Yes, you can substitute with any chunky weight micropolyester or chenille yarn like Bernat Baby Blanket, Hobbii Baby Snuggle, or Estako Velvet Chenille. Just keep in mind that using different yarn may change the final size of your lovey from the stated 45 cm, and you should match your hook size to your chosen yarn weight for best results.

Is this hippo lovey pattern safe for newborns and young babies?

While the pattern uses safety eyes which are generally secure, always supervise babies with any toy. For extra safety with very young infants, consider embroidering the eyes instead of using safety eyes, and ensure all yarn ends are thoroughly woven in and secured. The unfilled arms and legs make this lovey appropriately soft and safe for cuddling during supervised nap times.

Why don't the arms and legs get stuffed with fiberfill in this pattern?

The arms and legs are designed to remain flat and unstuffed to create the proper lovey blanket structure that babies can easily grip and cuddle. This design choice makes the lovey more functional as a security blanket while maintaining the adorable hippo character, and it also makes the project work up faster with less stuffing needed overall.

How do I achieve the sunken eye effect mentioned in the hippo lovey instructions?

After installing the safety eyes between rounds 10 and 11 as directed, use your fingers to gently press the eyes inward into the stuffed head. This creates a slight indentation around each eye that gives the hippo a sweeter, more endearing expression and is a signature detail of this particular lovey design that really brings the character to life.

What does it mean to crochet in continuous spirals for this lovey pattern?

Crocheting in continuous spirals means you keep working round after round without joining with a slip stitch or turning your work at the end of each round. This technique creates a seamless tube without a visible seam line, which is perfect for amigurumi pieces like the hippo head. Use a stitch marker to track the beginning of your rounds so you don't lose your place as you work continuously.