๐Ÿงถ Beautiful โœจ Detailed ๐Ÿ’ Adorable

Hedwig the Owl Amigurumi Pattern

Hedwig the Owl Amigurumi Pattern
4.2โ˜… Rating
3-4 Hours Time Needed
2.0K Made This
โœ‚๏ธ

Intermediate Level

Ideal for those with basic knitting experience, featuring slightly more advanced stitches and techniques to expand your skills.

โฑ๏ธ

Weekend Treat

Takes 5-7 hours, making it an enjoyable project to finish over a couple of days.

๐Ÿงธ

Cute Companion

An adorable friend to cherish, handcrafted with love to bring comfort and joy for years to come.

About This Hedwig the Owl Amigurumi Pattern

This enchanting Hedwig owl pattern works up beautifully using continuous rounds for a seamless finish. The body is cleverly constructed to create the owl's distinctive plump chest and tapered tail, while the wings feature an innovative technique for adding black speckled details that capture the snowy owl's natural markings. What makes this pattern special is its forgiving nature - the eyes don't need to be perfectly centered, giving each owl its own charming personality as if it's turning its head to look at you.

Hedwig the Owl Amigurumi Pattern crochet pattern - detailed view of completed project

The pattern includes detailed instructions for both body construction and wing attachment, with helpful notes about eye placement and beak stitching. You'll love how the front loop only technique creates dimension and texture throughout the owl's body.

Why You'll Love This Hedwig the Owl Amigurumi Pattern

I absolutely love this pattern because it's one of the most forgiving amigurumi designs I've ever worked with - no stress about perfect symmetry! The fact that off-center eyes actually make it cuter is genius. I'm always drawn to patterns that let each creation have its own personality, and this owl delivers exactly that. The wing construction is so clever with those pull-through black stitches creating authentic snowy owl markings without complicated colorwork. Plus, knowing I can make this in brown for different owl varieties means endless creative possibilities. It's the perfect gift for Harry Potter fans or anyone who loves magical creatures!

Hedwig the Owl Amigurumi Pattern step 1 - construction progress Hedwig the Owl Amigurumi Pattern step 2 - assembly progress Hedwig the Owl Amigurumi Pattern step 3 - details and accessories Hedwig the Owl Amigurumi Pattern step 4 - final assembly and finishing

Switch Things Up

I absolutely love putting my own spin on classic patterns, and this Hedwig owl is perfect for customization! First, I'd experiment with different eye placements - some owls with eyes closer together look wise and thoughtful, while wider spacing creates a surprised, playful expression that's utterly charming.

For the wings, I sometimes add an extra row or two to make them longer and more dramatic, giving the owl a majestic appearance. You could also try making the wings in a slightly darker shade of white or cream to create subtle depth and dimension.

Color variations are where things get really exciting! I've made barn owls using tan and cream, tawny owls with rich brown and caramel tones, and even magical fantasy owls in purples and blues with sparkly metallic yarn accents. Each color choice completely transforms the character.

Consider adding tiny felt details like eyebrows or little tufts on the head for extra personality. I sometimes embroider tiny white highlights in the eyes using white thread to make them sparkle and come alive. A small ribbon or charm around the neck can turn your owl into a gift-ready treasure.

The wing attachment angle matters too - positioning them slightly forward makes the owl look like it's ready to take flight, while placing them further back creates a more relaxed, roosting pose. Play around with positioning before you sew them permanently!

Common Mistakes & How to Fix Them

โœ— Forgetting to use stitch markers in continuous rounds can cause you to lose your place and miscount stitches completely โœ— Placing safety eyes too late when the opening becomes too small to reach inside for proper attachment and securing โœ— Stuffing too firmly in the beginning rounds creates a lumpy appearance instead of the smooth rounded owl body shape โœ— Not carrying the black yarn properly during wing color changes results in messy loops showing on the wrong side โœ— Skipping the front loop only instructions in round 24 eliminates the dimensional texture that shapes the owl's distinctive form

Hedwig the Owl Amigurumi Pattern

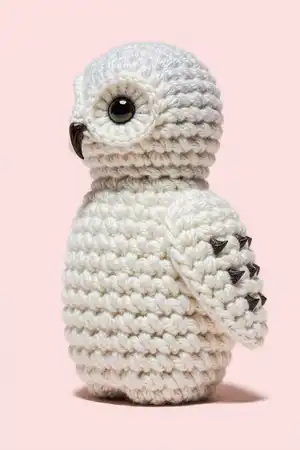
Create your own magical snowy owl companion with this charming Hedwig-inspired amigurumi pattern! This delightful crochet project captures the essence of everyone's favorite feathered friend with adorable mismatched eyes and beautifully detailed wings featuring distinctive black speckled markings. Perfect for Harry Potter fans and owl lovers alike, this pattern guides you through creating a cuddly white owl that can be customized with different colors to make various owl varieties. The continuous round construction keeps the process smooth and enjoyable from start to finish.

Intermediate 3-4 Hours

Materials Needed for Hedwig the Owl Amigurumi Pattern

โ€” Main Fabric

  • 01
    White worsted weight yarn (size 4)
  • 02
    Small amount of black yarn for beak and wing details
  • 03
    Poly-fil stuffing for body

โ€” Tools Required

  • 01
    G/6 4.25mm crochet hook
  • 02
    2 black safety eyes (8-12mm, 10mm recommended)
  • 03
    Stitch markers
  • 04
    Yarn needle or tapestry needle
  • 05
    Scissors

Progress Tracker

0% Complete

โ€” Body :

Round 1 :

MR 6 SC in ring (6)

Round 2 :

2SC in each around (12)

Round 3 :

*SC, 2SC* Repeat from * to * around (18)

Round 4 :

*SC 2, 2SC* Repeat from * to * around (24)

Round 5 :

*SC 3, 2SC* Repeat from * to * around (30)

Round 6-10 :

SC in each around (30)

Round 11 :

*SC 2, DEC* Repeat from * to * around. SC in last 2 (23)

Round 12 :

*SC 5, DEC* Repeat from * to * around. SC in last 2 (20)

Round 13 :

*SC, 2SC* Repeat from * to * around (30)

Round 14 :

*SC 2, 2SC* Repeat from * to * around (40)

Round 15-16 :

SC in each around (40)

Round 17 :

*SC, 2SC* Repeat from * to * a total of 3 times. SC in next 12. *DEC, SC* Repeat from * to * a total of 4 times. SC in last 10 (39)

Round 18-19 :

SC in each around (39)

Round 20 :

*SC 2, DEC* Repeat from * to * a total of 2 times. SC in each remaining (37)

Round 21 :

*SC, DEC* Repeat from * to * a total of 2 times. SC in each remaining (35)

Round 22-23 :

SC in each around (35)

Infos :

You should be able to tell which side is the front chest of the bird. Put the safety eyes on now while you can reach inside. The best part about the owl is that you don't have to get the eyes centered! In fact, it looks cuter if the eyes are on the side a bit so it looks like the owl is turning its head. Aim to get the eyes in Round 7 about 5 stitches apart. You can also stitch on the beak at this point. Cut a length of black yarn and thread through yarn needle. The beak is simple. Start centered between the eyes in the same row and straight down over a couple rows, go around 3 or 4 times. Tie off.

Round 24 :

FLO *SC, 2SC* Repeat from * to * a total of 4 times. Through both loops the rest of the round, SC in next 8, DEC 6 times, SC in last 7 (33)

Round 25 :

In the unworked back loops of Row 24 (should be 8 back loops) then through both loops; *SC 3, DEC* Repeat from * to * around. SC in last 4 (24)

Round 26 :

*SC 2, DEC* Repeat from * to * around (18)

Info :

Stuff with poly fil

Round 27 :

*SC, DEC* Repeat from * to * around (12)

Round 28 :

DEC around (6)

Info :

Finish off, leaving long tail to sew last hole shut. Finish stuffing if needed. Weave in ends.

โ€” Wings :

Info :

The look of these wings can be accomplished a couple of ways. Use White for the whole wing and use a needle and black yarn to stitch the V shaped black specks. OR you can do a pull through of black to give it the V shapes. Do this by inserting hook into the stitch, yarn over with Black yarn, pull through, yarn over with White yarn and pull through to finish the single crochet. Do the next stitch in all white, but carry over the black yarn. The wrong side will be sewn down to the body of the owl so you won't notice if the color changes get messy. The wings are worked in rows, each row ends with a Ch1 and turn.

โ€” Left Wing :

Ch 3 :

Starting chain

Row 1 :

SC in 2nd Ch from hook, SC (2)

Row 2 :

2SC, 2SC (4)

Row 3 :

2SC, SC, SC, 2SC (6)

Row 4 :

SC in each across (Do 2 black pull through stitches on this row. Starting in White- SC, SC, In black- SC, In White- SC, In Black- SC, In White- SC. Space out the black stitches) (6)

Row 5 :

2SC, SC in last 5 (7)

Row 6 :

SC 6, 2SC in last (Do 3 black pull through stitches on this row. Again spacing them out evenly.) (8)

Row 7 :

SC across (8)

Row 8 :

SC across (Do 4 black pull through stitches on this row. Again spacing them out evenly) (8)

Row 9 :

DEC, DEC, SC in last 4 (6)

Row 10 :

SC 4, DEC (Do 2 black pull through stitches on this row.) (5)

Row 11 :

DEC, DEC, SC (3)

Row 12 :

SC across (Do 1 black pull through stitch.) (3)

Row 13 :

SC3TOG (1)

Row 14 :

SC (1)

Row 15 :

SC evenly around the edge of the wing, SS to first SC. Finish off, leave long tail for sewing.

โ€” Right Wing :

Ch 3 :

Starting chain

Row 1 :

SC in 2nd Ch from hook, SC (2)

Row 2 :

2SC 2SC (4)

Row 3 :

2SC, SC, SC, 2SC (6)

Row 4 :

SC (Do 2 black pull through stitches on this row. Starting in White- SC, In black- SC, In White- SC, In Black- SC, In White- SC, SC. Space out the black stitches) (6)

Row 5 :

SC 5, 2SC (7)

Row 6 :

2SC, SC in last 6 (Do 3 black pull through stitches on this row. Again, spacing out the black stitches evenly.) (8)

Row 7 :

SC across (8)

Row 8 :

SC across (Do 4 black pull through stitches on this row. Spacing out the black stitches evenly) (8)

Row 9 :

SC 4, DEC, DEC (6)

Row 10 :

DEC, SC in last 4 (Do 2 black pull through stitches on this row.) (5)

Row 11 :

SC, DEC, DEC (3)

Row 12 :

SC across (Do 1 black pull through stitch on this row.) (3)

Row 13 :

SC3TOG (1)

Row 14 :

SC (1)

Row 15 :

SC evenly around the edge of the wing, SS to first SC. Finish off, leave long tail for sewing.

Assembly Instructions

  • Line up the bottom part of each wing parallel with the bottom of the owl body for proper positioning.
  • Sew the left wing to the left side of the owl body using the long tail left from finishing.
  • Sew the right wing to the right side of the owl body, ensuring both wings are symmetrically placed.
  • Weave in all remaining yarn ends securely to complete your Hedwig owl.

Important Notes

  • ๐Ÿ’กUse a stitch marker or scrap piece of yarn to track rounds since the body is worked continuously without joining
  • ๐Ÿ’กRead through the entire pattern before beginning to familiarize yourself with the construction technique
  • ๐Ÿ’กThe eyes don't need to be centered perfectly - slightly off-center placement adds character and charm
  • ๐Ÿ’กAttach safety eyes and stitch the beak while you can still reach inside the body opening
  • ๐Ÿ’กThe front loop only technique in round 24 is crucial for creating the owl's dimensional shape
  • ๐Ÿ’กWhen working wings, the wrong side will be sewn to the body so messy color changes won't show
  • ๐Ÿ’กYou can customize this pattern with brown yarn to create different owl varieties beyond snowy owls

This adorable Hedwig the Owl pattern brings a touch of magic to your crochet collection! Inspired by everyone's favorite snowy owl companion, this design combines continuous round construction with clever wing detailing to create a charming friend that's perfect for display or gifting. The forgiving nature of the pattern means each owl develops its own unique personality - no two are exactly alike! Whether you're a Harry Potter fan or simply love woodland creatures, you'll enjoy how quickly this cutie works up. ๐Ÿฆ‰โœจ Happy crocheting!

You ask,

we answer.

FAQs

Can I use a different yarn weight for this pattern?

While the pattern calls for worsted weight yarn, you can use different weights - just adjust your hook size accordingly. Keep in mind that using thinner yarn will create a smaller owl, while bulkier yarn will make a larger one. The safety eye size should also be adjusted to match your finished project size.

Do I have to use the pull-through method for the wing markings?

Not at all! The pattern offers two options: you can either use the pull-through color change technique as you crochet, or work the entire wing in white and embroider the black V-shaped markings afterward with a needle and black yarn. Choose whichever method you're more comfortable with.

What if I've never worked in continuous rounds before?

Continuous rounds are easier than they seem! The key is using a stitch marker to track where each round begins. Place your marker in the first stitch of the round, then move it up as you complete each round. This prevents losing your place and ensures accurate stitch counts throughout the body.

Can I make this owl in different colors?

Absolutely! The pattern specifically mentions you can use brown yarn to create different owl varieties. Feel free to experiment with grays, tans, or even fantasy colors. Just maintain the same stitch pattern and construction method for best results.

When should I stuff the owl body?

The pattern indicates to stuff with poly-fil after round 26, but you should start adding stuffing gradually as the opening gets smaller. It's much easier to stuff as you go rather than trying to force filling through a tiny opening at the end. Just don't overstuff - keep it firm but still soft and cuddly.