๐Ÿงถ Beautiful โœจ Detailed ๐Ÿ’ Adorable

Giraffe Hand Puppet Crochet Pattern

Giraffe Hand Puppet Crochet Pattern
4.9โ˜… Rating
6-8 Hours Time Needed
4.2K Made This
โœ‚๏ธ

Intermediate Level

Ideal for those with basic knitting experience, featuring slightly more advanced stitches and techniques to expand your skills.

โฑ๏ธ

All-Day Adventure

Requires 8-10 hours, ideal for a full day of immersive knitting.

๐Ÿงธ

Cute Companion

An adorable friend to cherish, handcrafted with love to bring comfort and joy for years to come.

About This Giraffe Hand Puppet Crochet Pattern

This delightful giraffe hand puppet pattern creates a fully interactive toy that's perfect for storytelling and imaginative play. The pattern includes detailed instructions for creating a working mouth mechanism, complete with an optional squeaker that adds an extra element of fun. With its long neck, adorable ossicones (giraffe horns), floppy ears, and distinctive chocolate brown spots, this puppet captures the gentle charm of everyone's favorite long-necked friend.

Giraffe Hand Puppet Crochet Pattern crochet pattern - detailed view of completed project

Worked in continuous rounds using American terminology, this pattern creates a sturdy yet soft puppet that fits comfortably on adult or child hands. The clever construction method joins the top and bottom mouth pieces with an inner tongue, creating a realistic puppet mouth perfect for performances.

Why You'll Love This Giraffe Hand Puppet Crochet Pattern

I absolutely love how this pattern transforms simple crochet techniques into an interactive toy that sparks creativity! The mouth mechanism is ingenious yet surprisingly straightforward to construct, and adding the optional squeaker makes it irresistible to little ones. I'm particularly fond of how the long giraffe neck creates the perfect puppet structure, and those sweet chocolate spots add just the right touch of character. This pattern works up relatively quickly for its size, and watching it come together as you join the mouth pieces is incredibly satisfying. It's a project that brings smiles at every stage!

Giraffe Hand Puppet Crochet Pattern step 1 - construction progress Giraffe Hand Puppet Crochet Pattern step 2 - assembly progress Giraffe Hand Puppet Crochet Pattern step 3 - details and accessories Giraffe Hand Puppet Crochet Pattern step 4 - final assembly and finishing

Switch Things Up

I love experimenting with different color combinations for this giraffe puppet! While the classic yellow and brown is adorable, I've tried making versions in soft pastels like lavender with white spots for a dreamy fantasy giraffe, or even bold combinations like teal with hot pink spots for a truly unique character.

You could also customize the spots by making them different sizes - some large, some tiny - to create a more realistic giraffe pattern. I've even tried adding embroidered eyelashes with black yarn to give the puppet more personality and expression.

For a special touch, consider adding a small mane along the back of the neck using fringe techniques, or embroider a sweet smile on the mouth area. If you're making this for a baby, you might want to skip the squeaker and add crinkle paper inside the ears instead for a different sensory experience.

The puppet length is also completely customizable - I've made mini versions for toddler hands and extra-long versions for dramatic puppet theater performances. Some makers even add a fabric lining inside the mouth for durability, which is perfect if the puppet will get lots of use!

Common Mistakes & How to Fix Them

โœ— Forgetting to add the squeaker before closing the tongue - always insert it during rounds 6-20 before sealing โœ— Sewing through both sides of the puppet body when attaching eyes, which closes the hand opening completely โœ— Misaligning the eyes so they're not symmetrical - always pin first and check by putting puppet on your hand โœ— Not maintaining consistent tension when working continuous rounds, causing the puppet body to become misshapen or uneven

Giraffe Hand Puppet Crochet Pattern

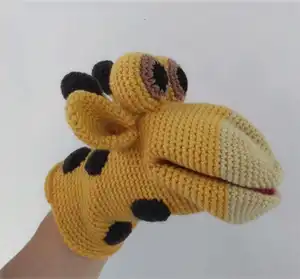
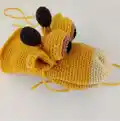
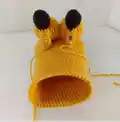
Create an adorable 19cm giraffe hand puppet that brings playtime to life! This charming pattern features a fully functional mouth with an optional squeaker, expressive eyes, and sweet spotted details. Perfect for puppet shows, imaginative play, or as a special handmade gift, this giraffe puppet combines personality with functionality. The pattern uses DK weight yarn in cheerful citrine yellow with chocolate brown spots, creating a lovable character that children and adults alike will treasure.

Intermediate 6-8 Hours

Materials Needed for Giraffe Hand Puppet Crochet Pattern

โ€” Main Fabric

  • 01
    Deramores Studio DK Citrine 100g (yellow)
  • 02
    Deramores Studio DK Ruby 50g (red for tongue)
  • 03
    Deramores Studio DK Vanilla (cream for mouth interior)
  • 04
    Deramores Studio DK Chocolate 50g (brown for spots and horns)
  • 05
    Deramores Studio DK Gingerbread 50g (tan for eye rings)
  • 06
    Deramores Studio DK Ebony small amount (black for eye centers)

โ€” Tools Required

  • 01
    2.5mm crochet hook
  • 02
    Fibrefill/toy stuffing
  • 03
    Toy squeaker (optional)
  • 04
    Stitch markers
  • 05
    Yarn needle
  • 06
    Pins
  • 07
    Scissors

Progress Tracker

0% Complete

โ€” Tongue :

Using Ruby yarn

Ch 2

Rnd 1 :

6 sc in 2nd ch from hook (6 sts)

Rnd 2 :

inc in all 6 sts (12 sts)

Rnd 3 :

(1 sc, inc in next st) x6 (18 sts)

Rnd 4 :

(2 sc, inc in next st) x6 (24 sts)

Rnd 5 :

(3 sc, inc in next st) x6 (30 sts)

Rnd 6-20 :

30 sc (30 sts)

Info :

Insert your squeak into the tongue if you are adding one

Finishing :

15 sc through both sides of the tongue to close. Sl last st and finish

โ€” Top of Mouth :

Using Vanilla yarn

Ch 2

Rnd 1 :

6 sc in 2nd ch from hook (6 sts)

Rnd 2 :

inc in all 6 sts (12 sts)

Rnd 3 :

(1 sc, inc in next st) x6 (18 sts)

Rnd 4 :

(2 sc, inc in next st) x6 (24 sts)

Rnd 5 :

(3 sc, inc in next st) x6 (30 sts)

Rnd 6 :

(4 sc, inc in next st) x6 (36 sts)

Rnd 7 :

(5 sc, inc in next st) x6 (42 sts)

Rnd 8 :

(6 sc, inc in next st) x6 (48 sts)

Rnd 9-12 :

48 sc (48 sts)

Info :

Change to Citrine yarn

Rnd 13-26 :

48 sc (48 sts)

Finishing :

Sl last st, cut yarn

โ€” Bottom of Mouth :

Using Vanilla yarn

Ch 2

Rnd 1 :

6 sc in 2nd ch from hook (6 sts)

Rnd 2 :

inc in all 6 sts (12 sts)

Rnd 3 :

(1 sc, inc in next st) x6 (18 sts)

Rnd 4 :

(2 sc, inc in next st) x6 (24 sts)

Rnd 5 :

(3 sc, inc in next st) x6 (30 sts)

Rnd 6 :

(4 sc, inc in next st) x6 (36 sts)

Rnd 7 :

(5 sc, inc in next st) x6 (42 sts)

Rnd 8 :

(6 sc, inc in next st) x6 (48 sts)

Rnd 9-12 :

48 sc (48 sts)

Info :

Change to Citrine yarn

Rnd 13-23 :

48 sc (48 sts)

Info :

Do not cut yarn, we will now join the mouth and tongue pieces together

Joining :

Place the top and bottom mouth pieces on top of one another with your yarn from the bottom mouth piece at the side. 5 sc through both pieces along what will be the middle seam to join both of the mouth pieces. Place a marker at the 1st st

Adding Tongue :

15 sc through the bottom of mouth, tongue and top of mouth, this will join them altogether along the same middle seam that you had started, now 5 sc through the top and bottom mouth pieces only. This will be the new beginning of your rnds. Replace your marker here

Rnd 24 :

54 sc (54 sts)

Rnd 25 :

(7 sc, dec) x6 (48 sts)

Rnd 26-50 :

48 sc (48 sts)

Info :

If you would like to make your puppet longer or shorter adjust the amount of rows worked here

Finishing :

Sl last st, tie off and finish

โ€” Eyes (Make 2) :

Using Ebony yarn

Ch 2

Rnd 1 :

6 sc in 2nd ch from hook (6 sts)

Rnd 2 :

inc in all 6 sts (12 sts)

Info :

Change to gingerbread yarn

Rnd 3 :

(1 sc, inc in next st) x6 (18 sts)

Rnd 4 :

(2 sc, inc in next st) x6 (24 sts)

Info :

Change to Citrine yarn

Rnd 5 :

(3 sc, inc in next st) x6 (30 sts)

Rnd 6-9 :

30 sc (30 sts)

Rnd 10 :

(3 sc, dec) x6 (24 sts)

Rnd 11 :

(2 sc, dec) x6 (18 sts)

Info :

Start to stuff

Rnd 12 :

(1 sc, dec) x6 (12 sts)

Rnd 13 :

dec x6 (6 sts)

Finishing :

Finish stuffing and close hole, leave enough yarn to sew to puppet later

โ€” Ears (Make 2) :

Using Citrine Yarn

Ch 2

Rnd 1 :

6 sc in 2nd ch from hook (6 sts)

Rnd 2 :

inc in all 6 sts (12 sts)

Rnd 3 :

(1 sc, inc in next st) (18 sts)

Rnd 4-5 :

18 sc (18 sts)

Rnd 6 :

(8 sc, inc in next st) x2 (20 sts)

Rnd 7 :

(9 sc, inc in next st) x2 (22 sts)

Rnd 8 :

(10 sc, inc in next st) x2 (24 sts)

Rnd 9 :

(11 sc, inc in next st) x2 (26 sts)

Rnd 10 :

(12 sc, inc in next st) x2 (28 sts)

Rnd 11 :

28 sc (28 sts)

Rnd 12 :

(13 sc, inc in next st) x2 (30 sts)

Rnd 13-14 :

30 sc (30 sts)

Finishing :

Sl last st, cut yarn leaving enough thread to sew on head later

โ€” Ossicones/Horns (Make 2) :

Using Chocolate Yarn

Ch 2

Rnd 1 :

6 sc in 2nd ch from hook (6 sts)

Rnd 2 :

inc in all 6 sts (12 sts)

Rnd 3 :

12 sc (12 sts)

Rnd 4 :

(1 sc, inc in next st) x6 (18 sts)

Rnd 5-6 :

18 sc (18 sts)

Rnd 7 :

(1 sc, dec) x6 (12 sts)

Rnd 8 :

(1 sc, dec) x4 (8 sts)

Info :

Start to stuff and continue to stuff as you go

Info :

Change to Citrine Yarn

Rnd 9-15 :

8 sc (8 sts)

Finishing :

Sl last st, cut yarn leaving enough thread to sew to head later

โ€” Spots (Make 6) :

Using Chocolate yarn

Ch 2

Rnd 1 :

6 sc in 2nd ch from hook (6 sts)

Rnd 2 :

inc in all 6 sts (12 sts)

Rnd 3 :

(1 sc, inc in next st) x6 (18 sts)

Finishing :

Sl last st, cut yarn leaving enough thread to sew to body later

Assembly Instructions

  • Start by pinning the eyes to the head, making them as symmetrical as possible - check placement by putting puppet on your hand
  • Sew the eyes to the puppet head carefully, making sure not to sew through both sides which would close the hand opening
  • Sew around each eye twice and catch the two eyes together through the back where they meet for extra security
  • Pin the ossicones (horns) into the back of the eyes, then sew them securely to the puppet head once positioned correctly
  • Attach the ears by sewing them in place on either side of the head, tying off loose ends on the inside of the puppet
  • Pin all six chocolate spots randomly on the puppet body for a natural giraffe pattern, then sew each one securely in place
  • Weave in all remaining loose yarn ends throughout the puppet to complete your giraffe hand puppet

Important Notes

  • ๐Ÿ’กUse stitch markers consistently to track your rounds, especially when joining the mouth pieces together
  • ๐Ÿ’กThe puppet can be made longer or shorter by adjusting rounds 26-50 to your preferred length
  • ๐Ÿ’กAlways pin pieces before sewing to ensure correct positioning and symmetry, particularly for the eyes
  • ๐Ÿ’กBe careful not to sew through both layers of the puppet body when attaching features or you'll close the hand opening
  • ๐Ÿ’กInsert the optional squeaker into the tongue before closing it during rounds 6-20 for best results
  • ๐Ÿ’กStuff the eyes and ossicones firmly but not too tightly to maintain their rounded shapes

This enchanting giraffe hand puppet pattern brings interactive storytelling to life with its working mouth mechanism and optional squeaker! Perfect for puppet shows, imaginative play, or creating special bonding moments with little ones, this 19cm tall giraffe combines functionality with undeniable charm. The pattern thoughtfully guides you through creating realistic features including expressive eyes, sweet floppy ears, distinctive ossicones, and those adorable chocolate spots that make giraffes so beloved. Happy crocheting and enjoy bringing your giraffe friend to life! ๐Ÿฆ’โœจ

You ask,

we answer.

FAQs

Can I make this puppet without the squeaker?

Absolutely! The squeaker is completely optional. Simply skip the step of inserting it into the tongue, and your puppet will work perfectly without it. Some prefer the quiet version for storytelling.

How do I prevent sewing through both sides of the puppet?

Always work carefully when attaching features, keeping your hand inside the puppet as you sew. This helps you feel if your needle goes through both layers. Sew only through the outer layer where you're attaching each piece.

Can I adjust the size of the puppet?

Yes! Using a different hook size or yarn weight will change the finished size. For a larger puppet, try using worsted weight yarn with a 3.5mm hook. For smaller, use sport weight with a 2mm hook.

How do I make the puppet longer or shorter?

The pattern specifically notes you can adjust rounds 26-50 to customize the length. Add more rounds for a longer neck or work fewer rounds for a shorter puppet body.

What's the best way to position the eyes symmetrically?

Always pin the eyes first, then put the puppet on your hand to check from all angles. Adjust the pins until they look even, then sew them in place. Taking this extra time ensures professional-looking results.