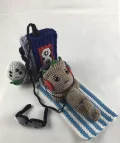
About This Galaxy Guardian Groot Amigurumi Pattern
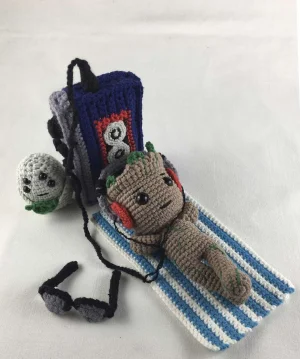
Perfect for the pop-culture fan in your life, this finished set makes an incredible desk display or a thoughtful handmade gift that truly stands out from the crowd.
Designed for experienced crocheters, these patterns involve intricate designs and complex techniques to challenge and inspire.
A 10-12 hour project—great for savoring the process over several sessions.
Playful characters full of personality, designed to spark imagination and become cherished playtime favorites.
Perfect for the pop-culture fan in your life, this finished set makes an incredible desk display or a thoughtful handmade gift that truly stands out from the crowd.
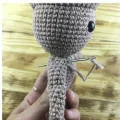
I absolutely love how this pattern uses different textures to bring a character to life. Splitting the yarn for the vine embroidery was a total game-changer for me—it gives Groot that perfect organic, weathered look without being bulky. Plus, making the tiny accessories like the cassette tape and the walkman feels like building a miniature world, which is honestly the most fun part of amigurumi!
I've always had a soft spot for this little guy, especially when he's in his 'teenager' phase with his music. This pattern was such a labor of love for me because I wanted to capture that exact vibe of him just lounging around.
One thing I discovered while making my first one is that splitting the yarn for the embroidery makes a world of difference. It gives the vines a much more delicate, organic look than using the full strand. If you’re feeling extra creative, you could even add a tiny bit of pink blush to his cheeks or the alien's face for some extra 'kawaii' factor.
I know there are a lot of small parts to this one, but don't let that overwhelm you! Take it one accessory at a time. I usually make the audio player first just to get the colorwork out of the way, and then the rest feels like a breeze. It’s the perfect project for a long weekend when you just want to get lost in your stitches and your favorite playlist.
Bring home the most adorable little tree in the universe! This project is such a joy because you're not just making a toy; you're creating a whole retro scene with a walkman, a cozy blanket, and even a tiny multi-eyed alien friend. I've spent hours refining the details so your finished Groot looks like he's truly lost in his favorite tunes. It's a rewarding build that captures all the personality of our favorite cosmic hero.
Start with brown yarn and create a MR, then work 6sc into it (6)
Work 1inc into every stitch around (12)
12sc worked into the BLO (12)
12sc around (12)
12sc around (12)
1dec, 4sc, 1dec, 4sc (10)
1dec, 8sc (9)
9sc around (9)
9sc around (9)
9sc around (9)
9sc around (9)
9sc around (9)
9sc around (9)
9sc around (9)
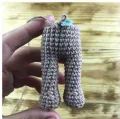
8sc, then sl st into the next stitch. Fasten off the first leg, but keep the yarn attached on the second leg to continue to the body.
Ensure you are stuffing the legs and body firmly as you progress.
ch2, join to the first leg with 9sc, work 2sc along the chain, 9sc around the second leg, and 2sc along the other side of the chain (22)
22sc around (22)
22sc around (22)
22sc around (22)
22sc around (22)
22sc around (22)
22sc around (22)
22sc around (22)
22sc around (22)
22sc around (22)
Repeat (3sc, 1dec) 4 times, then 2sc (18)
Repeat (1sc, 1dec) 6 times (12)
12sc around (12)
Work 12inc around (24)
Repeat (1sc, 1inc) 12 times (36)
36sc around (36)
36sc around (36)
Repeat (5sc, 1inc) 6 times (42)
42sc around (42)
42sc around (42)
42sc around (42)
42sc around (42)
42sc around (42)
42sc around (42)
42sc around (42)
42sc around (42)
Place the 9mm eyes between Rounds 37 and 38, leaving a 5sc gap between them.
Repeat (5sc, 1dec) 6 times in the BLO (36)
Repeat (4sc, 1dec) 6 times (30)
Repeat (3sc, 1dec) 6 times (24)
Repeat (2sc, 1dec) 6 times (18)
Repeat (1sc, 1dec) 6 times (12)
Work 6dec (6). Fasten off and weave in the end.
Return to the front loops left unworked in Round 42.
ch2, 42hdc, sl st to join (42)
ch1, 11sc, 4hdc, 6dc, ch2, sl st into the next stitch, ch2, 3dc, 1hdc, 16sc, sl st (41)
Now we add the green leafy details to the crown.
Attach green yarn to the 17th stitch of Round 44. ch2, 2dc, 1hdc. Fasten off.
Attach green yarn to the 22nd stitch of Round 44. ch2, 1hdc, 1sc. Fasten off.
Attach green yarn to the 29th stitch of Round 44. ch2, 1hdc, 1sc. Fasten off.
Using brown, 5sc in a MR (5)
5sc around (5)
1inc, 4sc (6)
6sc around (6)
1inc, 5sc (7)
7sc around (7)
1inc, 6sc (8)
8sc around (8)
8sc around (8)
8sc around (8)
8sc around (8)
8sc around (8)
8sc around (8)
8sc around (8)
Press the opening flat and work 3sc through both layers to close. Leave a long tail for sewing.
Using black, 6sc in a MR (6)
Switch to red yarn. 6inc (12)
Repeat (1sc, 1inc) 6 times (18)
18sc around (18)
Repeat (1sc, 1dec) 6 times (12)
6dec (6). Fasten off.
With gray yarn, ch33 and turn.
32sc, ch1, turn (32)
32sc (32). Fasten off, leaving a tail. Fold the strip lengthwise and sew it closed.
Using gray for the lenses (make 4 pieces), ch7 and turn.
6sc, ch1, turn (6)
Skip the first stitch, 4sc, sl st, ch1, turn (4)
Skip the first stitch, 2sc, sl st, ch1, turn (2)
Skip the first stitch, 1sc. Fasten off.
Layer two gray pieces together. Using black yarn, work a border around the top: ch1, 2sl st, 6sc, 2sl st. Fasten off.
Using black (make 2), ch23, turn, then 22sc. Fold in half and sew to the lenses.
Using white, ch41 and turn.
40sc, ch1, turn (40)
Switch to azure. 40sc per row, ch1 and turn at the end of each (40)
Switch to white. 40sc per row, ch1 and turn at the end of each (40)
Continue alternating colors every 2 rows until you reach Row 25.
Finish with a final row of white sc. Fasten off and weave in all ends.
Using gray, 6sc in a MR (6)
6inc (12)
Repeat (1sc, 1inc) 6 times (18)
Repeat (2sc, 1inc) 6 times (24)
Repeat (3sc, 1inc) 6 times (30)
30sc around for 11 rounds (30)
Repeat (3sc, 1dec) 6 times (24)
24sc around (24)
Repeat (2sc, 1dec) 6 times (18)
Insert the first pair of 6mm eyes in Round 16 (4sc apart). Insert the second pair in Round 18 (2sc apart).
Repeat (1sc, 1dec) 6 times (12)
6dec (6). Fasten off.
ch7, turn, 2sl st, 4sc. Sew to the sides at Rounds 12-13.
ch5, turn, 4sc. Sew to the bottom at Round 2.
ch7, turn. 1sc, 1hdc, 2sc, 2sl st, ch1, 2sl st, 1sc, 2hdc, 1sl st, ch2 (15). Sew to the alien's hands.
Start with blue. ch26, turn. Work 2 rows of 25sc. Start colorwork: Row 4 (4 blue, 13 red, 8 blue). Rows 5-10 (Follow the red/black/blue grid pattern shown in photos). Row 11 (8 blue, 13 red, 4 blue). Rows 12-14 (25sc blue). Row 15-16 (25sc gray).
Blue yarn. ch26, turn. 14 rows of 25sc blue, then 2 rows of 25sc gray.
Make 2 blue/gray strips (3sc wide, 14 rows long). Make one blue strip for the bottom and one gray strip for the top.
Small (make 3): ch3, work inc, 3sc in one ch, 1sc (6), then 6sc BLO. Big (make 1): ch4, work inc, 1sc, 4sc in one ch, inc (9), then 9sc BLO.
Make 2. Start light gray 5sc in MR. Round 2 (black): 5inc. Round 3 (light gray): (1sc, 1inc)x5. Round 4: (2sc, 1inc)x5. Sew to front panel.
Black yarn. 6sc in MR, 6sc BLO, 2 rounds of 6sc. Next: BLO (dec, 1sc, dec, 1sc). Finish with 4sc, then ch70 for the cord.
I hope you have as much fun making this little guy as I did designing him! There's something so special about seeing Groot come together with all his tiny gadgets. He’s the perfect companion for your desk, and he never fails to start a conversation with fellow fans. Don't forget to share your finished photos with our community — I absolutely love seeing your unique takes on the vine embroidery! Happy crafting, and may your stitches be as steady as a starship! 🧶✨🚀
You definitely can, but keep in mind that using a heavier yarn like worsted (#4) will make the finished Groot significantly larger, and you'll need to increase your hook size to around 3.5mm or 4.0mm.
The secret is to divide your green yarn into thinner strands. By using just one or two plies of the yarn, the vines look delicate and 'grow' into the fabric rather than sitting awkwardly on top of it.
Try stuffing it extra firmly! If it still feels a bit soft, you can cut a small piece of plastic canvas or stiff cardboard to fit inside the panels before you sew them together.
Not at all! Just use the yarn tail to sew the center of the leaf directly to the alien's 'hands.' It's a small detail, but it really adds to his personality.
