🧢 Beautiful ✨ Detailed πŸ’ Adorable

French Countryside Blanket Pattern

French Countryside Blanket Pattern
4.7β˜… Rating
15-20 Hours Time Needed
2.6K Made This
βœ‚οΈ

Beginner Friendly Level

Perfect for those just starting their sewing journey, with clear instructions and simple techniques

⏱️

Slow & Steady

A 10-12 hour projectβ€”great for savoring the process over several sessions.

🏑

Cozy Accent

A warm touch for your space that transforms ordinary corners into inviting nooks filled with handmade charm.

About This French Countryside Blanket Pattern

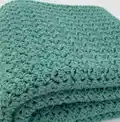
The French Countryside Blanket is a delightful project that showcases the beauty of the Paris Stitch, creating a wonderfully textured fabric perfect for snuggling. This medium-sized blanket measures approximately 48 x 50 inches and uses a light weight yarn that works up beautifully in the elegant seafoam green shown, though you can easily customize it with your favorite colors. The pattern includes comprehensive tables for sizing adjustments, making it simple to create anything from a small baby blanket to a generous throw for your living room.

French Countryside Blanket Pattern crochet pattern - detailed view of completed project

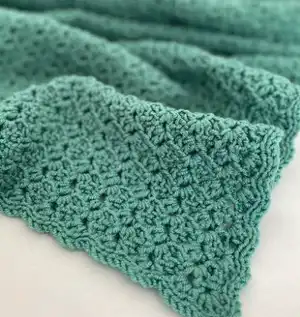
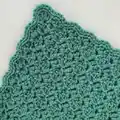
With detailed photo tutorials for the border placement and clear written instructions throughout, you'll find this pattern easy to follow even as a newer crocheter. The finished blanket features a classic Paris Stitch body with a charming decorative border that adds the perfect finishing touch.

Why You'll Love This French Countryside Blanket Pattern

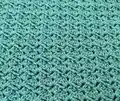
I absolutely love how this pattern brings together simplicity and elegance in one beautiful project. The Paris Stitch creates such a lovely texture that looks intricate but is surprisingly easy to master with just basic stitches. I appreciate that the pattern includes so much helpful information about yarn substitution and sizing customization, giving you complete creative freedom. The step-by-step photos for the border are incredibly helpful and take away any guesswork. What really makes this special is how versatile it is - I've made it in soft baby colors for gifts and in bold stripes for my own home, and it's gorgeous every time.

French Countryside Blanket Pattern step 1 - construction progress French Countryside Blanket Pattern step 2 - assembly progress French Countryside Blanket Pattern step 3 - details and accessories French Countryside Blanket Pattern step 4 - final assembly and finishing

Switch Things Up

I love experimenting with this pattern because it's so wonderfully adaptable to different styles and preferences. For a bohemian vibe, I've worked it in earthy terracotta and cream stripes that create a gorgeous southwestern feel. One of my favorite variations was making a baby blanket in the softest pastel rainbow gradient - starting with pale pink and transitioning through peach, yellow, mint, and lavender.

If you're feeling adventurous, try using self-striping or gradient yarn for an effortless color-changing effect that requires no extra work. I've also experimented with the texture by working every other row in a different color to create subtle stripes that really highlight the Paris Stitch pattern.

For a more modern aesthetic, consider working the blanket in bold jewel tones like deep emerald, sapphire, or amethyst. The texture of the Paris Stitch really pops in solid saturated colors. I've even made a monochromatic version in varying shades of grey that looks incredibly sophisticated draped over a neutral sofa.

Don't be afraid to adjust the size either - I've created small lovey-sized versions for baby gifts and oversized throws for king-sized beds by simply following the sizing tables. The border technique works perfectly regardless of your chosen dimensions.

Common Mistakes & How to Fix Them

βœ— Not maintaining consistent tension throughout the project can result in uneven Paris Stitches and a warped final shape that doesn't lay flat βœ— Forgetting to count stitches at the end of each row leads to gaining or losing stitches and throws off the entire pattern rhythm βœ— Placing the border stitches in the wrong spaces creates an uneven edge - always use the smaller third space as indicated in photos βœ— Skipping the tension swatch means your finished blanket size may differ significantly from the pattern specifications and you might run out of yarn

French Countryside Blanket Pattern

Transport yourself to the lush green hills of France with this stunning blanket pattern featuring the elegant Paris Stitch. This beginner-friendly design combines simple double crochet, single crochet, and chain stitches to create a beautiful textured fabric that's neither too dense nor too lacy. Perfect for customizing in any size, this versatile pattern works wonderfully for baby blankets in soft pastels or bold statement pieces in vibrant stripes. Complete with detailed step-by-step photos and comprehensive sizing guides, you'll create a cozy masterpiece that brings European charm to any space.

Beginner Friendly 15-20 Hours

Materials Needed for French Countryside Blanket Pattern

β€” Main Fabric

  • 01
    Ouma Ralie Feels Like Cashmere from Kismet Yarns in Seafoam Green - 9 balls of 100g each
  • 02
    DK weight yarn (Light Worsted) classified as Light (3) yarn weight
  • 03
    Alternative: Any DK/Light Worsted yarn with 273 yards per 100g and 11 wraps per inch

β€” Tools Required

  • 01
    4.5mm crochet hook (US size 7)
  • 02
    Yarn needle for weaving in ends
  • 03
    Scissors
  • 04
    Stitch markers (optional but helpful)
  • 05
    Measuring tape

Progress Tracker

0% Complete

β€” BLANKET

Starting Chain :

With a 4.5mm hook, make 222 ch (or use Table 1 for other sizes)

Row 1 (RS) :

2 dc in 4th ch from hook, ch 2, sc in next ch, *skip 2 ch, 2 dc in next ch, ch 2, sc in next ch*, rep from * to * until last ch, dc in last ch, turn [55 Paris Stitches]

Row 2 :

ch 2, *(2 dc, ch 2, sc) in ch2-sp*, rep from * to * until end of row, dc around turning ch

Info :

Repeat Row 2 until your desired length (the blanket in the photo has 103 rows)

Last Row (RS facing) :

Rep Row 2, but don't make the last dc in turning ch

β€” BORDER

Round 1 - Left Side :

For the CORNER, make: (dc, ch 1) x 3, dc, sl st in the first dc of the 2 dc at the end of the last row, turn so that the left side is now on top, locate the space on the left side made by the last dc at the end of each row (the smaller third space), make a Paris st in each of these spaces until the next corner (1 Paris st for every 2 rows), don't make a Paris st in the last sp, make a CORNER in the last sp

Round 1 - Bottom :

Turn so that the bottom is now on top, make a Paris st in the bottom of the same ch where the 2 dc of row 1 was made, continue until the next corner, make a CORNER in the ch2-sp at the end of this side

Round 1 - Right Side :

Locate the space made by the dc at the end of each row (one of the smaller spaces), make a Paris st in each of these spaces (works out as every third space) until the end of this side, make a CORNER in the last space before the ch2-starting-chain of the top row

Round 2 :

sl st in the BLO of each st around (insert your hook from the top into each st, the first 2 sl sts will be in the ch2-starting-chain), fasten off

Finishing :

Weave in all yarn ends

Assembly Instructions

  • No assembly required - this is a one-piece blanket worked from the center outward
  • After completing all rows, work the border continuously around all four sides
  • Weave in all yarn ends securely on the wrong side of the work
  • Block the finished blanket by laying flat and misting with water to even out stitches and achieve final dimensions
  • Allow to dry completely flat before use or gifting

Important Notes

  • πŸ’‘Always check your tension gauge before starting to ensure your blanket will be the correct size
  • πŸ’‘Use stitch markers at the end of each row to help count your Paris Stitches accurately
  • πŸ’‘The border is worked continuously so don't fasten off until you complete Round 2
  • πŸ’‘Take care to identify the correct spaces for border stitches - refer to the photos when in doubt
  • πŸ’‘Wind extra balls of yarn before starting if using a single large skein to avoid tangles
  • πŸ’‘Consider making a small swatch first to test color combinations if working with stripes

This French Countryside Blanket pattern brings timeless elegance to your crochet repertoire with its sophisticated Paris Stitch texture. Whether you're creating a cherished baby gift or a cozy throw for your own home, this versatile design adapts beautifully to your vision. The detailed instructions and helpful photos ensure your success, while the customization options let you make it truly your own. Wrap yourself in handmade warmth and European-inspired charm! 🧢✨

You ask,

we answer.

FAQs

Can I use a different yarn weight for this blanket?

Yes, you can use different yarn weights, but keep in mind that the sizing tables provided will no longer apply. Make sure to do a tension swatch with your chosen yarn and adjust your starting chains and row count accordingly to achieve your desired finished size.

How do I make this blanket larger or smaller?

The pattern includes comprehensive sizing tables! For width, use any multiple of 4 + 2 chains (see Table 1 for specific sizes). For length, simply crochet until you reach your desired measurement or refer to Table 2 for guidance on row counts.

What if I can't find the exact yarn used in the pattern?

The pattern provides detailed yarn specifications and a list of suitable substitutes. Look for any DK weight (Light #3) yarn with approximately 273 yards per 100g and 11 wraps per inch. Test your tension to ensure it matches the pattern gauge.

Is the Paris Stitch difficult to learn?

Not at all! The Paris Stitch uses only basic crochet techniques: double crochet, single crochet, and chains. If you can work these three stitches, you can master the Paris Stitch. The pattern creates a beautiful texture that looks more complex than it actually is.

How do I work the border correctly?

The pattern includes detailed step-by-step photos showing exactly where to place your hook for each side of the border. The key is identifying the correct spaces - look for the smaller 'third space' on the sides and follow the photo guidance for corner placement.