๐Ÿงถ Beautiful โœจ Detailed ๐Ÿ’ Adorable

Forest Friends Stacking Amigurumi Pattern

Forest Friends Stacking Amigurumi Pattern
4.0โ˜… Rating
6-8 Hours Time Needed
2.0K Made This
โœ‚๏ธ

Intermediate Level

Ideal for those with basic knitting experience, featuring slightly more advanced stitches and techniques to expand your skills.

โฑ๏ธ

All-Day Adventure

Requires 8-10 hours, ideal for a full day of immersive knitting.

๐Ÿงธ

Cute Companion

An adorable friend to cherish, handcrafted with love to bring comfort and joy for years to come.

About This Forest Friends Stacking Amigurumi Pattern

The Forest Friends Stacking pattern is a creative and unique amigurumi collection that brings together four woodland characters in a fun, interactive design. Each friend is crafted in a donut shape that allows them to stack beautifully, creating a charming display or engaging toy for children. The pattern includes detailed instructions for creating Birdie, Bunny, Bear, and Tree, each with their own distinctive features and personalities that capture the essence of forest life.

Forest Friends Stacking Amigurumi Pattern crochet pattern - detailed view of completed project

This pattern uses the continuous spiral technique common in amigurumi, with clear round-by-round instructions and helpful tips for achieving seamless decreases and perfect stuffing. The magic ring method ensures a neat finish for each adorable character.

Why You'll Love This Forest Friends Stacking Amigurumi Pattern

I absolutely love this pattern because it combines functionality with cuteness in the most delightful way! The stacking feature makes these forest friends interactive and entertaining for children, while the charming details like the birdie's little beak and wings, the bunny's fluffy pom-pom tail, and the bear's two-toned ears add so much personality to each piece. I appreciate how the pattern teaches you to work with donut shapes, which is a unique skill that opens up so many creative possibilities. The gradual size progression from smallest to largest creates a satisfying visual effect when stacked, and each character is small enough to complete relatively quickly while still being detailed and engaging to make.

Forest Friends Stacking Amigurumi Pattern step 1 - construction progress Forest Friends Stacking Amigurumi Pattern step 2 - assembly progress Forest Friends Stacking Amigurumi Pattern step 3 - details and accessories Forest Friends Stacking Amigurumi Pattern step 4 - final assembly and finishing

Switch Things Up

I love experimenting with this pattern by playing with different color combinations to create unique forest friends! Instead of traditional colors, try making a pastel collection with soft pinks, mint greens, and lavender for a dreamy nursery aesthetic, or go bold with bright rainbow colors for a more playful look.

You could also add embroidered details like closed sleepy eyes instead of safety eyes for a gentler appearance, or stitch tiny flowers and decorative elements onto the bodies for extra charm. I've found that adding small bows or ribbons around the donut shapes creates an adorable gift-ready presentation.

For seasonal variations, consider making holiday-themed versions - red and green for Christmas, orange and black for Halloween, or pastels with floral accents for spring. You could even create a whole forest family by adding other woodland creatures like a fox, owl, or hedgehog using the same donut base technique.

If you want to make these more interactive for children, try using different textured yarns for each character or adding crinkly material inside the stuffing for sensory play. The stacking feature naturally encourages developmental play, but you could enhance this by making each character slightly weighted differently or adding small bells inside for auditory stimulation.

Common Mistakes & How to Fix Them

โœ— Twisting the initial chain when creating the donut base - always double-check that your chain lies flat before joining with the first stitch โœ— Not marking the end of each round in the continuous spiral can lead to losing your place and uneven shaping throughout the project โœ— Stuffing the donut too early or too late - wait until you've sewn about 10% of the closing seam before beginning to stuff gradually โœ— Placing safety eyes at incorrect rounds or spacing them unevenly - always count your rounds carefully and measure the distance between eyes for symmetry

Forest Friends Stacking Amigurumi Pattern

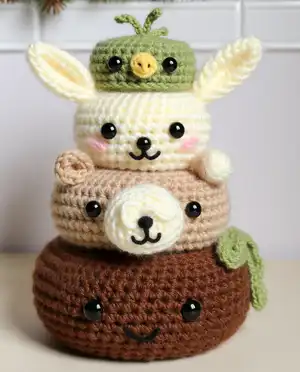
Create an adorable set of stackable forest friends with this delightful crochet pattern! This charming collection features four lovable characters - a sweet birdie, a cuddly bunny, a gentle bear, and a cheerful tree - all designed to stack perfectly on top of each other. Each character is crafted in a donut shape with unique details like wings, ears, pom-pom tails, and leaves. Perfect for nursery decor, baby gifts, or as playful companions for little ones, these forest friends bring woodland charm to any space while offering endless stacking fun.

Intermediate 6-8 Hours

Materials Needed for Forest Friends Stacking Amigurumi Pattern

โ€” Main Fabric

  • 01
    Vanna's Choice yarn (weight 4) in multiple colors
  • 02
    Sweet pea color for Birdie body
  • 03
    Duckie color for Birdie beak
  • 04
    Lamb color for Bunny body
  • 05
    Pink color for Bunny nose
  • 06
    Beige color for Bear body
  • 07
    Lamb color for Bear snout
  • 08
    Chocolate color for Tree body
  • 09
    Kelly green color for Tree leaves

โ€” Tools Required

  • 01
    4.25 mm crochet hook
  • 02
    7.5 mm safety eyes for Birdie
  • 03
    8 mm safety eyes for Bunny
  • 04
    9 mm safety eyes for Bear
  • 05
    10.5 mm safety eyes for Tree
  • 06
    12 mm safety nose for Bear
  • 07
    Stuffing (fiberfill or polyfill)
  • 08
    Tapestry needle
  • 09
    Stitch markers
  • 10
    Sturdy paper or cardboard (2 inches wide for pom-pom)
  • 11
    Scissors

Progress Tracker

0% Complete

โ€” Birdie Body :

Round 1 :

ch 20

Round 2 :

sc 20

Round 3 :

* sc 1, inc 1 * - repeat 10 times (30 st)

Round 4 :

sc 30

Round 5 :

* sc 2, inc 1 * - repeat 10 times (40 st)

Round 6-15 :

sc 40

Round 16 :

* sc 2, dec 1 * - repeat 10 times (30 st)

Round 17 :

sc 30

Round 18 :

* sc 1, dec 1 * - repeat 10 times (20 st)

Round 19 :

sc 20

Info :

Place 7.5 mm safety eyes between R8 and R9

โ€” Birdie Beak :

Instructions :

Create a magic loop with 10 sc

โ€” Birdie Wings (make two) :

Instructions :

ch 5, starting at 2nd chain from hook: sc, dc, dc, sc, on the other side of the chain: sc, dc, dc, sc

โ€” Birdie Hair :

Instructions :

ch 4, starting at 2nd chain from hook: slst 3, ch 3, starting at 2nd chain from hook: slst 3

โ€” Birdie Tail :

Instructions :

ch 5, starting at 2nd loop from hook: slst 4, ch 5, starting at 2nd loop from hook: slst 5, ch 5, starting at 2nd loop from hook: slst 5

โ€” Bunny Body :

Round 1 :

ch 30

Round 2 :

sc 30

Round 3 :

* sc 2, inc 1 * - repeat 10 times (40 st)

Round 4 :

sc 40

Round 5 :

* sc 3, inc 1 * - repeat 10 times (50 st)

Round 6-17 :

sc 50

Round 18 :

* sc 3, dec 1 * - repeat 10 times (40 st)

Round 19 :

sc 40

Round 20 :

* sc 2, dec 1 * - repeat 10 times (30 st)

Round 21 :

sc 30

Info :

Place 8 mm safety eyes between R10 and R11

โ€” Bunny Ears (make two) :

Round 1 :

5 sc (magic loop)

Round 2 :

sc 5

Round 3 :

inc 5 (10 st)

Round 4 :

sc 10

Round 5 :

* sc 3, dec 1 * - repeat 2 times (8 st)

Round 6 :

sc 8

Round 7 :

* sc 2, dec 1 * - repeat 2 times (6 st)

โ€” Bunny Tail :

Info :

Instructions on how to make a pom pom for the bunny's tail can be found on page 9

โ€” Bear Body :

Round 1 :

ch 40

Round 2 :

sc 40

Round 3 :

* sc 3, inc 1 * - repeat 10 times (50 st)

Round 4 :

sc 50

Round 5 :

* sc 4, inc 1 * - repeat 10 times (60 st)

Round 6-19 :

sc 60

Round 20 :

* sc 4, dec 1 * - repeat 10 times (50 st)

Round 21 :

sc 50

Round 22 :

* sc 3, dec 1 * - repeat 10 times (40 st)

Round 23 :

sc 40

Info :

Place 9 mm safety eyes between R10 and R11, and 12 mm safety nose one row below the eyes

โ€” Bear Ears (make two) :

Round 1 :

5 sc (magic loop)

Round 2 :

inc 5 (10 st)

Round 3 :

sc 10 (make stitches 6 and 7 inner ear colour)

Round 4 :

sc 10 (make stitches 6, 7 and 8 inner ear colour)

โ€” Bear Snout :

Round 1 :

6 sc (magic loop)

Round 2 :

inc 6 (12 st)

Round 3 :

sc, sc, sc 3 in next sc, sc, sc, sc, sc 3 in next sc, sc, slst

โ€” Bear Tail :

Round 1 :

5 sc (magic loop)

Round 2 :

inc 5 (10 st)

Round 3 :

sc 10

Round 4 :

* sc 3, dec 1 * - repeat 2 times (8 st)

โ€” Tree Body :

Round 1 :

ch 50

Round 2 :

sc 50

Round 3 :

* sc 4, inc 1 * - repeat 10 times (60 st)

Round 4 :

sc 60

Round 5 :

* sc 5, inc 1 * - repeat 10 times (70 st)

Round 6-21 :

sc 70

Round 22 :

*sc 5, dec 1 * - repeat 10 times (60 st)

Round 23 :

sc 60

Round 24 :

* sc 4, dec 1 * - repeat 10 times (50 st)

Round 25 :

sc 50

Info :

Place 10.5 mm safety eyes between R12 and R13

โ€” Tree Leaves (make two) :

Instructions :

ch 6, on first side of the chain, starting at the 2nd loop from hook: slst, sc, dc, dc, sc, on other side of the chain: sc, dc, dc, sc, sc, slst

โ€” Pom Pom Instructions :

Step 1 :

Wrap yarn around a piece of sturdy paper or cardboard that is 2 inches wide approximately 12 times

Step 2 :

Remove the wrapped yarn and tie another piece of yarn around it

Step 3 :

Pull tight and make a few more knots

Step 4 :

Cut through all the loops

Step 5 :

It doesn't look perfect yet

Step 6 :

Trim the pom pom until it is nice and round

Step 7 :

Leave tails for sewing onto the bunny's bottom

Assembly Instructions

  • Ensure your chain is not twisted when starting each donut body, laying it flat before joining the ends together.
  • Fold your work so that the bottom circle aligns perfectly with the top circle before beginning to sew them together.
  • Start sewing the top and bottom circles together by going through one stitch at the bottom and one stitch at the top alternately.
  • Sew approximately 10% of the way around the donut, then begin stuffing the opening as you continue sewing and stuffing simultaneously.
  • Attach safety eyes and any facial features before completely closing the donut to ensure proper placement and easier access.
  • Sew the birdie's beak, wings, hair, and tail pieces onto the completed donut body using the yarn tails left for sewing.
  • Attach the bunny's ears and pom-pom tail, bear's ears, snout and tail, and tree's leaves using a tapestry needle and matching yarn colors.

Important Notes

  • ๐Ÿ’กUse the magic ring method for starting all small pieces as it creates the cleanest and most professional-looking finish
  • ๐Ÿ’กMark the last stitch of each round with a stitch marker since amigurumi pieces are created in one continuous spiral
  • ๐Ÿ’กWhen decreasing, skip a stitch rather than single crocheting two stitches together for a more seamless appearance
  • ๐Ÿ’กFasten off at the end of each piece and leave a long tail for sewing to ensure secure attachment
  • ๐Ÿ’กFor the bear ears, switch colors in rounds 3 and 4 to create the inner ear detail as specified
  • ๐Ÿ’กThe pom-pom for the bunny tail should be trimmed carefully to achieve a nice round shape before attaching

This enchanting Forest Friends Stacking pattern brings the magic of woodland creatures into your crochet collection! Each adorable character is thoughtfully designed with unique details that capture their personality, from the birdie's cheerful wings to the bunny's fluffy pom-pom tail. The innovative donut-shaped design allows for creative stacking play while making beautiful nursery decor. Perfect for gifting or displaying, these forest friends are sure to bring smiles to faces young and old. ๐ŸŒฒ๐Ÿฆ๐Ÿฐ๐Ÿป Happy crocheting and enjoy creating your very own stackable woodland family! โœจ๐Ÿงถ

You ask,

we answer.

FAQs

What size will my finished forest friends be?

Using the recommended Vanna's Choice yarn and 4.25mm hook, the Birdie will be 4 inches in diameter, Bunny 5 inches, Bear 6 inches, and Tree 7 inches. All characters will be approximately 2 inches tall. Sizes may vary depending on your yarn choice and hook size.

Can I use different yarn weights for this pattern?

Yes, you can use different yarn weights, but this will change the final size of your forest friends. If you use a different weight yarn, make sure to adjust your hook size accordingly and note that the safety eye sizes may also need to be adjusted to maintain proper proportions.

What is the best way to stuff the donut shapes?

Start stuffing after you've sewn about 10% of the way around the donut when closing it. Continue to stuff gradually as you sew, working your way around. This method ensures even distribution of stuffing and prevents overstuffing or understuffing any section.

How do I make the pom-pom tail for the bunny?

Wrap yarn around a 2-inch piece of cardboard approximately 12 times, tie it tightly in the center, cut all loops, and trim into a round shape. Detailed step-by-step instructions with illustrations are provided on page 9 of the pattern.

Do I need to know any special techniques for this pattern?

You should be familiar with the magic ring method, working in continuous spirals, and basic amigurumi techniques. The pattern also uses a seamless decrease method where you skip a stitch rather than crocheting two stitches together for a cleaner look.

Can these forest friends be made child-safe?

Yes! Use safety eyes that lock securely in place, ensure all pieces are sewn on very firmly, and stuff adequately but not too tightly. Always supervise young children with handmade toys and check regularly for any loose parts.