๐Ÿงถ Beautiful โœจ Detailed ๐Ÿ’ Adorable

Boho Bunny Lovey Amigurumi Pattern

Boho Bunny Lovey Amigurumi Pattern
4.6โ˜… Rating
3-4 Hours Time Needed
2.8K Made This
โœ‚๏ธ

Beginner Friendly Level

Perfect for those just starting their sewing journey, with clear instructions and simple techniques

โฑ๏ธ

Bite-Sized Project

Complete in under 2 hoursโ€”quick, fun, and perfect for a little creative escape.

๐Ÿงธ

Cute Companion

An adorable friend to cherish, handcrafted with love to bring comfort and joy for years to come.

About This Boho Bunny Lovey Amigurumi Pattern

This adorable Boho Bunny Lovey combines the sweetness of an amigurumi bunny with the comfort of a soft security blanket. The pattern features a chunky bunny head with long, floppy ears and an embroidered nose that gives it tons of personality. The blanket portion is worked in simple half double crochet stitches and finished with cheerful pom-poms at each corner. Using super bulky yarn means this project works up quickly, making it perfect for last-minute baby gifts or nursery additions.

Boho Bunny Lovey Amigurumi Pattern crochet pattern - detailed view of completed project

The lovey is designed to be both cuddly and durable, with safety eyes that can be securely attached or embroidered for extra safety. The contrast between the detailed bunny head and simple blanket creates a beautiful handmade piece that will be treasured for years.

Why You'll Love This Boho Bunny Lovey Amigurumi Pattern

I absolutely love this pattern because it's the perfect blend of cute and practical! The super bulky yarn means you can finish this lovey in just a few hours, which is amazing when you need a quick gift. I love how the long bunny ears give it that sweet boho vibe, and the pom-poms add such a playful touch. The best part is watching the bunny's personality come to life as you embroider the little noseโ€”it's those small details that make handmade gifts so special. This pattern is forgiving for beginners but still creates something truly adorable that babies will love to snuggle.

Boho Bunny Lovey Amigurumi Pattern step 1 - construction progress Boho Bunny Lovey Amigurumi Pattern step 2 - assembly progress Boho Bunny Lovey Amigurumi Pattern step 3 - details and accessories Boho Bunny Lovey Amigurumi Pattern step 4 - final assembly and finishing

Switch Things Up

I love experimenting with this pattern because there are so many ways to make it your own! Try using different color combinationsโ€”a soft pastel palette creates a dreamy nursery vibe, while bold, modern colors give it a contemporary twist. You could also play with the blanket size by adding more chains and rows to create a larger lovey for toddlers.

I've had fun switching up the yarn textures tooโ€”a fluffy super bulky yarn creates an extra soft and cozy feel, while a smooth yarn gives cleaner stitch definition. Don't be afraid to get creative with the pom-poms either! You can make them in contrasting colors, use multiple colors in one pom, or even skip them entirely for a more minimalist look.

Another idea I love is embroidering little details like rosy cheeks or adding a small bow between the ears for a girl bunny. You could also experiment with different nose shapesโ€”a simple upside-down triangle works beautifully, or you can create a more detailed Y-shaped nose. The possibilities are endless, and each version will have its own unique personality!

Common Mistakes & How to Fix Them

โœ— Forgetting to use stitch markers when working in continuous rounds can cause you to lose your place and create uneven shaping in the head and ears โœ— Not stuffing the head firmly enough as you go results in a floppy bunny head that won't hold its shape properly over time โœ— Placing the safety eyes too far apart or too close together changes the bunny's expression dramatically so always count stitches carefully before securing them โœ— Attaching the ears too low on the head makes the bunny look unbalanced so make sure to position them between rounds five and six as instructed

Boho Bunny Lovey Amigurumi Pattern

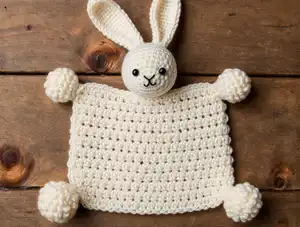
Create this charming boho-style bunny lovey that combines a cuddly amigurumi head with a soft, cozy blanket perfect for little ones. This delightful project features long floppy ears, sweet embroidered details, and playful pom-poms at each corner. Made with super bulky yarn, this lovey works up quickly and makes a wonderful handmade gift for babies and toddlers. The simple construction and clear instructions make it an enjoyable project that results in a treasured keepsake.

Beginner Friendly 3-4 Hours

Materials Needed for Boho Bunny Lovey Amigurumi Pattern

โ€” Main Fabric

  • 01
    Two skeins Wool-Ease Thick & Quick Yarn in Fisherman color or any Super Bulky (6) yarn
  • 02
    Small amount of yarn in contrasting color for nose embroidery (Chunky weight recommended)

โ€” Tools Required

  • 01
    Crochet hook size J (6mm) for head and ears
  • 02
    Crochet hook size P (11.5mm) for blanket portion
  • 03
    Fiberfill for stuffing head
  • 04
    Amigurumi safety eyes (15mm) or embroidery thread for eyes
  • 05
    Stitch markers
  • 06
    Darning needle for sewing
  • 07
    Pom maker size 6.8cm/2.7inch (optional)
  • 08
    Scissors

Progress Tracker

0% Complete

โ€” Head :

Info :

The head is worked in continuous rounds. Use a stitch marker at the start of each round. Start with 6mm hook and Magic Circle, CH 1 (does not count as ST)

Round 1 :

6 SC into MC. Pull Circle Tight. (6)

Round 2 :

INC in each ST around. (12)

Round 3 :

(SC 1, INC) x 6 around. (18)

Round 4 :

(SC 2, INC) x 6 around. (24)

Round 5 :

(SC 3, INC) x 6 around. (30)

Round 6-8 :

SC 1 in each ST around. (30)

Round 9 :

(SC 4, INC) x 6 around. (36)

Round 10-12 :

SC 1 in each ST around. (36)

Info :

Place amigurumi eyes between rounds 8 and 9 about 7 stitches apart. Start stuffing the head here and keep adding stuffing as you continue

Round 13 :

(SC 4, DEC) x 6 around. (30)

Round 14 :

(SC 3, DEC) x 6 around. (24)

Round 15 :

(SC 2, DEC) x 6 around. (18)

Round 16 :

(SC 1, DEC) x 6 around. (12)

Round 17 :

DEC in each ST around. (6)

Info :

Fasten off and leave long tail. Sew opening shut by weaving tail in and out of remaining stitches with yarn needle. Keep tail long and move on to blanket portion

โ€” Ear (Make Two) :

Info :

The ears are worked in continuous rounds. Use a stitch marker at the start of each round. Start with 6mm hook and Magic Circle, CH 1 (does not count as ST)

Round 1 :

4 SC into MC. Pull Circle Tight. (4)

Round 2 :

INC in each ST around. (8)

Round 3 :

SC 1 in each ST around. (8)

Round 4 :

(SC 1, INC) x 4 around. (12)

Round 5 :

(SC 3, INC) x 3 around. (15)

Round 6 :

(SC 4, INC) x 3 around. (18)

Round 7-11 :

SC 1 in each ST around. (18)

Round 12 :

(SC 4, DEC) x 3 around. (15)

Round 13-17 :

SC 1 in each ST around. (15)

Round 18 :

(SC 3, DEC) x 3 around. (12)

Round 19-24 :

SC 1 in each ST around. (12)

Round 25 :

(SC 2, DEC) x 3 around. (9)

Round 26 & 27 :

SC 1 in each ST around. (9)

Info :

Press the top together and crochet 4 SC across (through both sides). Fasten off and leave long tail for sewing

โ€” Blanket :

Info :

Use 11.5mm hook and CH 21

Row 1 :

Turn and HDC in second CH from hook and in each across, CH 1. (20)

Row 2-15 :

Repeat Row 1

Info :

Fasten Off

โ€” Poms :

Info :

Make 4 (One for each corner of blanket)

Assembly Instructions

  • Attach ears to head between rounds 5 and 6, centered to back of head with about five stitches between them.
  • Once ears are securely attached to the head, position the completed head at the center of the blanket.
  • Attach head to center four stitches of blanket by weaving long tail of head through the stitches and into the head over and over until attachment feels secure.
  • Attach one pom to each corner of the blanket by first tying tails of poms through a stitch at the corner and double knotting.
  • Sew in the pom ends to blanket securely to ensure they don't come loose.
  • Using contrasting nose color and needle, embroider the nose onto the head starting from the chin area.
  • Bring yarn up between rounds 9 and 10 about 2 stitches from right eye, stitch across 3 stitches to the left, then create a vertical stitch down the center to form the nose shape.
  • Tie a knot with beginning and end tail at chin and sew all ends into head, then trim all excess yarn.

Important Notes

  • ๐Ÿ’กUse stitch markers when working in continuous rounds to avoid losing your place in the pattern
  • ๐Ÿ’กStuff the head firmly as you go rather than waiting until the end for better shaping
  • ๐Ÿ’กIf making this for a baby, consider embroidering the eyes instead of using safety eyes for extra safety
  • ๐Ÿ’กThe long tail left after completing the head is essential for attaching it to the blanket so don't trim it
  • ๐Ÿ’กMake sure pom-poms are securely attached with double knots as they can be a choking hazard if they come loose
  • ๐Ÿ’กSuper bulky yarn creates a chunky, cuddly texture perfect for loveys and works up much faster than standard weight yarn

This sweet Boho Bunny Lovey pattern brings together the charm of amigurumi and the comfort of a security blanket in one adorable project! The chunky bunny head with its floppy ears and embroidered nose creates an instant friend for any little one, while the soft blanket provides cuddles and comfort. Perfect for baby showers, nursery gifts, or welcoming a new arrival, this lovey will quickly become a treasured keepsake. The super bulky yarn makes this a quick and satisfying project that's as fun to make as it is to give! ๐Ÿฐ๐Ÿงถโœจ

You ask,

we answer.

FAQs

Can I use a different yarn weight for this pattern?

While the pattern is designed for super bulky yarn, you can use a different weight but you'll need to adjust your hook size accordingly and the finished size will be different. The charm of this pattern is how quickly it works up with chunky yarn.

Is this lovey safe for newborns?

Yes, but consider embroidering the eyes instead of using safety eyes for babies under 12 months, and make sure all pom-poms are securely attached with multiple knots and reinforced stitching.

How do I keep track of rounds when working continuously?

Place a stitch marker in the first stitch of each round and move it up as you complete each round. This prevents you from losing your place and ensures even shaping.

Can I make the blanket portion larger?

Absolutely! Simply add more chains at the beginning to make it wider and work more rows to make it longer. Just remember you'll need extra yarn if you increase the blanket size.

What's the best way to attach the head to the blanket?

Use the long tail left from the head and weave it through the center stitches of the blanket multiple times, going back and forth between the blanket and head until it feels very secure.