🧢 Beautiful ✨ Detailed πŸ’ Adorable

Forest Dragon Amigurumi Pattern

Forest Dragon Amigurumi Pattern
4.3β˜… Rating
80-100 Hours Time Needed
3.2K Made This
βœ‚οΈ

Advanced Level

Designed for experienced knitters, these patterns involve intricate designs and complex techniques to challenge and inspire.

⏱️

Epic Journey

A monumental project requiring 80-100 hours of dedicated workβ€”perfect for those who want to create a true masterpiece over several weeks.

πŸ‰

Whimsical Buddy

Playful characters full of personality, designed to spark imagination and become cherished playtime favorites.

About This Forest Dragon Amigurumi Pattern

This Forest Dragon pattern is an advanced-level amigurumi project that creates a magnificent 8-foot 6-inch dragon from nose to tail tip. The pattern includes detailed instructions for creating every element of this majestic creature, from its textured body and articulated wings to its decorated tail and expressive face. With multiple color changes, intricate assembly techniques, and professional finishing details, this pattern will challenge your crochet skills while rewarding you with an absolutely stunning finished piece.

Forest Dragon Amigurumi Pattern crochet pattern - detailed view of completed project

Using approximately 35 skeins of yarn in coordinating greens, browns, and accent colors, this pattern guides you through creating individual components including the body, four legs with detailed toes and claws, posable wings with membrane details, an elaborate head with eyes and face, decorative spine ridges, and a spectacular tail with feather-like embellishments.

Why You'll Love This Forest Dragon Amigurumi Pattern

I absolutely love this pattern because it's the ultimate challenge for any serious amigurumi crocheter! The level of detail is incredibleβ€”from the individually crafted toes with claws to the layered wing membranes with embroidered veins. I'm amazed by how the pattern breaks down such a complex project into manageable pieces, and the final assembly creates something truly museum-worthy. The size alone is impressive, but it's the small touches like the textured back stripe, the feathered tail decorations, and the expressive face that make this dragon come alive. This is the kind of project that pushes your skills to new heights and gives you bragging rights for years to come!

Forest Dragon Amigurumi Pattern step 1 - construction progress Forest Dragon Amigurumi Pattern step 2 - assembly progress Forest Dragon Amigurumi Pattern step 3 - details and accessories Forest Dragon Amigurumi Pattern step 4 - final assembly and finishing

Switch Things Up

I absolutely love customizing this dragon pattern to create unique variations! One of my favorite modifications is changing the color scheme - imagine a frost dragon in icy blues and whites, or a fire dragon in oranges, reds, and blacks. The pattern's structure works beautifully with any color palette.

For a more challenging twist, I sometimes add wire armature throughout the entire body, legs, and tail to make the dragon fully posable. This requires careful planning during assembly, but the result is incredible - you can position your dragon in dynamic flying poses or curled protectively around treasure.

I've also experimented with the wing membranes by using a lighter weight yarn in a coordinating color to create a more delicate, translucent appearance. Some crocheters even use sheer fabric backed with crochet edging for an ethereal look.

The tail decorations offer wonderful creative opportunities too. Instead of the feathered design, I've created scale-like plates or added small crocheted gems. You could also make the tail end into a club shape for an ankylosaurus-dragon hybrid, or add a pointed barb for a more dangerous look.

Consider adding extra embellishments like small crocheted treasure pieces, chains with metallic yarn, or embroidered mystical symbols along the spine. I've even given dragons embroidered tribal markings or battle scars for added character and story.

The facial expression can be modified by changing eye placement and size - closer eyes create a more intimidating look, while wider-set eyes appear friendlier. You can also add eyelids or eyebrows for more expression.

For a truly unique piece, try giving your dragon functional elements like a small pouch attached to its side for hiding treasures, or create a removable saddle and rider for an adventure-ready companion. The possibilities are endless with this versatile pattern!

Common Mistakes & How to Fix Them

βœ— Not maintaining consistent tight stitches throughout, which causes stuffing to show through the fabric especially in the body and head sections βœ— Skipping the stuffing-as-you-go instruction for long pieces like the tail and neck, making it nearly impossible to stuff properly later βœ— Forgetting to leave long tails for sewing as specified, then struggling with weak connections between heavy pieces like wings and legs βœ— Not using stitch markers consistently during the complex back stripe and wing construction, leading to misaligned patterns and uneven shaping βœ— Rushing the assembly without pinning pieces first, resulting in crooked leg placement or wings that don't align properly with the body βœ— Understuffing the wings and legs, causing them to be floppy instead of maintaining their sculptural shape and posability

Forest Dragon Amigurumi Pattern

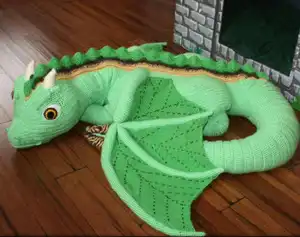
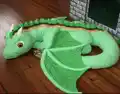
Create your own majestic forest dragon with this incredibly detailed amigurumi pattern! This stunning 8.5-foot dragon features articulated wings, intricate scales, and lifelike details that will captivate any dragon lover. With its impressive size and professional finish, this pattern guides you through creating a showstopping piece complete with textured spine ridges, detailed claws, and a magnificent tail. Perfect for experienced crocheters ready to take on an ambitious project that showcases advanced techniques and results in a truly spectacular finished piece.

Advanced 80-100 Hours

Materials Needed for Forest Dragon Amigurumi Pattern

β€” Main Fabric

  • 01
    22 skeins Caron Simply Soft yarn, 6oz, 315yds, Limelight (light green)
  • 02
    4 skeins Caron Simply Soft yarn, 6oz, 315yds, Kelly Green
  • 03
    2 skeins Caron Simply Soft yarn, 6oz, 315yds, Bone
  • 04
    2 skeins Caron Simply Soft yarn, 6oz, 315yds, Chocolate
  • 05
    2 skeins Caron Simply Soft yarn, 6oz, 315yds, Dark Sage
  • 06
    1 skein Caron Simply Soft yarn, 6oz, 315yds, White
  • 07
    1 skein Caron Simply Soft yarn, 6oz, 315yds, Black
  • 08
    1 skein Caron Simply Soft yarn, 6oz, 315yds, Gold
  • 09
    1 skein Caron Simply Soft yarn, 6oz, 315yds, Off White

β€” Tools Required

  • 01
    5mm/H crochet hook
  • 02
    Large eye needle for sewing
  • 03
    Stuffing (alpaca fiber or polyester fiberfill)
  • 04
    Stitch markers
  • 05
    Pins for assembly
  • 06
    Scissors
  • 07
    Wire for posable elements (optional)

Progress Tracker

0% Complete

β€” BODY :

Round 1 :

2 CH, 6sc into second chain from hook using double yarn, light green (6)

Round 2 :

2sc in each (12)

Round 3 :

(1sc, 2sc in next) x 6 (18)

Round 4 :

(2sc, 2sc in next) x 6 (24)

Round 5 :

(3sc, 2sc in next) x 6 (30)

Round 6 :

(4sc, 2sc in next) x 6 (36)

Round 7 :

(5sc, 2sc in next) x 6 (42)

Round 8 :

(6sc, 2sc in next) x 6 (48)

Round 9 :

(7sc, 2sc in next) x 6 (54)

Round 10 :

(8sc, 2sc in next) x 6 (60)

Round 11 :

(9sc, 2sc in next) x 6 (66)

Round 12 :

(10sc, 2sc in next) x 6 (72)

Round 13 :

(11sc, 2sc in next) x 6 (78)

Round 14 :

(12sc, 2sc in next) x 6 (84)

Round 15 :

(13sc, 2sc in next) x 6 (90)

Round 16 :

(14sc, 2sc in next) x 6 (96)

Round 17 :

(15sc, 2sc in next) x 6 (102)

Round 18 :

(16sc, 2sc in next) x 6 (108)

Round 19 :

(17sc, 2sc in next) x 6 (114)

Round 20 :

(18sc, 2sc in next) x 6 (120)

Round 21-26 :

sc in each (120)

Round 27 :

Row: 50sc, 1ss, ch, turn

Round 28 :

Row: A) skip next, 2sc, 45hdc, 2sc, 1ss, ch, turn B) skip next, 2sc, 45hdc, 2sc, 69sc

Round 29-36 :

sc in each (118)

Round 37 :

Row: 48sc, 1ss, ch, turn

Round 38 :

Row: A) skip next, 2sc, 43hdc, 2sc, 1ss, ch, turn B) skip next, 2sc, 43hdc, 71sc

Round 39 :

(56sc, sc2tog) x 2 (114)

Round 40-46 :

sc in each (114)

Round 47 :

Row: 45sc, 1ss, ch, turn

Round 48 :

Row: A) skip next, 2sc, 40hdc, 2sc, 1ss, ch, turn B) skip next, 2sc, 40hdc, 70sc

Round 49 :

(54sc, sc2tog) x 2 (110)

Round 50-56 :

sc in each (110)

Round 57 :

(9sc, sc2tog) x 10 (100)

Round 58-82 :

sc in each (100)

Round 83 :

(8sc, sc2tog) x 10 (90)

Round 84-93 :

sc in each (90)

Round 94 :

(7sc, sc2tog) x 10 (80)

Round 95-99 :

sc in each (80)

Round 100 :

(6sc, sc2tog) x 10 (70)

Round 101-105 :

sc in each (70)

Round 106 :

(5sc, sc2tog) x 10 (60)

Round 107 :

(4sc, sc2tog) x 10 (50)

Round 108 :

(3sc, sc2tog) x 10 (40)

Round 109 :

(2sc, sc2tog) x 10 (30)

Round 110 :

(4sc, sc2tog) x 5 (25) - Stuff body

Round 111 :

(3sc, sc2tog) x 5 (20)

Round 112 :

(2sc, sc2tog) x 5 (15)

Round 113 :

(1sc, sc2tog) x 5 (10)

Round 114 :

sc2tog x 5, fo (5)

β€” BACK LEGS (Make 2) :

Info :

Start with toes using MR, make 3 for each foot. Double thread, light green. Note: some directions are specific to left vs right leg.

Toe Round 1 :

6sc in MR (6)

Toe Round 2 :

2sc in each (12)

Toe Round 3-4 :

sc in each (12)

Toe Round 5 :

Row: 1ss, ch, turn, 1ss, 3sc, 1ss (5), ch, turn

Toe Round 6 :

Row: 1ss, 3sc, 1ss (5), place new stitch marker

Toe Round 7 :

sc in each (12)

Toe Round 8 :

(2sc in next, 2sc) x 4 (16)

Toe Round 9 :

sc in each (16)

Toe Round 10 :

Row: 1ss, ch, turn, 1ss, 6sc, 1ss, ch, turn

Toe Round 11 :

Row: 1ss, 6sc, 1ss, place new stitch marker

Toe Round 12 :

sc in each (16)

Toe Round 13 :

(2sc in next, 3sc) x 4 (20)

Toe Round 14-15 :

sc in each (20) - fo first two toes, leave third toe attached with long tails

Round 16 :

10sc continuing in third toe, 10sc in second toe, 20sc around first toe, sc in opposite 10 sts of second toe, sc in opposite 10 sts of third toe (60), place new marker

Round 17-19 :

sc in each (60)

Round 20 :

9sc, sc2tog, 8sc, sc2tog, 17sc, sc3tog, 7sc, sc3tog, 9sc (54)

Round 21-22 :

sc in each (54)

Round 23 :

8sc, sc2tog, 7sc, sc2tog, 15sc, sc3tog, 7sc, sc3tog, 7sc (48)

Round 24-25 :

sc in each (48)

Round 26 :

7sc, sc2tog, 7sc, sc2tog, 12sc, sc3tog, 7sc, sc3tog, 5sc (42)

Round 27-46 :

sc in each (42)

Round 47 :

Row: 28sc, 1ss, ch, turn

Round 48 :

Complex row with 16 steps (a-p) creating back leg shaping with multiple turns and slip stitches

Round 49 :

sc in each (42)

Round 50 :

26sc, (2sc in next x 16) (58) - stuff foot

Round 51-52 :

sc in each (58)

Round 53 :

9sc, (2sc in next x 6), 43sc (64)

Round 54 :

12sc, (2sc in next x 6), 46sc (70)

Round 55-56 :

sc in each (70)

Round 57 :

Left: 28sc, ch, turn / Right: 52sc, 2sc in next x 4, 6sc, ch, turn

Round 58 :

Left: 42sc, 2sc in next x 4, 6sc, ch, turn / Right: skip to next row

Round 59 :

56sc, ch, turn

Round 60-97 :

Continue with detailed shaping rows, decreasing from 60 to 4 stitches, fo, llt

β€” FRONT LEGS (Make 2) :

Info :

Start with toes using MR, make 3 for each foot. Double thread, light green.

Toe Round 1-14 :

Similar toe construction as back legs

Round 15-86 :

Detailed front leg shaping from foot assembly through upper leg to shoulder attachment point

β€” TAIL :

Prep :

85 CH, make a ring with ss, double thread, llt, light green

Round 1-165 :

Extensive tail construction with gradual decreasing and decorative spine ridges created through complex row work

β€” NECK :

Prep :

75 CH, make a ring, double thread, leave long tail for sewing, light green

Round 1-28 :

Neck construction with spine ridge details, decreasing from 75 to 1 stitch

β€” HEAD :

Round 1 :

2 CH, 6sc into second chain from hook, double thread, light green (6)

Round 2-54 :

Head construction increasing to 132 stitches then decreasing back down to 6, with stuffing

β€” EYES (Make 2) :

Info :

Double thread, colors: white, gold, brown, black. Chain 2 to start

Round 1-14 :

Multi-colored eye construction with color changes creating iris and pupil details

β€” FACE :

Prep :

26 chain, double yarn, light green

Round 1-38 :

Face/muzzle construction with eye socket openings and snout shaping

β€” TAIL END DECORATION (Make 3) :

Prep :

Double yarn, leave very long tail, brown and light brown. Chain 2 to start

Round 1-135 :

Elaborate feather-like decoration using back loop/front loop alternating technique, creating textured ridges

β€” CLAWS (Make 12) :

Prep :

Double thread, cream, 5CH, llt

Round 1-3 :

Small claw construction: 4sc in original ch, 4ch (8), then sc2tog x 4 (4), then sc2tog x 2 (2), fo

β€” HORNS (Make 2) :

Prep :

MR, double yarn, cream

Round 1-11 :

3sc in mr (3), increasing gradually to 21 stitches with sc and hdc, 1ss, fo, llt

β€” NOSTRILS (Make 2) :

Prep :

Double yarn, light green, 6ch

Row 1 :

Starting in second ch from hook: 1ss, 1sc, 1hdc, 1sc, 1ss

β€” LIPS :

Info :

Light green, double yarn, use foundation single crochet (fsc) technique

Row 1 :

3fsc, 24sc directly on muzzle starting in 4th mouth stitch, 3fsc. Stitch edges to create smile

β€” LOWER JAW :

Prep :

15 chain, double yarn, light green

Round 1-9 :

Jaw construction from 29 to 53 stitches, fo, llt

β€” WING FINGERS :

Wing Finger A (Make 2) :

18ch ring, double yarn, light green, llt. Rounds 1-50 creating longest finger that attaches to body

Wing Finger B (Make 2) :

18ch ring, double yarn, light green. Rounds 1-109 creating farthest finger from body

Wing Finger C (Make 2) :

16ch ring, double yarn, light green. Rounds 1-81 creating inside finger next to B

Wing Finger D (Make 2) :

16ch ring, double yarn, light green, llt. Rounds 1-61 creating finger between A and C
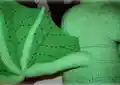
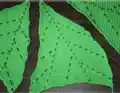
β€” WING SKIN MEMBRANES :

Wing Skin A (Make 2) :

Single yarn, green and dark green. 2ch start, rows 1-81 creating membrane closest to body with optional embroidered veins

Wing Skin B (Make 2) :

Single yarn, green. 2ch start, rows 1-94 creating middle membrane with optional embroidered veins

Wing Skin C (Make 2) :

Single yarn, green. 2ch start, rows 1-128 creating membrane farthest from body with optional embroidered veins

β€” BACK STRIPE :

Prep :

201 chain with light brown, double yarn, using dark green, medium green, light brown, and brown

Round 1-26 :

Complex decorative spine stripe using front loop/back loop technique, reverse crochet stitches, and multi-color layering to create dimensional ridges

Assembly Instructions

  • Attach back legs beside the body slightly overlapping the back curve (skinnier half), allowing front part of upper leg to fold naturally. Whip stitch around opening, leaving hand-sized gap for stuffing, then complete sewing. Use toe tails to close gaps between toes.
  • Position front legs beside body overlapping the front curve (larger half), with right leg over left. Attach left leg first, then right leg. Whip stitch with hand-sized opening for stuffing, complete sewing. Close toe gaps with tails.
  • Stuff tail firmly before starting assembly. Attach tail to rump and very top of thighs with bottom resting on ground for stability. Ensure tail tip doesn't enter leg opening. Leave room for tail decorations.
  • Attach neck to body with narrow portion facing front at shoulder and V pointing down middle of back, curving over front leg. Use long tail to whip stitch securely.
  • Sew eyes into face sockets pointing slightly toward front and down. Connect face to head going 1-2 inches past largest portion, stuffing carefully around eyes. Line up bumps from decreases at top center, cheekbones, and jawline.
  • Attach completed head with face to neck, careful of angle so head appears to rest on arm naturally.
  • Flatten and stitch wing finger ends together: B and A together, then C and D together. Stitch C/D assembly into middle of A/B assembly. Attach wing membranes to fingers, optionally embroider vein details first.
  • Attach completed wings to body just above and back from shoulder with very firm stitching, stuffing firmly. Wings designed to open and close.
  • Place tail end decorations (3 pieces) equidistant on upward-facing side of tail, starting just back from tip. Pin then stitch securely, not attaching to ground-touching portion.
  • Attach 12 claws with flat portion just below first knuckle of each toe, claw portion covering toe tip.
  • Stitch horns beside eyebrows at back end with tips pointing slightly back, stuffing as you sew.
  • Position nostrils at corners of muzzle forming a U shape.
  • Attach lips creating small smile, starting at 4th mouth stitch.
  • Position lower jaw below lip extending toward neck, stuff lightly with gradual stuffing toward neck to avoid bulge.
  • Place back stripe starting between eyes to cover top holes from face decreases, centering down to tail curve. Go between horns and over wing tops. Whip stitch along entire length after pinning and double-checking centering.

Important Notes

  • πŸ’‘Use double yarn throughout except where specified as single yarn (wing membranes and back stripe details)
  • πŸ’‘Maintain tight, consistent stitches to prevent stuffing from showing through, especially important in body and head
  • πŸ’‘Crochet counterclockwise with hands inside piece for body parts (except eyes which go clockwise) to minimize visible rows
  • πŸ’‘Leave long tails as specified for sewing - this is critical for securing heavy pieces like wings and legs
  • πŸ’‘Stuff firmly as you go for long pieces like tail and neck - impossible to stuff properly if left until end
  • πŸ’‘Use stitch markers religiously during complex sections like back stripe and wing construction to maintain alignment
  • πŸ’‘Pin all major pieces before final sewing to ensure proper positioning and symmetry
  • πŸ’‘Wings require extra-sturdy attachment with very firm stitching as they're the most handled part if given to children
  • πŸ’‘Optional alpaca fiber stuffing is more compactable and heavier than fiberfill but requires more effort; polyester fiberfill works well too

This spectacular Forest Dragon pattern represents the pinnacle of amigurumi artistry, combining advanced techniques with meticulous attention to detail. From the individually sculpted toes and claws to the layered wing membranes with embroidered veins, every element has been thoughtfully designed to create a truly museum-quality piece. The pattern may be challenging, but the result is an 8.5-foot masterpiece that will be treasured for generations. Whether displayed majestically with wings spread or curled protectively around itself, this dragon embodies the magic and wonder of fantasy brought to life through the art of crochet. πŸ‰βœ¨

You ask,

we answer.

FAQs

How much yarn do I really need for this massive project?

You'll need approximately 35 skeins total: 22 skeins of Limelight (main light green), 4 Kelly Green, 2 each of Bone, Chocolate, and Dark Sage, plus 1 skein each of White, Black, Gold, and Off White. It's better to have extra of the main color as running out---mid-project would be frustrating.

Can I use a different yarn weight or brand?

While you can substitute yarns, using a different weight will significantly change the finished size. If using heavier yarn with a larger hook, your dragon could be 10+ feet long. Make sure all your yarns are the same weight for consistent results, and choose yarns with good stitch definition for the intricate details.

What's the best stuffing method for such a large project?

Stuff firmly but not overly tight, and most importantly, stuff as you go for long pieces like the tail, neck, and legs. The pattern creator recommends alpaca fiber for better shape retention and weight, but quality polyester fiberfill works well. Use small amounts at a time and push to the ends with a wooden spoon handle or dowel.

How do I keep track of my place in such a complex pattern?

Use multiple stitch markers of different colors for different purposes, keep detailed notes of which round you're on, and consider printing the pattern to physically check off completed rounds. For the back stripe and wing construction especially, markers are essential to maintain the complex patterns.

Are the wings sturdy enough or will they be floppy?

If stuffed firmly as directed and attached with strong stitching, the wings will maintain their shape beautifully. The pattern creates a sturdy internal structure with the wing fingers. You can also insert wire into the wing fingers if you want them to be posable, though this isn't required.

How long will this project actually take?

Plan for 80-100 hours minimum depending on your crochet speed and experience level. Many crocheters work on this as a long-term project over several weeks or even months. The intricate details like the back stripe, wing membranes, and tail decorations are time-intensive but create the spectacular finished result.

Can I make this dragon smaller?

To make it smaller, use a thinner yarn with a smaller hook and reduce your starting chain counts proportionally. However, scaling down this pattern requires significant math and pattern adjustment skills. Consider that many of the details that make this dragon impressive rely on the larger scale.

What's the hardest part of this pattern?

Most crocheters find the back stripe with its multiple color layers and reverse crochet technique most challenging, followed by the wing membrane attachment and the complex leg shaping. The pattern provides detailed instructions, but these sections require patience and careful attention to avoid mistakes.