🧶 Beautiful ✨ Detailed 💝 Adorable

Festive Light Bulbs Amigurumi Pattern

Festive Light Bulbs Amigurumi Pattern
4.1★ Rating
3-4 Hours Time Needed
2.3K Made This
✂️

Intermediate Level

Ideal for those with basic knitting experience, featuring slightly more advanced stitches and techniques to expand your skills.

⏱️

Weekend Treat

Takes 5-7 hours, making it an enjoyable project to finish over a couple of days.

🎄

Holiday Cheer

Festive fun for the season, bringing handmade magic to celebrations and creating new family traditions.

About This Festive Light Bulbs Amigurumi Pattern

This festive light bulb pattern combines classic amigurumi techniques with creative construction details to create a charming string of decorative lights. Each bulb features a rounded main body worked in continuous rounds, transitioning to a cap section with a unique coiled screw detail created using back loop only stitches. The pattern includes instructions for crafting individual sockets that connect together with chain stitches, allowing you to customize the length of your light strand. You can personalize each bulb with safety eyes and embroidered facial features to give them distinct personalities.

Festive Light Bulbs Amigurumi Pattern crochet pattern - detailed view of completed project

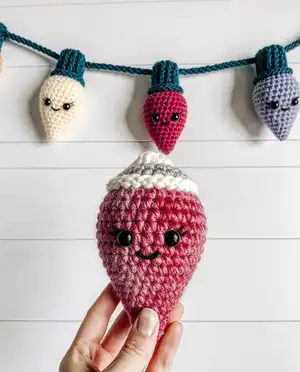
The innovative socket design creates a snug fit that keeps your bulbs secure while allowing them to be twisted in and out for interactive display. This pattern uses chunky Bernat Blanket yarn for a soft, cozy texture that works up quickly and creates substantial, huggable decorations.

Why You'll Love This Festive Light Bulbs Amigurumi Pattern

I absolutely love how this pattern brings together nostalgia and creativity in such a unique way! The interactive element of being able to twist the bulbs in and out of their sockets adds a playful touch that makes these more than just static decorations. I'm obsessed with how you can create an entire string of lights in different colors and give each one its own personality through facial expressions. The back loop only technique for creating the screw threads is such a clever construction detail that adds authentic dimension. What really makes my heart happy is how versatile this pattern is—you can make them festive for holidays or bright and cheerful for year-round decor. Plus, working with chunky yarn means these adorable lights come together faster than you'd expect, giving you that satisfying finished project feeling without the marathon crafting session.

Festive Light Bulbs Amigurumi Pattern step 1 - construction progress Festive Light Bulbs Amigurumi Pattern step 2 - assembly progress Festive Light Bulbs Amigurumi Pattern step 3 - details and accessories Festive Light Bulbs Amigurumi Pattern step 4 - final assembly and finishing

Switch Things Up

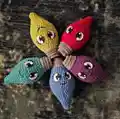
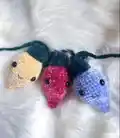
I love experimenting with color combinations to create different moods with these adorable light bulbs! For a classic Christmas look, try traditional red, green, and white bulbs on a dark green or brown cord. If you're feeling more modern, go for a monochromatic scheme with various shades of blue or pink for a cohesive, contemporary vibe.

Size variations are another fun way to personalize this pattern. Using worsted weight yarn with a smaller hook creates delicate mini lights perfect for tree ornaments or gift tags. On the flip side, working with super bulky yarn makes oversized statement pieces that work beautifully as floor cushions or quirky room decorations.

I've experimented with adding extra embellishments like tiny bows at the base of each bulb or even small jingle bells hidden inside for a surprise sound element. Some crafters in the community have created themed sets—pastel colors for spring, orange and purple for Halloween, or patriotic red, white, and blue for summer celebrations.

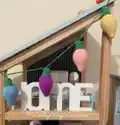
The socket system is surprisingly versatile too. Instead of creating one long strand, I've made individual socket cords for each bulb to create a more flexible display where you can arrange them in different configurations. This works especially well if you want to drape them over a mantle or bookshelf where spacing needs to vary.

Common Mistakes & How to Fix Them

✗ Forgetting to place stitch markers for the screw coil in rounds 23 and 25 can make it difficult to locate where to add the front loop stitches later on ✗ Not stuffing the bulb tip firmly enough at the beginning can result in a flat or misshapen bulb that doesn't have the classic rounded light bulb appearance ✗ Making the socket too loose or too tight will prevent the bulb from fitting properly—adjust your tension to ensure a snug but workable fit ✗ Closing the cap opening before completing the screw coil detail will make it impossible to add this decorative element without undoing your work

Festive Light Bulbs Amigurumi Pattern

Create your own adorable string of festive crochet light bulbs with this delightful amigurumi pattern! These charming decorative lights feature expressive faces, colorful bulbs, and a detailed screw cap design that makes them perfect for holiday decor or year-round display. Each light bulb is connected with a cord socket system that allows you to twist them in and out, adding an interactive element to your handmade creation. This pattern includes complete instructions for crafting multiple bulbs in your favorite colors, along with tips for creating unique personalities through embroidered facial features.

Intermediate 3-4 Hours

Materials Needed for Festive Light Bulbs Amigurumi Pattern

— Main Fabric

  • 01
    Bernat Blanket Yarn (Size 6) in main bulb color - approximately 48g per bulb
  • 02
    Bernat Blanket Yarn (Size 6) in cap color - approximately 10g per bulb
  • 03
    Bernat Blanket Yarn (Size 6) in socket and cord color - approximately 13g per socket

— Tools Required

  • 01
    Size 6 mm (J) crochet hook
  • 02
    Scissors
  • 03
    Yarn needle
  • 04
    Stitch markers (including secondary color marker)
  • 05
    16 mm safety eyes in black
  • 06
    Polyester fiberfill stuffing
  • 07
    Extra yarn for embroidery (optional for facial features)

Progress Tracker

0% Complete

— Lightbulb (Using the Bulb Colour) :

Round 1 :

MR 6 SC [6]

Round 2 :

(SC, INC) x 3 [9]

Round 3 :

SC around [9]

Round 4 :

(2 SC, INC) x 3 [12]

Round 5 :

SC around [12]

Round 6 :

(SC, INC) x 6 [18]

Round 7 :

SC around [18]

Round 8 :

(2 SC, INC) x 6 [24]

Round 9 :

SC around [24]

Round 10 :

(3 SC, INC) x 6 [30]

Round 11 :

SC around [30]

Round 12 :

(4 SC, INC) x 6 [36]

Round 13-16 :

SC around [36] (4 Rounds)

Round 17 :

(4 SC, DEC) x 6 [30]

Round 18-19 :

SC around [30] (2 Rounds)

Info :

If placing safety eyes, place between rows 15 and 16 about 5 stitches apart

Info :

Start Stuffing, making sure to fill the tip of your bulb and work the fill evenly around your bulb

Round 20 :

(3 SC, DEC) x 6 [24]

Round 21 :

SC around [24]

Round 22 :

(2 SC, DEC) x 6 [18]

Info :

Switch to Cap Colour for Bulb

— Using the Cap Colour for Bulb :

Round 23 :

IN BLO SC, place a secondary stitch marker colour in front loop of this stitch to leave behind as you continue around. This will be the start of your screw later. Continue around IN BLO SC [18]

Round 24 :

IN BLO SC around [18]

Round 25 :

IN BLO SC around, in very last stitch place another stitch marker in the front loop, marking it as the end of your screw [18]

Round 26 :

IN BLO DEC x 9 around [9]

Info :

Fasten off, leaving tail, but do not close opening yet

Info :

Using the same yarn colour for the cap of your bulb, go back to the first front loop that was marked with a stitch marker. SLST your yarn and continue around SLSTing in every front loop until you reach the last stitch marker

Info :

Remove last stitch marker, place one more SLST and fasten off weaving in both ends of the coil you just created

Info :

Continue stuffing your bulb, making sure the bulb and cap are on the firmer side. Close up opening and weave in tail

Info :

Now you can give your light bulbs some personality and faces by adding cheeks, mouth, eyebrows, whatever you would like. You can also leave them as they are with or without eyes

— Socket and Cord (Using the socket and cord colour) :

Round 1 :

MR 9 SC [9]

Round 2 :

INC x 9 around [18]

Round 3 :

IN BLO SC around [18]

Round 4-8 :

SC around [18] (5 Rounds)

Info :

SLST, then Fasten off, weaving in your tail ends

Info :

Make as many that is required for joining all your lights together

Info :

NOTE: If you find the light bulb is a little loose or tight, adjust tension to make sure you have a fit that allows the bulb to be twisted in

— Chaining the Sockets Together :

Step 1 :

Start by CHing 30, then taking a socket, SC through the top on one side of the MR, where the first row was made

Step 2 :

Move to the other side of the MR, opposite of the SC you just made, place another SC through the top of your socket. This will keep your lightbulb even while hanging

Step 3 :

CH 20 and repeat the process of attaching sockets until you have reached the last one, making sure to keep even distance between your bulbs

Step 4 :

After attaching the last socket, CH 30 so you have extra length on ends and fasten off

Info :

You can weave in your ends or leave them to help hang your lights

Info :

Place your bulbs in the sockets. They will be a very snug fit, which is what you want to make sure the lightbulb does not fall out easily. Turning the bulb helps the light shimmy in its socket, which is the fun aspect of the festive lights

Assembly Instructions

  • Create as many bulbs as desired in your chosen color combinations, making sure each is firmly stuffed before closing.
  • Crochet the required number of sockets to match your bulbs, adjusting tension if needed for a snug but workable fit.
  • Begin the cord by chaining 30 stitches to create the starting length for hanging.
  • Attach the first socket by working single crochet stitches through opposite sides of the magic ring opening to keep it centered on the cord.
  • Chain 20 stitches between each socket to create consistent spacing along your light strand.
  • Continue attaching sockets with 20-chain spacing until all sockets are connected to the cord.
  • Finish with 30 chains after the last socket to create matching length on both ends for easy hanging.
  • Twist each bulb into its corresponding socket, using a gentle turning motion to work it into the snug fit.
  • Add embroidered facial features like cheeks, mouths, or eyebrows to give each bulb unique personality and charm.

Important Notes

  • 💡Use stitch markers carefully to track the beginning and end points of your screw coil in rounds 23-25
  • 💡Maintain consistent tension throughout to ensure all bulbs are the same size and fit properly in their sockets
  • 💡Stuff bulbs firmly, especially at the tip, to achieve the classic rounded light bulb shape
  • 💡If safety eyes are difficult to insert through chunky yarn, pre-mark placement and create small openings with your hook
  • 💡The back loop only technique in the cap section creates the ridges needed for the screw thread effect
  • 💡Test fit your first bulb in its socket before making multiple pieces to ensure proper tension
  • 💡Leave yarn tails long enough when fastening off to make weaving in easier with thick yarn

This charming Festive Light Bulbs pattern brings warmth and whimsy to any space with its adorable crochet decorations! The clever construction combines amigurumi basics with innovative techniques like the back loop screw detail and interactive socket system. Perfect for creating personalized holiday decor or cheerful year-round accents, these sweet bulbs can be customized with endless color combinations and facial expressions. Whether you display them as a garland, use them as gift toppers, or simply enjoy them as cuddly companions, this pattern offers both creative satisfaction and delightful results. 🧶 Light up your crafting with this joyful project! ✨💡

You ask,

we answer.

FAQs

Can I use a different yarn weight for this pattern?

Yes, you can use different yarn weights, but be sure to adjust your hook size accordingly and note that using lighter weight yarn will create smaller bulbs. The pattern is optimized for chunky Bernat Blanket yarn (Size 6) which creates substantial, huggable decorations that work up quickly.

How do I make sure my bulbs fit properly in the sockets?

The pattern notes that fit should be snug but workable. If your first bulb is too loose or tight in the socket, adjust your tension—crochet tighter if it's loose, or looser if it's too tight. Test your first complete bulb and socket set before making multiples to ensure proper fit.

Do I have to add faces to the light bulbs?

No, facial features are completely optional! The pattern mentions you can leave them plain with or without eyes. Some crafters prefer the clean, simple look while others enjoy giving each bulb personality with embroidered features like cheeks, mouths, and eyebrows.

How many light bulbs should I make for a complete strand?

The pattern allows you to make as many bulbs as you'd like to customize your strand length. A typical decorative strand might include 5-8 bulbs, but you can adjust based on where you plan to display them and your available crafting time and materials.

What's the best way to create the screw coil detail?

The key is placing stitch markers accurately in rounds 23 and 25 to mark where your coil begins and ends. After completing round 26, return to the marked front loops and slip stitch through each one to create the raised coil effect that mimics a real light bulb screw base.