About This Fancy Dog Amigurumi Pattern
This sweet pup makes a gorgeous addition to a nursery shelf or a heartfelt gift for a dog lover. She is sturdy enough for playtime but chic enough to be a standout display piece.
Ideal for those with basic crocheting experience, featuring slightly more advanced stitches and techniques to expand your skills.
Takes 5-7 hours, making it an enjoyable project to finish over a couple of days.
An adorable friend to cherish, handcrafted with love to bring comfort and joy for years to come.
This sweet pup makes a gorgeous addition to a nursery shelf or a heartfelt gift for a dog lover. She is sturdy enough for playtime but chic enough to be a standout display piece.
I absolutely fell in love with how the layered ruffles come together on this design! Working on the different textures—from the smooth body stitches to the bouncy skirt layers—kept me completely engaged. Plus, seeing her little face come together with those oversized ears and sweet bows was pure joy.
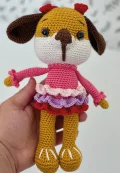
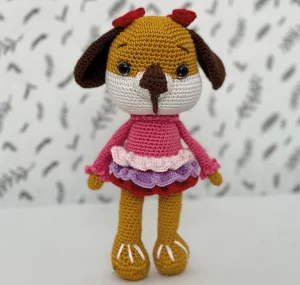
When I first made this sweet pup, I knew she needed a wardrobe that matched her big personality. The three-tiered skirt is the perfect canvas for playing with color! I went with a soft pink, lavender, and rich red combination, but you could easily swap these out for a beautiful autumn palette of mustard, olive, and rust, or even a bright rainbow theme.
One tip I always share with my crafting friends is to use a slightly smaller hook than your yarn calls for. This keeps your stitches nice and tight, which means none of that fluffy white stuffing will peek through her beautiful dress. If you want to make her even cuddlier, try using a velvet or chenille yarn—just remember to scale up your safety eyes and hook size accordingly!
I love adding a little bit of pink blush to her cheeks at the very end to give her that extra touch of handmade sweetness. She is such a joy to stitch, and I hope you love making her as much as I did!
Meet your next favorite crochet project! This sweet little pup is absolutely bursting with personality, from her floppy chocolate-brown ears to her layered, ruffled skirt. If you love creating toys with lots of cute details and textures, you are going to have a blast bringing this little lady to life. Grab your favorite yarn and let's make something truly special together.
Work 6 sc in a mr (6)
Work 6 inc (12)
Repeat (1 sc, 1 inc) 6 times (18)
Repeat (2 sc, 1 inc) 6 times (24)
Repeat (3 sc, 1 inc) 6 times (30)
Repeat (4 sc, 1 inc) 6 times (36)
Repeat (5 sc, 1 inc) 6 times (42)
Repeat (6 sc, 1 inc) 6 times (48)
Work 1 sc in each st around (48)
Place the safety eyes between Round 15 and Round 16, leaving a gap of 9 sc between them.
Work 12 sc, then work 9 inc, followed by 6 sc, then work another 9 inc, and finish with 12 sc (66)
Switch to White yarn.
Work 1 sc in each st around (66)
Begin stuffing the head firmly, continuing to add stuffing as you progress.
Repeat (9 sc, 1 dec) 6 times (60)
Repeat (8 sc, 1 dec) 6 times (54)
Repeat (7 sc, 1 dec) 6 times (48)
Repeat (6 sc, 1 dec) 6 times (42)
Repeat (5 sc, 1 dec) 6 times (36)
Repeat (4 sc, 1 dec) 6 times (30)
Repeat (3 sc, 1 dec) 6 times (24)
Work 1 sc in each st around (24). Fasten off, leaving a long tail for sewing.
Using Mustard yarn, work 6 sc in a mr (6)
Work 6 inc (12)
Work 1 sc in each st around (12)
Working in flo, work 1 sc in each st around (12)
Switch to Pink yarn.
Work 1 sc in each st around (12)
Flatten the arm and crochet through both layers to close: work 6 sc. Fasten off. Do not stuff the arms.
For the sleeve ruffle, attach Pink yarn to the unworked blo of Round 7. Work 3 sc in each st around. Fasten off.
Using Mustard yarn, work 6 sc in a mr (6)
Work 6 inc (12)
Repeat (1 sc, 1 inc) 6 times (18)
Work 1 sc in each st around (18)
Work 6 sc, 6 inc, 6 sc (24)
Work 1 sc in each st around (24)
Work 1 sc in each st around (24)
Work 9 sc, 6 dec, 9 sc (18)
Work 8 sc, 2 dec, 8 sc (16)
Work 1 sc in each st around (16)
Stuff both legs firmly. Position the legs together and prepare to join them by chaining 4.
Work 16 sc around the first leg, work 4 sc along one side of the chain, then work 16 sc around the second leg (36)
Work 4 sc along the unworked loops of the joining chain, then work 36 sc around the rest of the body (40)
Work 1 sc in each st around (40)
Switch to Pink yarn.
Working in flo, work 1 sc in each st around (40)
Work 1 sc in each st around (40)
Working in flo, work 1 sc in each st around (40)
Work 1 sc in each st around (40)
Working in flo, work 1 sc in each st around (40)
Work 1 sc in each st around (40)
Repeat (5 sc, 1 dec) 6 times, adjusting slightly to end with 34 stitches (34)
Work 1 sc in each st around (34)
Repeat (7 sc, 1 dec) 4 times, adjusting slightly to end with 30 stitches (30)
Stuff the body firmly, continuing to add stuffing as you work the final rounds.
Working in flo, work 1 sc in each st around (30)
Work 1 sc in each st around (30). Fasten off, leaving a long tail for sewing.
Attach Red yarn to the unworked blo of Round 29 of the body.
Work 3 sc in each st around (120)
Work 1 sc in each st around (120). Fasten off.
Attach Purple yarn to the unworked blo of Round 33 of the body.
Work 3 sc in each st around (120)
Work 1 sc in each st around (120). Fasten off.
Attach Light Pink yarn to the unworked blo of Round 37 of the body.
Work 3 sc in each st around (120)
Work 1 sc in each st around (120). Fasten off.
For the collar detail, attach Pink yarn to the unworked blo of Round 48 of the body. Work 3 sc in each st around (90). Fasten off.
Using Brown yarn, work 6 sc in a mr (6)
Work 6 inc (12)
Repeat (1 sc, 1 inc) 6 times (18)
Repeat (2 sc, 1 inc) 6 times (24)
Repeat (3 sc, 1 inc) 6 times (30)
Work 1 sc in each st around (30)
Repeat (3 sc, 1 dec) 6 times (24)
Work 1 sc in each st around (24)
Repeat (2 sc, 1 dec) 6 times (18)
Work 1 sc in each st around (18)
Flatten the ear and crochet through both layers to close: work 9 sc. Fasten off, leaving a long tail for sewing.
Using Brown yarn, work 6 sc in a mr (6)
Work 6 inc (12)
Repeat (3 sc, 1 inc) 3 times (15)
Work 1 sc in each st around (15)
Repeat (3 sc, 1 dec) 3 times (12)
Work 1 sc in each st around (12)
Repeat (1 sc, 1 dec) 4 times (8)
Work 1 sc in each st around (8)
Flatten the tail and crochet through both layers to close: work 4 sc. Fasten off, leaving a long tail for sewing.
Using Red yarn, ch 21. Starting in the second ch from hook, work 20 sc, turn (20)
Work 20 sc (20). Fasten off. Wrap a length of Red yarn firmly around the middle of the folded piece to create a bow shape, leaving a long tail for sewing.
Using Brown yarn, ch 3. Starting in the second ch from hook, work 2 sc, turn (2)
Work 1 sc, then work 1 inc, turn (3)
Work 1 sc, then work 1 inc, followed by 1 sc, turn (4)
Work 1 sc, then work 1 inc, followed by 2 sc, turn (5)
Work 1 sc, then work 1 inc, followed by 3 sc (6). Fasten off, leaving a long tail for sewing.
Using White yarn, ch 11. Starting in the second ch from hook, work 10 sc, turn (10)
Work 1 sc, 1 inc, 6 sc, 1 inc, 1 sc, turn (12)
Work 1 sc, 1 inc, 8 sc, 1 inc, 1 sc, turn (14)
Work 1 sc, 1 inc, 10 sc, 1 inc, 1 sc, turn (16)
Work 1 sc, 1 inc, 12 sc, 1 inc, 1 sc (18). Fasten off, leaving a long tail for sewing.
I cannot wait to see your finished pup! Every single stitch you put into this toy adds to her unique charm, and I know she is going to bring so much joy to whoever receives her. Don't forget to take your time with the facial details—that's where the magic really happens. Happy stitching, and may your hands stay cozy! 🧶✨🐶
Yes, you can! Just be sure to scale up your hook size to a 3.5mm or 4.0mm, and use larger safety eyes (about 14mm or 16mm). Your finished dog will turn out significantly larger but just as cute.
To prevent a wobbly head, make sure to stuff both the neck and head very firmly. You can also insert a rolled-up piece of felt or a plastic fabric tube inside the neck to act as a supportive spine before sewing.
The fullness comes from putting three single crochets into every single back loop of the body rounds. Ensure you don't skip any stitches during this increase round, as it creates that beautiful, bouncy ruffle.
Absolutely! Use a tapestry needle with a strand of white yarn. Insert the needle from the bottom of the foot, bring it up about 3 rounds high, and go straight back down to create three simple vertical lines.
