🧢 Beautiful ✨ Detailed πŸ’ Adorable

Sweet Handfuls Baby Jesus Amigurumi Pattern

Sweet Handfuls Baby Jesus Amigurumi Pattern
4.4β˜… Rating
8-10 Hours Time Needed
3.7K Made This
βœ‚οΈ

Intermediate Level

Ideal for those with basic knitting experience, featuring slightly more advanced stitches and techniques to expand your skills.

⏱️

All-Day Adventure

Requires 8-10 hours, ideal for a full day of immersive knitting.

πŸŽ„

Holiday Cheer

Festive fun for the season, bringing handmade magic to celebrations and creating new family traditions.

About This Sweet Handfuls Baby Jesus Amigurumi Pattern

This Sweet Handfuls Baby Jesus pattern is a labor of love designed to bring the Christmas story to life in your home. The pattern includes everything you need to create a complete nativity display: a miniature wooden manger built from craft sticks, a textured straw bed with detailed wet-blocking instructions, a golden halo, soft swaddling blanket with button closure, adorable curled hair, and a sweet diaper wrap. Each component is thoughtfully designed to work together, creating a beautiful representation of Baby Jesus that can become the centerpiece of your family's Christmas traditions.

Sweet Handfuls Baby Jesus Amigurumi Pattern crochet pattern - detailed view of completed project

Whether you place Him in the manger on Christmas Eve after midnight Mass or let Him appear Christmas morning to delight your children, this handcrafted Baby Jesus will hold a special place in your heart. The pattern uses fine yarn and small hooks to create realistic details and a precious heirloom-quality finish.

Why You'll Love This Sweet Handfuls Baby Jesus Amigurumi Pattern

I absolutely love this pattern because it combines so many different crafting techniques into one meaningful project. The wet-blocking process for the straw bed was fascinating to learn, and watching those wild strands transform into neat, organized straw was so satisfying! I also enjoyed the challenge of constructing the wooden manger - it's such a unique element that elevates this beyond a typical amigurumi pattern. The curled hair with its intricate gluing process creates the most adorable ringlets, and the golden halo adds that perfect touch of reverence. This isn't just a crochet project; it's a way to create a meaningful Christmas tradition that will be treasured by your family for years to come. Every time I look at my finished Baby Jesus nestled in His manger, I feel such warmth and joy knowing I made something so special with my own hands.

Sweet Handfuls Baby Jesus Amigurumi Pattern step 1 - construction progress Sweet Handfuls Baby Jesus Amigurumi Pattern step 2 - assembly progress Sweet Handfuls Baby Jesus Amigurumi Pattern step 3 - details and accessories Sweet Handfuls Baby Jesus Amigurumi Pattern step 4 - final assembly and finishing

Switch Things Up

I love how versatile this Baby Jesus pattern can be with just a few creative modifications! For a more traditional look, you could create the hair in black or darker brown yarn instead of light brown, giving Him a Middle Eastern appearance that's more historically accurate. The swaddling blanket is another area where I've experimented - try adding delicate lace edging in cream or gold thread around the borders for an extra touch of elegance, or use variegated yarn in soft pastels for a more whimsical baby blanket feel.

The manger itself offers wonderful customization opportunities too. I've stained mine with different wood finishes - a rich walnut stain creates a beautiful antique look, while leaving it natural gives a fresh, modern farmhouse vibe. You could even paint it white and distress it for a shabby chic aesthetic. For the straw bed, I've played with colors beyond golden yellow - try a natural beige or tan for authentic hay color, or even mix in some cream-colored strands for dimension and texture.

The halo is my favorite piece to customize! Instead of metallic gold, you could use a soft white or cream yarn for a more subtle, glowing effect, or even try silver metallic for a moonlit appearance. I've also experimented with adding tiny gold beads or sequins to the edge of the halo for extra sparkle. For families with multiple children, consider making several Baby Jesus dolls in different styles - one traditional, one modern, one whimsical - so each child can have their own special version to place in the manger on Christmas morning. The possibilities are truly endless with this beautiful pattern! 🌟

Common Mistakes & How to Fix Them

βœ— Skipping the wet blocking process for the straw bed which results in wild, unmanageable straw pieces that won't lay flat or look realistic βœ— Using the wrong hook size throughout the project causing sizing issues where clothing items won't fit the doll properly or look proportional βœ— Rushing through the hair gluing process without proper pinning which leads to uneven curls and gaps where the scalp shows through βœ— Not centering the crotch piece correctly on the diaper wrap leaving uneven leg holes that make the garment look crooked and poorly constructed

Sweet Handfuls Baby Jesus Amigurumi Pattern

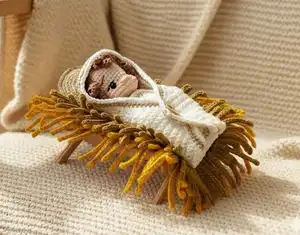
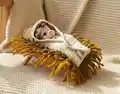
Create a heartwarming Baby Jesus amigurumi doll perfect for Christmas traditions! This intermediate-level pattern guides you through crafting a complete nativity scene including a handmade wooden manger, cozy straw bed, delicate halo, swaddling blanket, and beautifully curled hair. Designed to fit the Sweet Handfuls Mini Baby Doll base, this pattern combines traditional crochet techniques with woodworking elements to create a cherished heirloom that will become part of your family's holiday celebrations for generations to come.

Intermediate 8-10 Hours

Materials Needed for Sweet Handfuls Baby Jesus Amigurumi Pattern

β€” Main Fabric

  • 01
    Size 2 (super fine weight) yarn in White or Natural White
  • 02
    Size 2 (super fine weight) yarn in Light Brown
  • 03
    Size 2 (super fine weight) yarn in Golden Yellow
  • 04
    Size 2 (super fine weight) yarn in Olive (or light brown)
  • 05
    Size 2 (super fine weight) yarn in Metallic Gold
  • 06
    Hobbii Rainbow Cotton 8/4 in Natural White (002), Light Brown (006), Curry (056), Olive (072) recommended
  • 07
    Go Handmade Cocktail Deluxe in Gold (metallic) recommended

β€” Tools Required

  • 01
    Size 1.5mm crochet hook
  • 02
    Size 2.0mm crochet hook
  • 03
    Sweet Handfuls Mini Baby Doll base (no hair, eyes open or closed)
  • 04
    Stitch markers or paper clips
  • 05
    14 craft sticks (popsicle sticks)
  • 06
    Scissors
  • 07
    Craft glue or wood glue
  • 08
    Craft paint or spray paint (optional)
  • 09
    Tapestry needle
  • 10
    Stick pins (lots)
  • 11
    Large Styrofoam or thick foam piece for wet blocking
  • 12
    Medium wooden button
  • 13
    Plastic canvas or thin cardboard for halo
  • 14
    Fiber fill (optional for halo)

Progress Tracker

0% Complete

β€” Manger Construction :

Step 1 :

Lay one craft stick on Template A, put a dot of glue in the center, lay a second craft stick in the glue forming the X shape (Make 2 of these)

Step 2 :

Using Template B, mark where you will need to cut the craft stick, then cut on the 2 marked lines (Cut 4 craft sticks this way)

Step 3 :

Using the smaller cut pieces, glue them onto the X shape to reinforce it, you should end up with 2 double thick X shapes

Step 4 :

Prop up the X shapes making sure the distance that they are separated is the length of a craft stick

Step 5 :

Starting in the center, put drops of glue on the X shapes, carefully place the 2 center craft sticks

Step 6 :

Continue adding glue and craft sticks so that there are 3 on each half forming the trough, let dry and make sure everything is straight

Info :

Optional: Paint the wooden manger with craft paint or spray paint if desired, or stain it
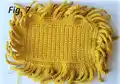
β€” Straw Bed :

Info :

Using Yarn Over (v-stitch) or your preference, using 2.0mm hook, using Golden Yellow yarn, turning ch (ch1) will not be included in the stitch count

Start :

Ch17

Row 1 :

Starting in 2nd ch from hook, 16sc, ch1, turn (16)

Row 2-27 :

16sc, ch1, turn (26 rows) (16)

Row 28 :

16sc (do not turn) (16)

Info :

Border and Straw - Place marker and start continuous rounds

Rnd 1 :

27 sc across ends of rows, 3sc in corner, 14sc, 3sc in corner, 27sc across ends of rows, 3sc in corner, 14sc, 3sc in corner (94)

Rnd 2 :

BLO - [28sc, INC (in corner), 16sc, INC (in corner), 29sc, INC (in corner), 17sc, INC (in corner)] (98)
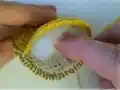
Rnd 3 :

(2 pieces of straw) *(ch10, starting 2nd ch from hook – 9slst, 1sc in next sc, ch15, starting 2nd ch from hook – 14slst, 1sc in next sc), continue from * around, last piece of straw will be a ch15 piece (98 pieces of straw)

Info :

Finish off and sew in ends, join Olive (or light brown) yarn to exposed front loops from Rnd 2

Interior Rnd :

*(Ch12, starting 2nd ch from hook – 11slst, 1sc in next sc, ch8, starting 2nd ch from hook – 7slst, 1sc in next sc), continue from * around (92 pieces of straw)

Info :

Finish off and sew in ends, wet the straw bed and wring out excess water, lay out on foam and stretch each piece of straw keeping it straight, pin down with stick pins, let dry overnight

β€” Hair :

Info :

Using Yarn Under (x-stitch), using 1.5mm hook, using Light Brown yarn

Rnd 1 :

7sc in mr (7)

Rnd 2 :

(INC) x7 (14)

Rnd 3 :

(1sc, INC) x7 (21)

Rnd 4 :

(2sc, INC) x7 (28)

Rnd 5 :

This round will be crocheting the pieces of hair, each piece will be numbered

Hair Piece 1 :

Ch15, starting in 2nd ch from hook – INC, 1sc, INC, 11sc, 1sc in next sc (on Rnd)

Hair Piece 2 :

Ch17, starting in 2nd ch from hook – INC, 1sc, INC, 13sc, 1sc in next sc (on Rnd)

Hair Piece 3 :

Ch15, starting in 2nd ch from hook – INC, 1sc, INC, 11sc, 1sc in next sc (on Rnd)

Hair Piece 4 :

Ch17, starting in 2nd ch from hook – INC, 1sc, INC, 13sc, 1sc in next sc (on Rnd)

Hair Piece 5 :

Ch15, starting in 2nd ch from hook – INC, 1sc, INC, 11sc, 1sc in next sc (on Rnd)

Hair Piece 6-8 :

Ch13, starting in 2nd ch from hook – INC, 1sc, INC, 9sc, 1sc in next st (on Rnd) - Make 3 pieces

Space :

3sc (in next 3sts on Rnd, forming a gap between hair strands)

Hair Piece 9 :

Ch7, starting in 2nd ch from hook – 6sc, 1sc in next sc (on Rnd)

Hair Piece 10 :

Ch9, starting in 2nd ch from hook – 8sc, 1sc in next sc (on Rnd)

Hair Piece 11 :

Ch11, starting in 2nd ch from hook – 10sc, 1sc in next sc (on Rnd)

Hair Piece 12 :

Ch9, starting in 2nd ch from hook – 8sc, 1sc in next sc (on Rnd)

Hair Piece 13 :

Ch7, starting in 2nd ch from hook – 6sc, 1sc in next sc (on Rnd)

Space :

3sc (in next 3sts on Rnd, forming a gap between hair strands)

Hair Piece 14-16 :

Ch13, starting in 2nd ch from hook – INC, 1sc, INC, 9sc, 1sc in next st (on Rnd) - Make 3 pieces

Hair Piece 17 :

Ch15, starting in 2nd ch from hook – INC, 1sc, INC, 11sc, 1sc in next sc (on Rnd)

Hair Piece 18 :

Ch17, starting in 2nd ch from hook – INC, 1sc, INC, 13sc, 1sc in next sc (on Rnd)

Hair Piece 19 :

Ch15, starting in 2nd ch from hook – INC, 1sc, INC, 11sc, 1sc in next sc (on Rnd)

Hair Piece 20 :

Ch17, starting in 2nd ch from hook – INC, 1sc, INC, 13sc, 1sc in next sc (on Rnd)

Hair Piece 21 :

Ch15, starting in 2nd ch from hook – INC, 1sc, INC, 11sc, 1sc in next sc (on Rnd)

Info :

You should have 21 pieces of hair with 2 spaces, the hair piece will be placed on the head with the back side facing out so that the curls are curling under

β€” Diaper Wrap :

Info :

Using Yarn Over (v-stitch), using 1.5mm hook, using White or Natural White yarn

Start :

Ch28, then join in a circle by making a sc into the beginning chain, being careful not to twist the row of chains, place marker and begin working in continuous rounds

Rnd 1-3 :

28sc (3 rounds) (28)

Info :

Leaving the marker in place, change to Rows to form the crotch section, turning ch (ch1) will not be included in stitch count, crotch rows will be designated with letters

Row A :

BLO 8sc (skipping the rest of the round), ch1, turn (8)

Row B :

DEC, 4sc, DEC, ch1, turn (6)

Row C :

6sc, ch1, turn (6)

Row D :

DEC, 2sc, DEC, ch1, turn (4)

Row E-H :

4sc, ch1, turn (4 rows) (4)

Row I :

INC, 2sc, INC, ch1, turn (6)

Row J :

INC, 4sc, INC (8)

Info :

Cut yarn leaving a tail for sewing, sew crotch piece to waistband using a whipstitch through the inside loop on the waistband and both loops on crotch piece, center it with 6sts on waistband over each leg hole, sew in ends

Rnd 4 :

Return to where marker was, working into exposed front loops and FLO - (3sc, INC) x7 (35)

Rnd 5 :

FLO 35sc (35)

Rnd 6 :

10sc, (INC, 1sc) x6, 13sc (41)

Rnd 7-8 :

41sc (2 rounds) (41)

Rnd 9 :

FLO 41sc (41)

Info :

Finish off with invisible join, sew in ends, with garment facing you take the right side and pinch it into creases, using white yarn sew through the creases from bottom to top and back again to hold them in position, pull yarn tight and knot it, sew in ends

β€” Halo :

Info :

Using Yarn Under (x-stitch), using 2.0mm hook, using Metallic Gold yarn - Make first circle

Rnd 1 :

8sc in mr (8)

Rnd 2 :

(INC) x8 (16)

Rnd 3 :

(1sc, INC) x8 (24)

Rnd 4 :

BLO – (1sc, INC, 1sc) x8 (32)

Rnd 5 :

(3sc, INC) x8 (40)

Rnd 6 :

(2sc, INC, 2sc) x8 (48)

Rnd 7 :

BLO – (5sc, INC) x8 (56)

Rnd 8 :

(3sc, INC, 3sc) x8 (64)

Rnd 9 :

(7sc, INC) x8 (72)

Info :

Do not finish off, set aside to make second circle using Golden Yellow yarn

Second Circle Rnd 1 :

8sc in mr (8)

Second Circle Rnd 2 :

(INC) x8 (16)

Second Circle Rnd 3 :

(1sc, INC) x8 (24)

Second Circle Rnd 4 :

(1sc, INC, 1sc) x8 (32)

Second Circle Rnd 5 :

(3sc, INC) x8 (40)

Second Circle Rnd 6 :

(2sc, INC, 2sc) x8 (48)

Second Circle Rnd 7 :

(5sc, INC) x8 (56)

Second Circle Rnd 8 :

(3sc, INC, 3sc) x8 (64)

Second Circle Rnd 9 :

(7sc, INC) x8 (72)

Info :

Finish off with invisible join, sew in ends, cut a piece of plastic canvas or cardboard into a circle slightly smaller than the crocheted circles

Assembly :

Placing the 2 crocheted circles back-to-back, use yarn from Metallic Gold circle to crochet through both loops of matching sc on both circles, continue with sc around, when about 2/3 of the way around insert the plastic canvas piece between the 2 circles

Info :

Optional: Add a little fiber fill between canvas piece and Golden Yellow circle to puff out the back of the halo like a thin pillow

Finishing :

Continue with sc around until circles are fully sewn together, finish off and sew in ends

β€” Swaddling Blanket :

Info :

Using Yarn Over (v-stitch), using 2.0mm hook, starting with White or Natural White yarn

Rnd 1 :

6sc in mr (6)

Rnd 2 :

(INC) x6 (12)

Rnd 3 :

(1sc, INC) x6 (18)

Rnd 4 :

(2sc, INC) x6 (24)

Rnd 5 :

(3sc, INC) x6 (30)

Rnd 6 :

(4sc, INC) x6 (36)

Rnd 7 :

18sc (skipping the rest of the round, change to Rows), ch1, turn (18)

Info :

Remove stitch marker, turning ch (ch1) will not be included in stitch count

Row 8-15 :

18sc, ch1, turn (8 rows) (18)

Row 16 :

INC, 16sc, INC, ch1, turn (20)

Row 17 :

20sc, ch1, turn (20)

Row 18 :

INC, 18sc, INC, ch1, turn (22)

Row 19 :

22sc, ch1, turn (22)

Row 20 :

INC, 20sc, INC, ch1, turn (24)

Row 21 :

24sc, ch1, turn (24)

Row 22 :

INC, 22sc, INC, ch1, turn (26)

Row 23 :

INC, 24sc, INC, ch1, turn (28)

Row 24 :

INC, 26sc, INC, ch1, turn (30)

Row 25 :

INC, 28sc, INC, ch1, turn (32)

Row 26 :

INC, 30sc, INC, ch1, turn (34)

Row 27 :

INC, 32sc, INC, ch1, turn (36)

Row 28 :

INC, 34sc, INC, ch1, turn (38)

Row 29 :

INC, 36sc, INC, ch1, turn (40)

Row 30 :

INC, 38sc, INC, ch1, turn (42)

Row 31 :

INC, 40sc, INC, ch1, turn (44)

Info :

The next 2 rows will include making a button hole and will not increase

Row 32 :

40sc, ch3, sk 3 sts, 1sc, ch1, turn (44)

Row 33 :

1sc, 3sc in ch3 sp, 40sc, ch1, turn (44)

Info :

Now the rows will begin to decrease

Row 34 :

DEC, 40sc, DEC, ch1, turn (42)

Row 35 :

DEC, 38sc, DEC, ch1, turn (40)

Row 36 :

DEC, 36sc, DEC, ch1, turn (38)

Row 37 :

DEC, 34sc, DEC, ch1, turn (36)

Row 38 :

DEC, 32sc, DEC, ch1, turn (34)

Row 39 :

34sc, ch1, turn (34)

Row 40 :

DEC, 30sc, DEC, ch1, turn (32)

Row 41 :

32sc, ch1, turn (32)

Row 42 :

DEC, 28sc, DEC, ch1, turn (30)

Row 43 :

30sc, ch1, turn (30)

Row 44 :

DEC, 26sc, DEC, ch1, turn (28)

Row 45 :

28sc, ch1, turn (28)

Row 46 :

DEC, 24sc, DEC, ch1, turn (26)

Row 47 :

26sc, ch1, turn (26)

Row 48 :

DEC, 22sc, DEC, ch1, turn (24)

Row 49 :

24sc, ch1, turn (24)

Row 50 :

DEC, 20sc, DEC, ch1, turn (22)

Row 51 :

22sc, ch1, turn (22)

Row 52 :

DEC, 18sc, DEC, ch1, turn (20)

Row 53 :

20sc, ch1, turn (20)

Row 54 :

DEC, 16sc, DEC, ch1, turn (18)

Row 55 :

18sc, ch1, turn (18)

Row 56 :

DEC, 14sc, DEC, ch1, turn (16)

Row 57 :

16sc, ch1, turn (16)

Row 58 :

DEC, 12sc, DEC, ch1, turn (14)

Row 59 :

14sc, ch1, turn (14)

Row 60 :

DEC, 10sc, DEC, ch1, turn (12)

Row 61 :

12sc, ch1, turn (12)

Row 62 :

DEC, 8sc, DEC, ch1, turn (10)

Row 63 :

10sc, ch1, turn (10)

Row 64 :

DEC, 6sc, DEC, ch1, turn (8)

Row 65-67 :

8sc, ch1, turn (3 rows) (8)

Info :

Do not turn after last row, place marker and start continuous rounds for Border

Border Rnd 1 :

60sc (across ends of rows), 18sc (across front edge of hood from Rnd 6), [24sc, INC (next to button hole), 34sc] (across ends of rows), INC in corner (1st stitch of Row 67), 6sc (across Row 67), INC in corner (last stitch of Row 67), do not cut yarn (148)

Border Rnd 2 :

Change to Metallic Gold yarn – 139sc, INC, 7sc, INC (increases are in the corners) (150)

Border Rnd 3 :

Change back to White or Natural White yarn – BLO – [60sc, DEC, 16sc (across front edge of hood), DEC, 60sc, INC, 8sc, INC (increases are in the corners)] (150)

Info :

Finish off and sew in ends, determine the best placement for the button by swaddling the doll and sew button in place with yarn or thread

Assembly Instructions

  • Using stick pins, fasten the middle section of the hair piece to the head, carefully centering the 5 shorter strands in front with back strands reaching the back of the neck area
  • When satisfied with placement, glue the middle of the hair piece to the top of the head and re-pin it securely
  • Starting from the center of the back, carefully place glue under the 2 middle strands, gluing down to just above the curl, pin down each strand with hair strands touching each other and lying flat around the back of the head
  • Continue to glue down and pin each strand around the back of the head, alternating between each side, until all 10 strands of hair on the back of the head are glued in place
  • Apply glue under the 3 side hair strands down to the ear, glue down the middle strand first with curl falling just in front of the ear, then glue the 2 strands on either side with their curls above the middle strand curl, repeat on the other side
  • Glue the shorter hair bangs in the front of the forehead, starting with the middle strand centered on the forehead, then glue the 2 outer strands leaving space for the final 2 strands to fit
  • Place the halo on the straw bed where Baby Jesus's head will rest, then place the completed Baby Jesus doll in the wooden manger with the swaddling blanket wrapped around Him following the folding instructions provided

Important Notes

  • πŸ’‘Use stitch markers throughout the project especially when switching between rounds and rows to avoid losing your place in the pattern
  • πŸ’‘Wet blocking the straw bed is essential for a professional finish - do not skip this step or the straw pieces will be wild and unmanageable
  • πŸ’‘When gluing the hair, work slowly and use plenty of stick pins to hold each strand in place until the craft glue dries completely
  • πŸ’‘The hair piece should be placed with the back side facing out so the curls naturally curl under for the most realistic appearance
  • πŸ’‘Keep track of which hook size you use for the doll base and maintain consistency throughout all related items for proper sizing
  • πŸ’‘Optional painting or staining of the wooden manger should be done before placing the straw bed inside to avoid damaging the crochet work
  • πŸ’‘The halo can be left unattached to the straw bed for flexibility in positioning or glued/sewn in place if you prefer it to remain stationary

This Sweet Handfuls Baby Jesus pattern is a truly special project that combines multiple crafting skills - crochet, woodworking, and detailed finishing work - to create a treasured Christmas heirloom. The intricate hair with its beautiful curls, the handcrafted wooden manger, the delicate golden halo, and the soft swaddling blanket all come together to create a reverent representation of Baby Jesus. Whether you display Him under your Christmas tree or place Him in the manger after midnight Mass, this handmade creation will become a cherished part of your family's holiday traditions for generations to come. πŸ§Άβœ¨πŸŽ„

You ask,

we answer.

FAQs

Can I use a different yarn weight for this pattern?

While the pattern is designed for size 2 (super fine weight) yarn, you can use a different yarn weight, but you'll need to adjust your hook size accordingly and be aware that your finished doll and accessories will be proportionally larger or smaller. Make sure to use the same yarn weight throughout all components to maintain proper sizing.

Do I need to buy a pre-made Sweet Handfuls Mini Baby Doll base?

Yes, this pattern is designed as an add-on set for the Sweet Handfuls Mini Baby Doll base. You'll need to make or purchase the base doll separately in your desired skin tone with no hair and eyes open or closed before creating these Christmas accessories.

Can I skip the wet blocking process for the straw bed?

While you may be able to skip wet blocking if using acrylic yarn that doesn't curl, wet blocking is highly recommended for the best results. An alternative is to carefully iron the straw bed before and after attaching the olive-colored interior round, but wet blocking gives the most professional appearance.

What's the difference between Yarn Over and Yarn Under techniques?

Yarn Over (v-stitch) creates a softer feel and look, perfect for clothing and blankets, while Yarn Under (x-stitch) creates tighter, more structured stitches ideal for the doll base and hair. The pattern specifies which technique to use for each component, though with practice you can choose your preference.

How do I keep the hair curls from unraveling?

The key is to use plenty of stick pins while the craft glue dries completely. Pin each strand carefully as you glue it down, working from the center back outward. Allow at least 24 hours for the glue to fully dry before removing the pins, and use small pliers if they're stuck from the glue.

Can I use hot glue instead of craft glue for the wooden manger?

Yes, you can use hot glue which will dry much faster, but craft glue or wood glue creates tighter seams with less bulk. If using hot glue, work quickly and be prepared to hold pieces in place until the glue sets, and accept that seams may be slightly more visible.

Is the halo meant to be attached permanently to the straw bed?

No, the halo is designed to rest on the straw bed separately, allowing you to position it perfectly around Baby Jesus's head. You can glue or sew it in place if you prefer, but keeping it separate gives you more flexibility in arranging your nativity display.